Pull-Apart Santa Cake Recipe
Introduction
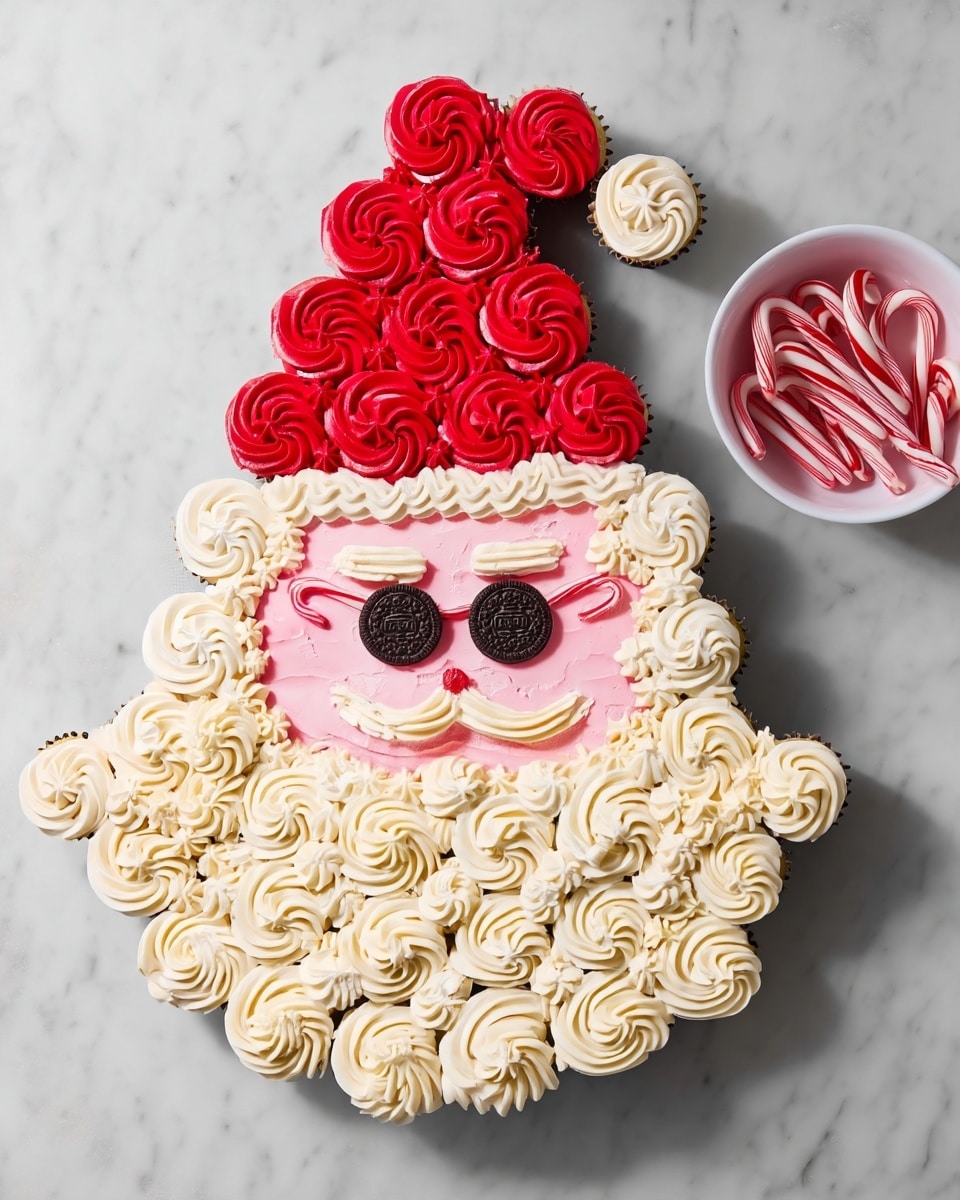
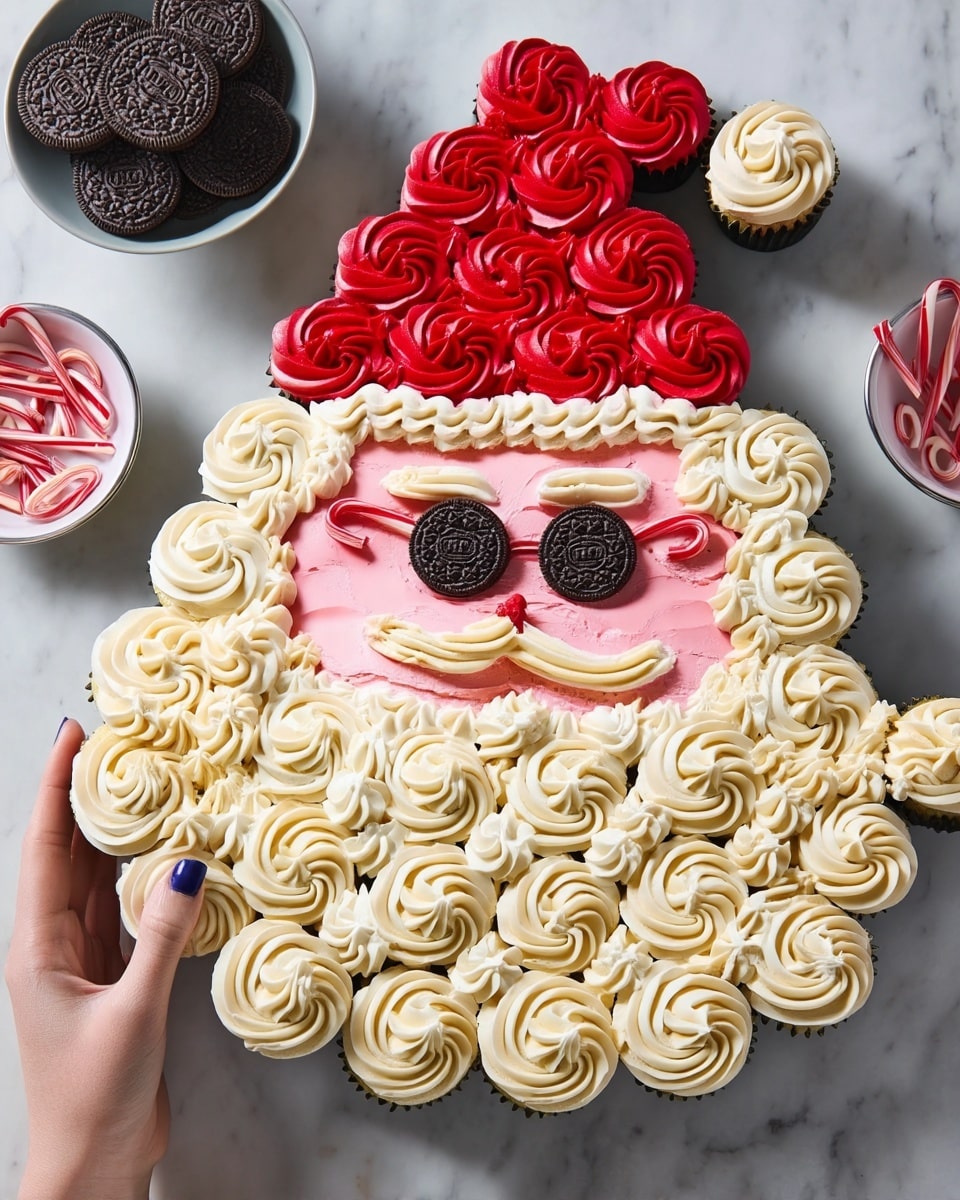
This Pull-Apart Santa Cake is a delightful and festive treat perfect for the holiday season. Featuring cupcakes arranged and decorated to resemble Santa’s face and hat, it’s both fun to make and impressive to serve. Whether for a holiday party or family gathering, this cake brings cheer to any occasion.
Ingredients
- Cooking spray
- 2 (15.25-oz.) boxes vanilla cake mix, plus ingredients called for on boxes
- 4 (16-oz.) cans store-bought vanilla frosting, divided
- Red food gel coloring
- Brown food coloring (optional)
- 1 Oreo, divided into wafer halves
- 3 mini candy canes
- 2 piping bags, each fitted with a large star tip
Instructions
- Step 1: Preheat your oven and grease 4 standard 12-cup muffin tins with cooking spray. Line each cup with liners. In a large bowl, prepare the cupcake batter according to the instructions on the vanilla cake mix boxes. Divide the batter evenly among the prepared muffin cups.
- Step 2: Bake the cupcakes following the cake mix directions. Once baked, let them cool slightly, then refrigerate until cold, about 30 minutes.
- Step 3: While cupcakes chill, prepare the frostings. In a small bowl, mix 3 cups of frosting with 1 to 2 drops of red food coloring, adding more until you reach the desired vibrant red. In another small bowl, blend ½ cup white frosting with 1 to 2 drops of red coloring to create a pale pink shade. For different skin tones, add brown food coloring to this mixture as desired. Transfer the red icing to a piping bag fitted with a star tip. Place the remaining white frosting in a second piping bag with the same tip.
- Step 4: On a large platter, arrange the cupcakes in rows to form Santa’s shape: start with a row of 3 cupcakes at the top, then 2 cupcakes beneath, followed by rows of 3, 4, 5, two rows of 6, another row of 5, a row of 8, and finish with a row of 6. Shape the bottom three rows into a half-moon to represent the beard. Tilt the top row of 3 cupcakes to one side to create the floppy hat effect.
- Step 5: Using an offset spatula, spread the pink or brown frosting over the center cupcakes in the fifth, sixth, and seventh rows to form Santa’s face. Use white frosting to pipe rose swirls onto the cupcakes below the face to make the beard, as well as on the cupcakes adjacent to the face. Fill gaps between roses with smaller white swirls. Pipe the hat’s brim with a long squiggle of white frosting and finish the hat’s tip with a single white swirl.
- Step 6: Spread frosting onto 2 Oreo wafer halves and place them as Santa’s eyes. Pipe white frosting to create eyebrows and a mustache around the eyes. Then, add a small dollop of red frosting just above the mustache to form the nose.
- Step 7: Clean your star tip and refill the piping bag with red frosting. Pipe red rose swirls onto the cupcakes in the hat area that remain unfrosted to complete Santa’s hat design.
- Step 8: Break the curved parts off 2 candy canes. Place one straight piece horizontally between the Oreo eyes to form the bridge of Santa’s glasses. Attach the two curved candy cane pieces to the sides of the Oreo wafers to form the arms of the glasses.
Tips & Variations
- Use gel food coloring to achieve vibrant frosting colors without thinning the frosting.
- Substitute homemade vanilla cupcakes and frosting for a more personalized touch.
- For a different look, add edible glitter or small candy decorations to the hat.
- Adjust skin tone frosting by mixing in cocoa powder or additional brown food coloring as needed.
Storage
Store the completed Pull-Apart Santa Cake in an airtight container in the refrigerator for up to 3 days. For best texture, allow the cake to come to room temperature before serving. If stored in the fridge, let it sit for about 30 minutes before enjoying. Leftover cupcakes can be stored separately in an airtight container for up to 4 days.
How to Serve
Serve this delicious recipe with your favorite sides.
FAQs
Can I use other cake flavors instead of vanilla?
Yes, you can substitute the vanilla cake mix for chocolate or spice cake mixes to change the flavor while keeping the same decoration technique.
How do I prevent my frosting from being too soft for piping?
Use chilled frosting and gel colors to maintain firmness. If frosting becomes too soft, refrigerate it briefly before piping to help it hold its shape better.
PrintPull-Apart Santa Cake Recipe
This festive Pull-Apart Santa Cake features adorable vanilla cupcakes creatively arranged and decorated to form Santa Claus’s face and hat. Soft vanilla cupcakes are baked, cooled, and then artfully frosted with red, white, and pale pink icing to recreate the jolly details of Santa’s beard, hat, and facial features. With easy-to-use store-bought cake mixes and frosting, plus simple decorating techniques using piping bags and candy cane accents, this cake is perfect for holiday celebrations and is sure to delight kids and adults alike.
- Prep Time: 25 minutes
- Cook Time: 20-25 minutes
- Total Time: 1 hour 20 minutes
- Yield: Approximately 60 cupcakes (10 rows; detailed arrangement) 1x
- Category: Dessert
- Method: Baking
- Cuisine: American
Ingredients
Cake
- Cooking spray, as needed for greasing pans
- 2 (15.25-oz.) boxes vanilla cake mix (plus ingredients called for on box, e.g., eggs, oil, water)
Frosting & Decoration
- 4 (16-oz.) cans store-bought vanilla frosting, divided
- Red food gel coloring
- Brown food gel coloring (optional, for skin tone shading)
- 1 Oreo cookie, separated into wafer halves
- 3 mini candy canes
- 2 piping bags fitted with a large star tip
Instructions
- Prepare cupcake batter and pans: Grease four standard 12-cup muffin tins with cooking spray and line with cupcake liners. In a large bowl, prepare the cupcake batter according to the instructions on the cake mix box, mixing in required ingredients such as eggs, oil, and water. Divide the batter evenly among the prepared cupcake cups.
- Bake and chill cupcakes: Bake the cupcakes according to the box instructions or until a toothpick comes out clean. Allow cupcakes to cool slightly, then refrigerate for about 30 minutes to chill and firm them for decorating.
- Prepare colored frostings: In a small bowl, stir together 3 cups of the vanilla frosting with 1 to 2 drops of red food gel coloring, adding more red coloring until a vibrant red shade is achieved. In another small bowl, combine ½ cup of white frosting with 1 to 2 drops of red coloring to create a pale pink hue; add brown gel coloring as desired to adjust skin tone. Transfer the red frosting to one piping bag fitted with a large star tip, and put the remaining white frosting in another piping bag with the same tip.
- Arrange cupcakes into Santa shape: On a large platter, arrange the cupcakes to form Santa’s head and beard. Start with a row of 3 cupcakes at the top (forming the hat), place a row of 2 below it, followed by rows of 3, 4, 5, then two rows of 6, another row of 5, a row of 8, and a final row of 6. Arrange the bottom three rows in a half-moon shape to represent Santa’s beard. Shift the top row of 3 cupcakes to one side and angle them downward to create the floppy part of the hat.
- Frost face and beard details: Using an offset spatula, spread the pale pink or brown frosting on the centers of the fifth, sixth, and seventh rows to form Santa’s face. With white frosting, pipe roses onto each cupcake representing the beard below the face, and decorate cupcakes on either side. Fill any gaps between the roses with smaller white swirls. Pipe a long squiggly white line along the brim of the hat and finish the hat’s tip with a white swirl.
- Add facial features: Dollop frosting onto the Oreo wafer halves to stick them onto the face as eyes. Use white frosting to pipe eyebrows above the eyes and a mustache below them. Spoon a small dollop of red frosting above the mustache to create Santa’s nose.
- Complete the hat and add final touches: Transfer the star tip cleanly to a piping bag filled with red frosting, then pipe red rose swirls over the unfrosted cupcakes in the hat area to finish it. Break the curved parts from two candy canes; place one straight candy cane between the Oreo eyes as the bridge and use the curved pieces on each Oreo wafer half to create Santa’s glasses’ sides.
Notes
- You can adjust the skin tone shades by varying the amount of red and brown gel coloring mixed into the white frosting for the face.
- For easier decorating, chill the cupcakes before frosting so they hold their shape better under icing.
- Use a large star piping tip for creating rose-shaped swirls to mimic Santa’s fluffy beard and hat details.
- This cake is best assembled and served on the day of the party to keep the cupcakes fresh.
- Store any leftover cupcakes separately to maintain frosting texture and cupcake moisture.
Keywords: Pull-Apart Santa Cake, Christmas cupcake cake, holiday dessert, vanilla cupcakes, festive cakes, kid-friendly dessert