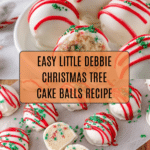
Little Debbie Christmas Tree Cake Balls Recipe
Introduction
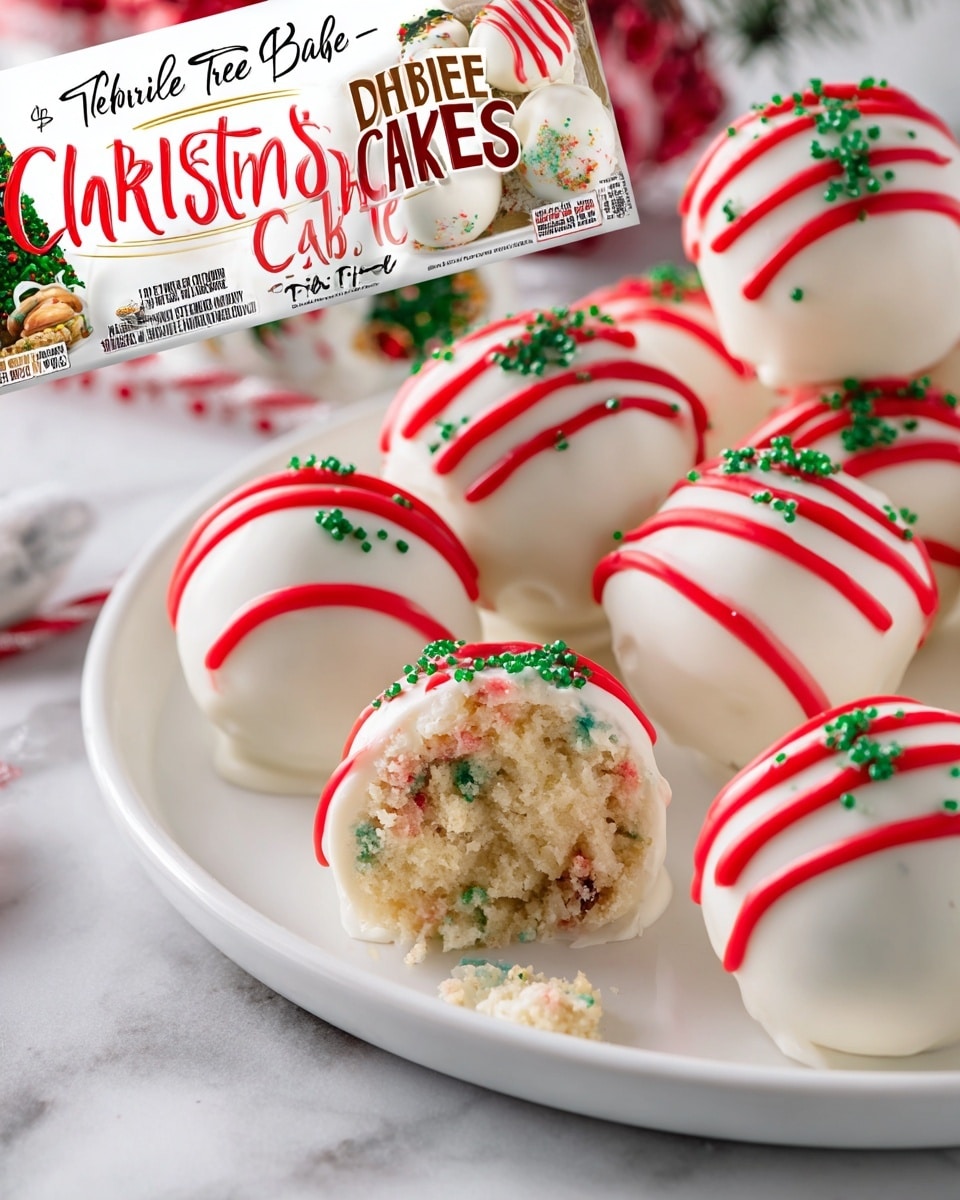
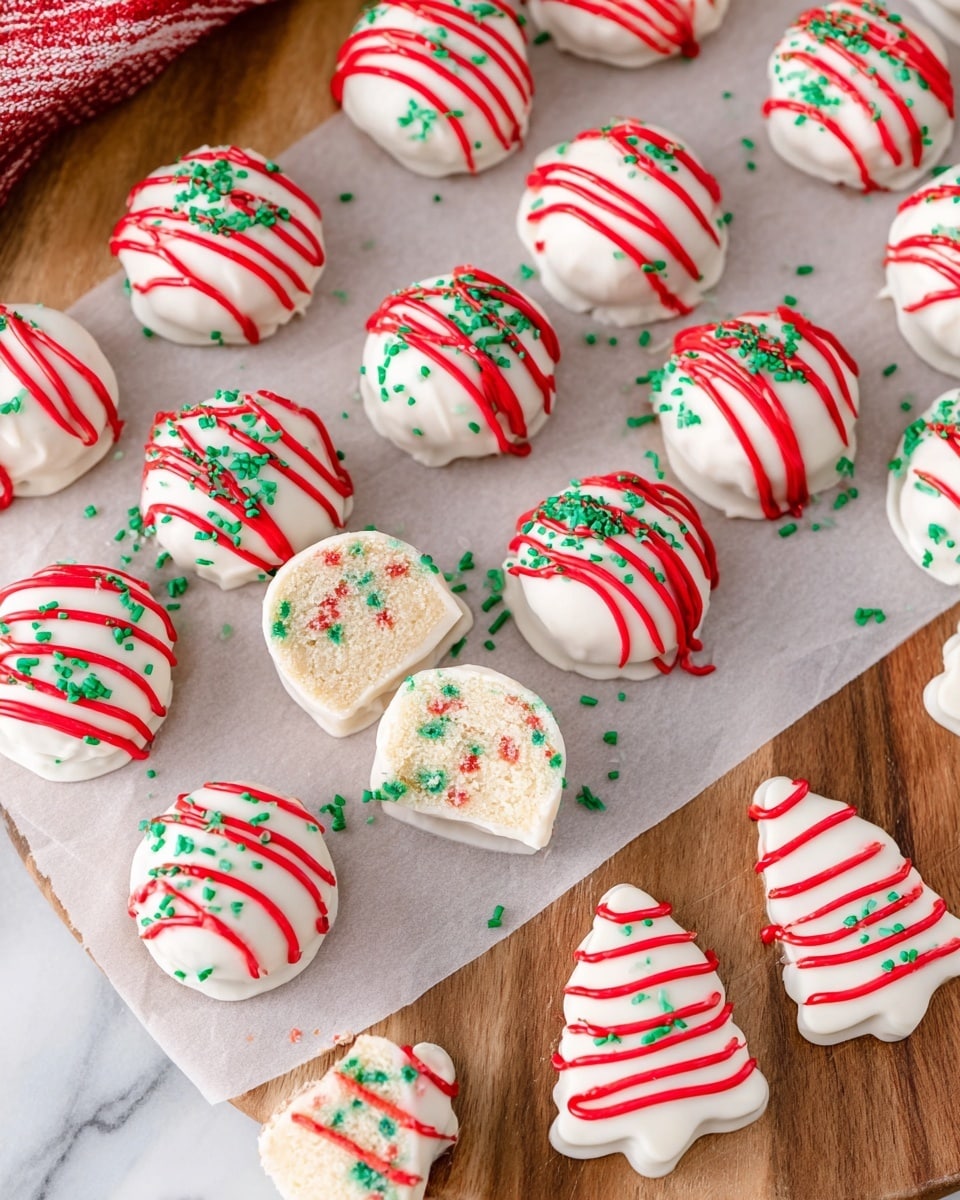
These Little Debbie Christmas Tree Cake Balls are a delightful holiday treat that combines creamy cream cheese with festive vanilla snack cakes, all coated in smooth white chocolate. Easy to make and perfect for holiday parties, they capture the charm and flavor of your favorite seasonal snack in bite-sized form.
Ingredients
- 10 Little Debbie vanilla Christmas tree snack cakes, unwrapped (from 2 – 8.62 oz. boxes)
- 8 ounces cream cheese, softened to room temperature
- 20 ounces white chocolate melting wafers (Ghirardelli brand used)
- 6 ounces red vanilla flavored melting candy wafers (Wilton brand used)
- 1 tablespoon green sanding sugar sprinkles
Instructions
- Step 1: Line two large baking sheets with parchment paper or silicone mats and set aside.
- Step 2: In a large mixing bowl, beat the softened cream cheese on medium speed with a handheld mixer for 1-2 minutes until fluffy and smooth.
- Step 3: Break the Little Debbie vanilla Christmas tree snack cakes into smaller pieces, then add them to the cream cheese. Mix on low speed just until fully combined, allowing some small pieces of the vanilla coating to remain for texture.
- Step 4: Using a small cookie scoop, portion out about 1 tablespoon of the mixture. Roll it gently in your palm to form a smooth ball.
- Step 5: Place each cake ball onto one of the prepared baking sheets. Repeat with the remaining mixture.
- Step 6: Freeze the cake balls for 30-45 minutes until completely solid. This will make coating easier.
- Step 7: Melt the white chocolate wafers in a medium bowl according to package directions, stirring until smooth.
- Step 8: In a separate bowl, melt the red vanilla flavored candy wafers following the package instructions. Stir until smooth, then transfer to a small piping bag with the tip cut off.
- Step 9: Dip one cake ball into the melted white chocolate, coating all sides. Lift it out with a fork, gently tapping off excess chocolate back into the bowl.
- Step 10: Place the coated cake ball on the second prepared baking sheet. Pipe a red zig-zag pattern over the top and sprinkle with green sanding sugar to mimic the look of the original snack cakes. Repeat with remaining cake balls.
- Step 11: Allow the cake balls to set for 15-20 minutes until the white chocolate coating is completely firm before serving.
Tips & Variations
- Use a silicone mat instead of parchment paper for easier cleanup and less slipping while working.
- Substitute any cream cheese brand you prefer, but be sure it is softened for a smooth mixture.
- If you don’t have red candy wafers, colored icing or edible markers can create a similar decorative effect.
- For a chocolate twist, dip the cake balls in milk or dark chocolate instead of white chocolate.
Storage
Store the cake balls in an airtight container in the refrigerator for up to 5 days. Let them sit at room temperature for 10 minutes before serving to soften slightly. They can be frozen for up to 2 months; thaw overnight in the refrigerator before enjoying.
How to Serve
Serve this delicious recipe with your favorite sides.
FAQs
Can I make these cake balls ahead of time?
Yes, these cake balls can be prepared and stored in the refrigerator for several days or frozen for longer storage. Just be sure to thaw them properly before serving.
What if I don’t have a piping bag for decorating?
If you don’t have a piping bag, you can use a small resealable plastic bag and snip a tiny corner off to pipe the melted red candy wafers. Alternatively, use a toothpick or a small spoon to drizzle the decoration.
PrintLittle Debbie Christmas Tree Cake Balls Recipe

Delightfully festive Little Debbie Christmas Tree Cake Balls combine the nostalgic flavors of vanilla snack cakes and cream cheese, coated in smooth white chocolate and decorated with red candy drizzle and green sanding sugar. These bite-sized treats are perfect for holiday parties and celebrations, offering a fun twist on a classic dessert favorite.
- Prep Time: 15 minutes
- Cook Time: 45 minutes (including freezing)
- Total Time: 1 hour
- Yield: Approximately 20 cake balls 1x
- Category: Dessert
- Method: No-Cook
- Cuisine: American
Ingredients
Base Ingredients
- 10 Little Debbie vanilla Christmas tree snack cakes, unwrapped (from 2 – 8.62 oz. boxes)
- 8 ounces cream cheese, softened to room temperature
Coating and Decoration
- 20 ounces white chocolate melting wafers (Ghirardelli brand used)
- 6 ounces red vanilla flavored melting candy wafers (Wilton brand used)
- 1 tablespoon green sanding sugar sprinkles
Instructions
- Prepare Baking Sheets: Line two large baking sheets with parchment paper or silicone baking mats and set them aside to be used later for forming and coating the cake balls.
- Make Cake Ball Mixture: In a large mixing bowl, add the softened cream cheese and beat with a handheld mixer on medium speed for 1-2 minutes until the mixture is fluffy and smooth.
- Add Snack Cakes: Break the Little Debbie vanilla Christmas Tree Snack Cakes into smaller pieces and add them to the beaten cream cheese. Mix on low speed just until everything is fully combined, leaving some small pieces of vanilla coating intact but with a mostly smooth mixture.
- Form Cake Balls: Using a small cookie scoop, measure out about 1 tablespoon of the cake mixture and place into your hand. Gently roll it between your palms to form smooth, compact balls.
- Place Balls on Sheet: Arrange the formed cake balls on one of the prepared baking sheets. Continue until all mixture is used and all balls are placed on the sheet.
- Freeze the Cake Balls: Freeze the cake balls for 30-45 minutes or until they are completely firm. This step helps ensure easier and neater coating with the melted chocolate.
- Melt White Chocolate: Melt the white chocolate wafers in a medium bowl following package instructions. Stir until smooth and glossy.
- Melt Red Candy Wafers: In a separate small bowl, melt the red vanilla-flavored candy wafers as per package directions, stirring until smooth. Transfer the melted red candy to a piping bag, cutting off the tip for easy drizzle decoration.
- Coat Cake Balls: Dip one frozen cake ball at a time into the melted white chocolate, fully coating all sides. Use a fork to lift it out and gently tap the fork against the bowl side to drain excess chocolate.
- Decorate: Place the coated cake ball onto the second prepared baking sheet. Pipe a decorative zig-zag pattern with the red melted candy over each cake ball and sprinkle lightly with green sanding sugar to mimic the original Christmas tree design. Repeat for all cake balls.
- Set the Coating: Allow the coated and decorated cake balls to set for 15-20 minutes until the chocolate coating is completely firm before serving.
Notes
- Freezing the cake balls before coating helps achieve a smooth chocolate layer and prevents the cake from crumbling.
- Use high-quality melting wafers for the best texture and flavor of the coating.
- Adjust the amount of green sanding sugar for a more or less festive look.
- Store cake balls in an airtight container in the refrigerator to keep fresh for up to 5 days.
- For easier decoration, pipe the red candy drizzle while the white chocolate coating is still slightly tacky but not wet.
Keywords: Little Debbie, Christmas Tree Cake Balls, holiday desserts, no-bake cake balls, white chocolate coating, festive snacks

