Best Witch Hat Halloween Cookies Recipe
Introduction
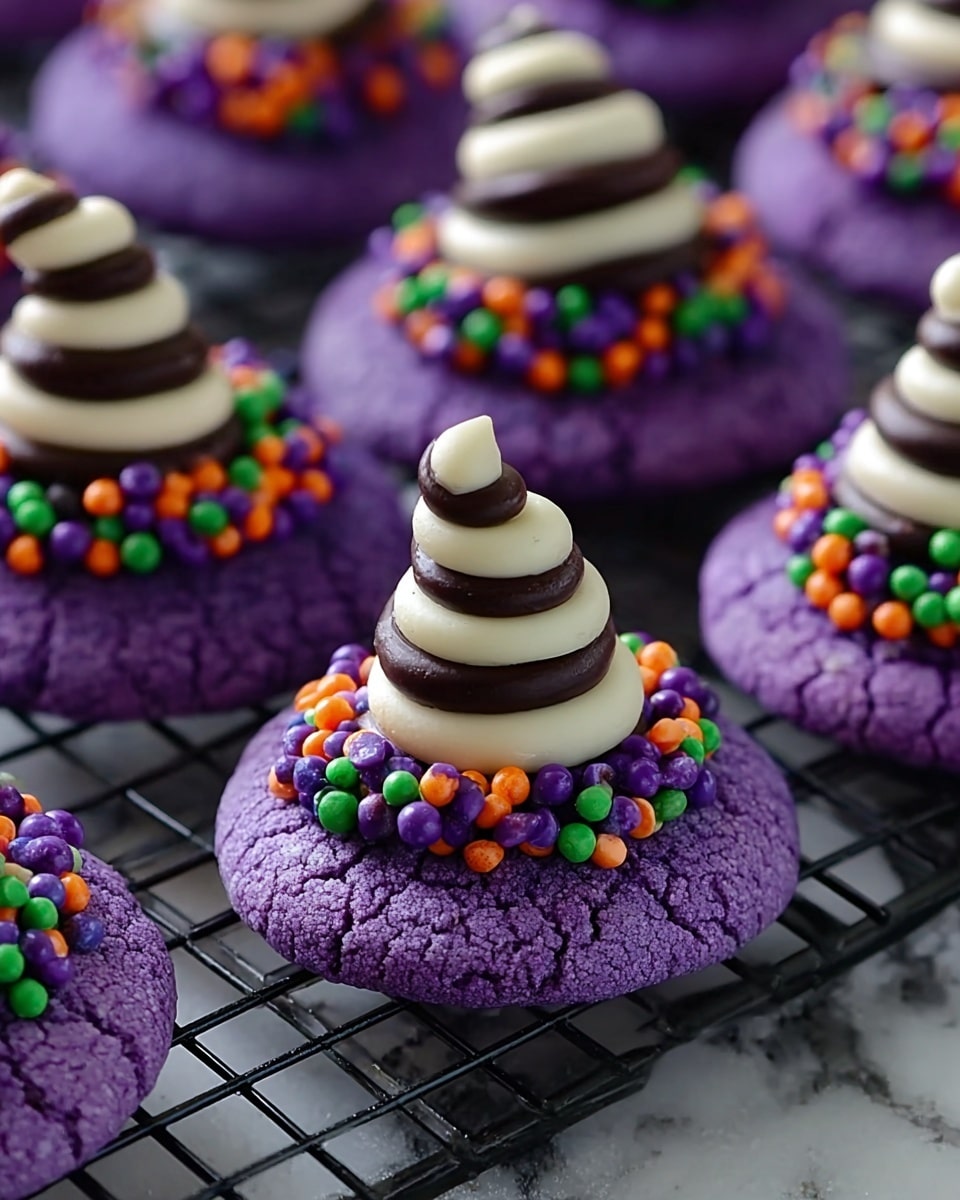
Celebrate Halloween with these charming Witch Hat Cookies that are as fun to make as they are to eat. Featuring a tender peanut butter base with a vibrant purple hue and topped with chocolate kisses, these cookies add a festive touch to any spooky gathering.
Ingredients
- 1 1/2 cups all-purpose flour
- 2 tsp cornstarch
- 1/2 tsp baking soda
- 1/4 tsp baking powder
- 1/8 tsp fine sea salt
- 1/2 cup unsalted butter, softened
- 1 cup white sugar
- 1 large egg
- 3/4 cup smooth peanut butter
- 1 tsp vanilla extract
- Purple gel food coloring
- Halloween sprinkles or purple sanding sugar
- 33 chocolate kisses or hugs candies, unwrapped
Instructions
- Step 1: Line a sheet tray with parchment paper and set aside. In a large bowl, whisk together the flour, cornstarch, baking soda, baking powder, and fine sea salt until evenly combined. Set aside.
- Step 2: In a separate large bowl, cream the softened butter and white sugar with an electric mixer for about 2 minutes until light and fluffy. Mix in the egg until fully incorporated, then add the peanut butter and vanilla extract, mixing well and scraping down the bowl as needed.
- Step 3: Add the dry ingredients to the wet mixture and stir until a uniform dough forms. Gradually add purple gel food coloring, mixing well until the desired shade is reached. Finish mixing by hand to ensure even color without streaks.
- Step 4: Using a 1-tablespoon scoop, portion dough into mounds and place them close but not touching on the parchment-lined sheet tray. Cover with plastic wrap and chill in the refrigerator for at least 2 hours or overnight for best texture.
- Step 5: Preheat oven to 350°F (175°C) and prepare new parchment-lined baking trays. Place Halloween sprinkles or purple sanding sugar in a small bowl. Roll each chilled dough mound into a smooth ball, then coat thoroughly in the sprinkles or sugar.
- Step 6: Arrange the coated dough balls on the prepared trays, spacing them 2 inches apart. Bake for 9–11 minutes until puffed and starting to crack, aiming to slightly underbake for a soft center.
- Step 7: Let cookies cool on the tray for 5 minutes. While warm, gently press a chocolate kiss or hug into the center of each cookie until it sticks. Immediately transfer the tray to the freezer for 10 minutes to keep the chocolate from melting.
- Step 8: After chilling, transfer the cookies to a wire rack to finish cooling. Repeat baking with remaining dough.
Tips & Variations
- For a nut-free version, substitute the peanut butter with sunflower seed butter or cream cheese.
- Chilling the dough is crucial to prevent spreading and achieve thick, soft cookies.
- Try different colored gel food coloring to create a variety of festive hats for themed parties.
- Use different Halloween-themed sprinkles to add texture and extra visual appeal.
Storage
Store cookies in an airtight container at room temperature for up to 5 days. To maintain freshness, place a slice of bread in the container to keep cookies soft. For longer storage, freeze baked cookies without the chocolate kisses for up to 3 months; add chocolates after thawing. Reheat frozen cookies briefly in a warm oven to refresh texture.
How to Serve

Serve this delicious recipe with your favorite sides.
FAQs
Can I make these cookies gluten-free?
Yes, replace the all-purpose flour with a gluten-free baking blend that measures cup-for-cup. Make sure it contains xanthan gum for best texture.
Why do I need to chill the dough before baking?
Chilling firm ups the dough, preventing the cookies from spreading too much in the oven, which helps them keep their thick, hat-like shape and ensures a soft, tender interior.
PrintBest Witch Hat Halloween Cookies Recipe
Celebrate Halloween with these whimsical Best Witch Hat Halloween Cookies, featuring soft, peanut butter-flavored purple cookies decorated with festive sprinkles and topped with chocolate kisses for a fun and spooky treat perfect for parties or festive gatherings.
- Prep Time: 15 minutes
- Cook Time: 10 minutes
- Total Time: 2 hours 25 minutes
- Yield: Approximately 33 cookies 1x
- Category: Dessert
- Method: Baking
- Cuisine: American
Ingredients
Dry Ingredients
- 1 1/2 cups all-purpose flour
- 2 tsp cornstarch
- 1/2 tsp baking soda
- 1/4 tsp baking powder
- 1/8 tsp fine sea salt
Wet Ingredients
- 1/2 cup unsalted butter, softened
- 1 cup white sugar
- 1 large egg
- 3/4 cup smooth peanut butter
- 1 tsp vanilla extract
Additional Ingredients
- Purple gel food coloring
- Halloween sprinkles or purple sanding sugar
- 33 chocolate kisses or hugs candies, unwrapped
Instructions
- Prepare Dry Ingredients: In a large bowl, whisk together the all-purpose flour, cornstarch, baking soda, baking powder, and fine sea salt until evenly combined. Set aside for later use.
- Cream Butter and Sugar: In a separate large bowl, use an electric hand mixer or stand mixer paddle attachment to cream softened unsalted butter and white sugar together for 2 minutes until light and fluffy. Then mix in the large egg until fully incorporated.
- Add Peanut Butter and Vanilla: Add the smooth peanut butter and vanilla extract to the wet mixture, mixing thoroughly and scraping down the sides of the bowl as needed to ensure a uniform blend.
- Combine Wet and Dry Ingredients: Gradually add the dry ingredient mixture into the wet mixture, stirring until a uniform dough forms. Incorporate purple gel food coloring little by little, mixing until the dough reaches the desired shade, finishing by hand to avoid streaks for an even purple color.
- Chill the Dough: Using a 1-tablespoon cookie scoop, portion dough into mounds and place them close together on a parchment-lined sheet tray. Cover with plastic wrap and chill in the refrigerator for at least 2 hours or overnight to ensure thick cookies that do not spread.
- Preheat and Prepare for Baking: Preheat oven to 350°F (175°C). Line new sheet trays with parchment paper. Place Halloween sprinkles or purple sanding sugar in a small bowl.
- Coat and Bake Cookies: Roll each chilled dough mound into a smooth ball, then roll in sprinkles or sanding sugar to coat completely. Arrange the coated balls 2 inches apart on the prepared trays. Bake for 9–11 minutes until puffy and beginning to crack, slightly underbaking for a soft interior.
- Cool and Decorate: Allow cookies to cool on the sheet tray for 5 minutes. While warm, gently press an unwrapped chocolate kiss or Hug candy into the center of each cookie until it sticks.
- Freeze to Set: Immediately transfer the tray to the freezer for 10 minutes to prevent the chocolate from melting due to residual heat.
- Final Cooling: After freezer chilling, transfer cookies to a wire rack to finish cooling. Repeat baking with remaining dough as needed.
Notes
- Chilling the dough is essential to prevent cookies from spreading and to achieve a thick texture.
- Slightly underbake the cookies for a soft and chewy center; they will continue to firm up as they cool.
- Use gel food coloring for more vibrant color without altering dough consistency.
- Press the chocolate candy into the warm cookies gently to avoid cracking.
- Freezing after baking helps maintain the shape and prevents melting of the chocolate toppings.
Keywords: Halloween cookies, witch hat cookies, peanut butter cookies, holiday treats, festive cookies, chocolate kiss cookies

