Salted Honey Pie: A Perfect Blend of Sweet and Salty Recipe
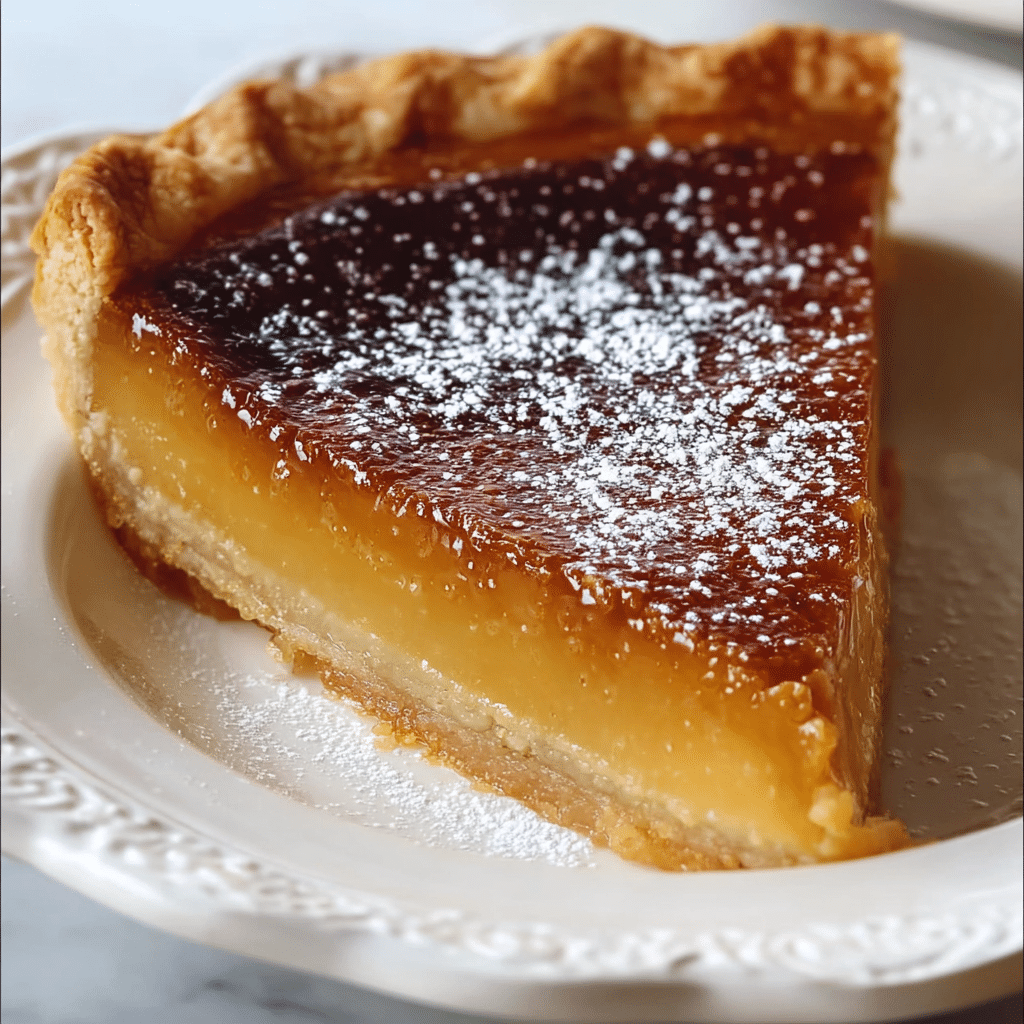
If you’re looking for a dessert that perfectly captures that magical combo of sweet and salty, then you absolutely have to try the Salted Honey Pie: A Perfect Blend of Sweet and Salty. This pie is like a warm hug on a plate, where luscious honey-infused custard meets a flaky crust, and a sprinkle of flaky sea salt takes every bite to heavenly heights. It’s creamy, comforting, and with just the right hint of salt to balance the sweetness, it transforms simple ingredients into a decadent treat you’ll want to share again and again.
Ingredients You’ll Need
One of the best things about this Salted Honey Pie: A Perfect Blend of Sweet and Salty is how straightforward the ingredients are, yet how each one plays a key role in building its luscious flavor and perfect texture. From the richness of heavy cream to the delicate crunch of flaky sea salt, every element is essential.
- Pie crust: Provides a buttery, flaky base that holds the creamy filling beautifully; feel free to use your favorite homemade or store-bought version.
- 4 large egg yolks: Lightly beaten, they add richness and help thicken the custard filling for that smooth texture.
- 2 1/2 cups heavy whipping cream: Creates the creamy body of the custard, adding depth and luxury to every bite.
- 2/3 cup packed light brown sugar: Offers a subtle caramel undertone, balancing sweetness with a gentle molasses note.
- 1/3 cup sifted cornstarch: Works as the thickening agent, ensuring the filling sets up perfectly without any graininess.
- 1/2 tsp salt: Enhances flavor overall and sharpens the sweet notes.
- 1/2 cup honey: The star ingredient, infusing the pie with warm, fragrant sweetness that’s unmatched.
- 2 tsp vanilla extract: Adds aromatic warmth and complexity, elevating the custard’s richness.
- Flaky sea salt: For sprinkling on top, providing that satisfying contrast and signature salty crunch.
How to Make Salted Honey Pie: A Perfect Blend of Sweet and Salty
Step 1: Prepare the Pie Crust
Begin by placing your pie crust in a deep dish 8-inch or 9-inch pie pan. There’s no need to pre-bake it for this recipe, but chilling it while you make the filling helps the crust bake evenly and prevents shrinking, preserving its flaky texture. If you love a bit of extra crunch, sprinkling a little sugar on top before baking adds a delightful sweet crunch that pairs beautifully with the honey custard.
Step 2: Heat the Cream Mixture
In a medium saucepan, gently combine the heavy whipping cream, brown sugar, cornstarch, and salt. Warm this mixture over medium heat, stirring continuously until it reaches a rolling boil. This is the moment your kitchen fills with the enticing aroma of caramelizing sugar, signaling the custard is thickening perfectly. Keep stirring closely to avoid lumps—patience here results in a silky smooth filling!
Step 3: Temper the Eggs
To avoid scrambled eggs in your custard, you need to temper your beaten egg yolks. Slowly add a small amount of the hot cream mixture into the eggs while whisking vigorously. Gradually add the rest, and once smooth and combined, you’re set for the next step. This careful technique ensures a velvety, lump-free custard that’s everything you want in a Salted Honey Pie: A Perfect Blend of Sweet and Salty.
Step 4: Combine the Mixture
Pour your tempered egg mixture back into the saucepan with the rest of the cream mixture. Stir well, then add in the honey and vanilla extract. This is where the magic truly comes together—honey gives the custard a deep golden hue and its rich, floral sweetness, while vanilla wraps everything in a comforting warmth. Stir until all ingredients are perfectly incorporated.
Step 5: Fill the Pie Crust
Pour the warm (not hot) custard filling into the chilled pie crust, spreading it out evenly to eliminate air pockets. The creamy, pale caramel color signals that the pie is ready to head to the oven and become the showstopper dessert you’re dreaming of.
Step 6: Bake the Pie
Set your oven to 375°F (190°C) and bake the pie for 40 to 45 minutes. Expect the filling to bubble and the top to develop a golden, slightly crisp crust while the edges of the pie crust turn a perfect golden brown. It might jiggle a bit when you remove it, but that’s totally normal—it will set as it cools.
Step 7: Cool and Set
Allow the pie to cool at room temperature so the custard can firm up fully. Then pop it into the fridge until completely chilled and perfectly set. This resting phase deepens the flavors and guarantees that luscious, smooth texture that makes Salted Honey Pie: A Perfect Blend of Sweet and Salty so irresistible.
Step 8: Finish with Sea Salt
Just before serving, sprinkle flaky sea salt generously on top. This final touch enhances all the honey’s sweetness and adds that signature contrast which truly defines this pie’s unique flavor profile.
Step 9: Serve and Enjoy
Slice your pie into 8-10 servings and present it chilled. Each bite offers a heavenly combo of creamy custard, flaky crust, and that unforgettable sweet and salty balance that has everyone coming back for more.
How to Serve Salted Honey Pie: A Perfect Blend of Sweet and Salty

Garnishes
Enhance the elegance of your Salted Honey Pie by sprinkling extra flaky sea salt right before serving. A dollop of lightly whipped cream or a few toasted nuts can add a delightful textural contrast and elevate the honey notes beautifully.
Side Dishes
This pie pairs wonderfully with fresh fruits like sliced figs or crisp apples, which bring a light freshness to the richness of the dessert. A scoop of vanilla ice cream is always a welcome companion, adding a cool creaminess that balances the honeyed warmth.
Creative Ways to Present
Feeling fancy? Serve individual mini Salted Honey Pies in ramekins for intimate gatherings. Or, drizzle a touch of caramel sauce on each slice and garnish with edible flowers for a stunning presentation that will wow your guests.
Make Ahead and Storage
Storing Leftovers
Keep any leftover Salted Honey Pie covered tightly in the refrigerator. It will stay fresh for up to 3 days, maintaining that perfect custard consistency and crisp crust.
Freezing
While freezing isn’t ideal for this pie due to its custard base, you can freeze the pie crust separately before baking. This saves prep time for future pies and ensures a flaky crust when ready to serve.
Reheating
Reheat gently at room temperature before serving, but ideally enjoy the pie chilled. Warming can alter the custard texture, so it’s best savored cold or at ambient temperature for the perfect silky mouthfeel.
FAQs
Can I use a store-bought pie crust for this recipe?
Absolutely! A good quality store-bought pie crust works perfectly here, especially if you chill it well before filling to maintain its flaky texture during baking.
What type of honey should I use?
Choose a mild to medium-flavored honey like clover or wildflower to complement the custard without overpowering the delicate balance of sweet and salty.
Why do I need to temper the eggs?
Tempering prevents the eggs from cooking too quickly and curdling, ensuring your custard stays smooth and creamy without lumps.
Can I make this pie gluten-free?
Yes! Use a gluten-free pie crust and ensure your cornstarch is certified gluten-free to keep the entire pie safe for gluten-sensitive eaters.
How long should the pie chill before serving?
For the best texture, refrigerate the pie for at least 3-4 hours, or overnight if possible, allowing the custard to fully set and flavors to meld beautifully.
Final Thoughts
This Salted Honey Pie: A Perfect Blend of Sweet and Salty is one of those rare desserts that feels both luxurious and comforting, making it a guaranteed crowd-pleaser. With its simple yet thoughtfully combined ingredients and impeccable balance of flavor, it’s a pie you’ll be eager to make and share with everyone you love. Give it a try—and prepare to fall in love with every silky, salty-sweet bite!
PrintSalted Honey Pie: A Perfect Blend of Sweet and Salty Recipe

Salted Honey Pie is a luscious dessert that harmoniously blends sweet honey custard with a touch of flaky sea salt, all encased in a flaky pie crust. This recipe features a smooth, rich filling made from heavy cream, brown sugar, and honey, thickened with cornstarch and enriched with egg yolks and vanilla extract. Its creamy texture and sweet-salty balance make it a perfect, elegant dessert for any occasion.
- Prep Time: 15 minutes
- Cook Time: 45 minutes
- Total Time: 1 hour
- Yield: 8–10 servings 1x
- Category: Dessert
- Method: Baking
- Cuisine: American
- Diet: Vegetarian
Ingredients
Pie Crust
- 1 refrigerated or homemade pie crust (8- or 9-inch)
Custard Filling
- 4 large egg yolks, lightly beaten
- 2 1/2 cups (600 ml) heavy whipping cream
- 2/3 cup (150 g) packed light brown sugar
- 1/3 cup (45 g) cornstarch, sifted
- 1/2 teaspoon salt
- 1/2 cup (120 ml) honey
- 2 teaspoons vanilla extract
Topping
- Flaky sea salt, for sprinkling
Instructions
- Prepare the Pie Crust: Place your pie crust in a deep 8-inch or 9-inch pie pan. Chill it in the refrigerator to keep the butter cold, preventing shrinkage during baking and promoting a flaky texture. Optionally, sprinkle some sugar on top for a sweet crunchy finish after baking.
- Heat the Cream Mixture: In a medium saucepan over medium heat, combine heavy whipping cream, brown sugar, cornstarch, and salt. Stir constantly as it heats to avoid lumps, bringing it to a rolling boil. The mixture will thicken and develop a rich, caramel aroma.
- Temper the Eggs: Remove the saucepan from heat. Gradually whisk small amounts of the hot cream mixture into the lightly beaten egg yolks to gently raise their temperature. Continue adding the cream while whisking until smooth and combined, ensuring the eggs do not scramble.
- Combine the Mixture: Pour the tempered egg yolk mixture back into the saucepan with the remaining cream mixture. Stir well, then add honey and vanilla extract, mixing thoroughly to infuse the custard with flavor.
- Fill the Pie Crust: Pour the slightly warm custard filling evenly into the chilled pie crust. Spread carefully to avoid air pockets, ensuring uniform texture and flavor in every slice.
- Bake the Pie: Bake in a preheated oven at 375°F (190°C) for 40-45 minutes. The filling will bubble and the top will turn golden brown. The pie might jiggle slightly but will firm up as it cools.
- Cool and Set: Let the pie cool to room temperature on the counter, then chill it in the refrigerator until fully set and firm. This step enhances texture and flavor melding.
- Finish with Sea Salt: Just before serving, sprinkle flaky sea salt generously over the top. This adds a delightful contrast to the sweetness and a pleasant crunch.
- Serve and Enjoy: Slice into 8-10 portions and serve chilled. Enjoy the silky, creamy custard with the perfect balance of sweet honey and salty sea salt atop a flaky crust.
Notes
- Do not pre-bake the crust; chilling is sufficient for this custard pie.
- Tempering the eggs properly is essential to avoid curdling and ensure a smooth custard.
- Keep stirring the cream mixture to prevent lumps and burning.
- Use quality honey for the best flavor impact.
- Refrigeration after baking is crucial for the custard to set fully.
- Adjust flaky sea salt amount to taste depending on your preference for sweetness versus saltiness.
- This pie keeps well refrigerated for up to 3 days.
- For a deeper caramel flavor, you may substitute half the brown sugar with dark brown sugar.
Nutrition
- Serving Size: 1 slice (1/10 of pie)
- Calories: 370
- Sugar: 30 g
- Sodium: 150 mg
- Fat: 25 g
- Saturated Fat: 15 g
- Unsaturated Fat: 8 g
- Trans Fat: 0.2 g
- Carbohydrates: 30 g
- Fiber: 0.5 g
- Protein: 5 g
- Cholesterol: 140 mg
Keywords: Salted Honey Pie, honey custard pie, sweet and salty dessert, flaky pie crust, creamy honey pie, easy custard pie recipe

