Red Velvet Cheesecake Recipe
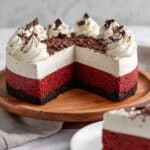
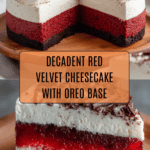
This decadent Red Velvet Cheesecake combines the rich, velvety texture of classic red velvet with the creamy indulgence of cheesecake. Featuring a crunchy Oreo cookie base and a luscious cream cheese filling infused with melted dark chocolate and red food coloring, this no-bake dessert is perfect for special occasions or anytime you crave a luxurious treat. Topped with softly whipped cream and shaved dark chocolate, it is irresistibly elegant and bursting with flavor.
- Prep Time: 30 minutes
- Cook Time: 0 minutes
- Total Time: 6 hours 30 minutes
- Yield: 8 servings 1x
- Category: Dessert
- Method: No-Cook
- Cuisine: American
Ingredients
Scale
Base
- 200g / 7oz Oreo cookies (about 1.5 standard packs)
- 60g / 4 tbsp unsalted butter, melted
Red Velvet Cheesecake Filling
- 2 tsp unflavoured gelatine powder
- 2 tbsp water
- 1 cup heavy/thickened cream, fridge cold
- 500g / 1 lb cream cheese, softened (block form)
- 3/4 cup caster sugar / superfine sugar
- 1 tsp vanilla extract
- 150g / 5 oz 70% dark chocolate
- 6 tsp red food colouring
Whipped Cream Topping
- 1 1/4 cups heavy/thickened cream, fridge cold (for whipping)
- 3 tbsp caster sugar / superfine sugar
- 1 tsp vanilla extract
- Optional: 2 tbsp shaved or grated dark chocolate (for decoration)
Instructions
- Prepare the Pan Base: Flip the base of a 20cm / 8″ springform pan upside down for easy cheesecake removal. Lightly butter the pan base and press a square sheet of baking paper onto it. Clip the pan sides onto the base, allowing excess paper to stick out. Butter and line the pan sides with additional baking paper.
- Make the Oreo Biscuit Base: Break Oreos roughly by hand and blitz in a food processor until fine crumbs form. Add melted butter and blitz again until combined. Transfer the mixture into the prepared pan and press firmly and evenly into the base using the flat underside of a cup measure.
- Bloom the Gelatine: Sprinkle gelatine powder over 2 tbsp of water in a small bowl and stir briefly to partly dissolve. Let it sit for 5 minutes to bloom, turning into a rubbery texture. Microwave for 15 seconds until liquid, stir, then let cool for 3 to 5 minutes. Ensure it is liquid before using to avoid lumps.
- Whip the Cream: Using cold cream from the fridge, whip on high speed for 2–3 minutes until stiff peaks form. Set aside.
- Beat Cream Cheese Mixture: In a separate bowl, beat softened cream cheese and sugar on high for 2 minutes until fluffy and smooth. Add the cooled gelatine liquid and vanilla extract, then beat for another 30 seconds to incorporate well.
- Add Chocolate and Red Food Colouring: Mix in lukewarm melted dark chocolate and red food colouring. Beat for 1 minute until the mixture turns a deep scarlet red color, ensuring a rich red velvet hue rather than a bright red.
- Fold in Whipped Cream: Gently fold in one-third of the whipped cream into the cream cheese mixture until combined. Repeat with the remaining cream, folding gently to maintain a light and airy texture.
- Set the Cheesecake: Pour the cheesecake filling into the prepared springform pan. Refrigerate for at least 6 hours or until fully set.
- Remove the Cheesecake from the Pan: Carefully release the sides of the springform pan. Use the excess baking paper to slide the cheesecake off the base onto a serving platter. Peel off the paper lining from the sides and slide out the paper from underneath the cake.
- Prepare the Whipped Cream Topping: Beat the cold heavy cream, sugar, and vanilla extract on high speed for about 2 minutes until softly whipped. For extra stability, you may use stabilisers as preferred.
- Decorate and Serve: Spoon the whipped cream onto the center of the cheesecake, leaving a 2.5cm / 1″ border around the edges. Sprinkle with shaved or grated dark chocolate for an elegant finishing touch. Serve chilled and enjoy!
Notes
- This recipe uses unflavoured gelatine powder; ensure it is fully bloomed and melted to avoid lumps.
- Use high-quality 70% dark chocolate for a rich flavor that complements the cream cheese and red velvet color.
- Red food colouring is crucial for the classic red velvet appearance; adjust amount as needed but the recommended 6 tsp achieves a deep, vibrant color.
- Chilling the heavy cream before whipping helps achieve the perfect stiff peaks.
- For easy cake removal, line the pan generously with baking paper extending beyond the base and sides.
- Whipped cream topping can be stabilized with additives if you want to prepare it in advance or need it to hold shape longer.
- Oreo cookie crust gives a delicious chocolatey crunch that pairs well with the creamy filling.
Keywords: Red velvet cheesecake, no bake cheesecake, Oreo crust cheesecake, chocolate cheesecake, red velvet dessert
Find it online: https://thefoodrecipe.com/red-velvet-cheesecake-recipe/