Olive Garden Breadsticks Recipe
Introduction
These Olive Garden-style breadsticks are soft, buttery, and packed with a perfect garlic salt topping. They’re easy to make at home and taste just like the restaurant favorite. Perfect for dipping or enjoying on their own.

Ingredients
- 1 1/2 cups warm water (110 degrees)
- 2 1/4 teaspoons active dry yeast (1 package)
- 2 tablespoons sugar
- 4 1/4 cups bread flour
- 1 tablespoon salt
- 2 tablespoons melted butter
- 1/4 cup butter (melted, for brushing)
- 1 teaspoon garlic salt
Instructions
- Step 1: In a small bowl, combine the sugar, yeast, and warm water. Let sit for 5 minutes, or until foamy.
- Step 2: In a large bowl, whisk together the flour and salt. Add the yeast mixture and 2 tablespoons melted butter. Mix until it starts to come together in a ball.
- Step 3: Turn the dough onto a lightly floured surface and knead for 5 minutes until smooth and elastic.
- Step 4: Form the dough into a square on your counter. Divide it into 12 equal pieces, then roll each piece into a breadstick shape.
- Step 5: Place the breadsticks on a lined baking sheet. Cover and let them rise for about 45 minutes, until puffed.
- Step 6: Preheat the oven to 400°F (200°C). Bake the breadsticks for 12 minutes, or until lightly browned.
- Step 7: Mix together the 1/4 cup melted butter and garlic salt. Brush this mixture over the hot breadsticks right after baking.
- Step 8: Allow the breadsticks to cool slightly before serving for the best flavor and texture.
Tips & Variations
- For extra flavor, sprinkle grated Parmesan cheese on top after brushing with garlic butter.
- Use bread flour for a chewier texture, or all-purpose flour for a softer breadstick.
- Try adding dried Italian herbs like oregano or basil to the garlic butter for a herby twist.
- If you don’t have garlic salt, mix garlic powder with regular salt instead.
Storage
Store any leftover breadsticks in an airtight container at room temperature for up to 2 days. To reheat, warm them in a toaster oven or regular oven at 350°F (175°C) for 5-7 minutes to revive their soft texture. Avoid microwaving as it can make them chewy.
How to Serve

Serve this delicious recipe with your favorite sides.
FAQs
Can I make the dough ahead of time?
Yes, you can prepare the dough and let it rise in the refrigerator overnight. Bring it to room temperature before shaping and baking.
Can I freeze the breadsticks?
Absolutely. Freeze the baked breadsticks in a sealed bag or container for up to 3 months. Reheat in the oven directly from frozen for best results.
PrintOlive Garden Breadsticks Recipe
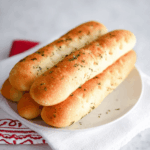
These Olive Garden-style breadsticks are soft, buttery, and perfectly garlicky. Made from scratch with simple ingredients, they feature a fluffy interior and a golden crust, brushed with melted garlic butter for that signature flavor. Perfect as a side for pasta dishes, soups, or salads, these breadsticks bring warm, comforting flavors to your table.
- Prep Time: 15 minutes
- Cook Time: 12 minutes
- Total Time: 1 hour 15 minutes
- Yield: 12 breadsticks 1x
- Category: Side Dish
- Method: Baking
- Cuisine: Italian-American
Ingredients
Dough
- 1 1/2 cups warm water (110 degrees F)
- 2 1/4 teaspoons active dry yeast (1 package)
- 2 tablespoons sugar
- 4 1/4 cups bread flour
- 1 tablespoon salt
- 2 tablespoons melted butter
Topping
- 1/4 cup butter (melted)
- 1 teaspoon garlic salt
Instructions
- Activate Yeast: In a small bowl, combine the sugar, active dry yeast, and warm water. Stir gently and let the mixture sit for about 5 minutes, or until it becomes foamy, indicating the yeast is active.
- Mix Dough Ingredients: In a large bowl, whisk together the bread flour and salt to distribute evenly. Add the yeast mixture along with 2 tablespoons of melted butter. Mix the ingredients together until they begin to form a cohesive dough ball.
- Knead the Dough: Transfer the dough onto a lightly floured surface. Knead by hand for approximately 5 minutes until smooth and elastic, which helps develop gluten for a tender, airy texture.
- Shape Dough: Form the dough into a square shape on your counter. Using a knife or dough cutter, divide this square into 12 equal portions. Roll each portion individually into a thin, elongated breadstick shape.
- Proof the Breadsticks: Place the breadsticks evenly spaced on a baking sheet lined with parchment paper or a silicone mat. Cover loosely with a clean kitchen towel or plastic wrap and let them rise in a warm spot for about 45 minutes, doubling in size.
- Bake: Preheat the oven to 400°F (200°C). Once risen, bake the breadsticks for 12 minutes or until they turn lightly golden brown, indicating they are cooked through and have a crusty exterior.
- Apply Garlic Butter: In a small bowl, combine the melted butter and garlic salt. As soon as the breadsticks come out of the oven, generously brush this mixture over them to infuse flavor and add moisture.
- Cool and Serve: Allow the breadsticks to cool slightly on a rack before serving to prevent burning and to enhance their soft texture.
Notes
- Use warm water around 110°F to ensure the yeast activates properly without killing it.
- Kneading the dough well is key to achieving the perfect breadstick texture.
- Allowing the dough to rise improves the softness and fluffiness of the breadsticks.
- Brush on garlic butter immediately after baking for the best absorption and flavor.
- These breadsticks are best enjoyed fresh but can be stored in an airtight container for up to 2 days.
- Reheat gently in the oven for a few minutes to restore softness.
Keywords: Olive Garden breadsticks, garlic breadsticks, soft breadsticks, Italian side dish, homemade breadsticks


