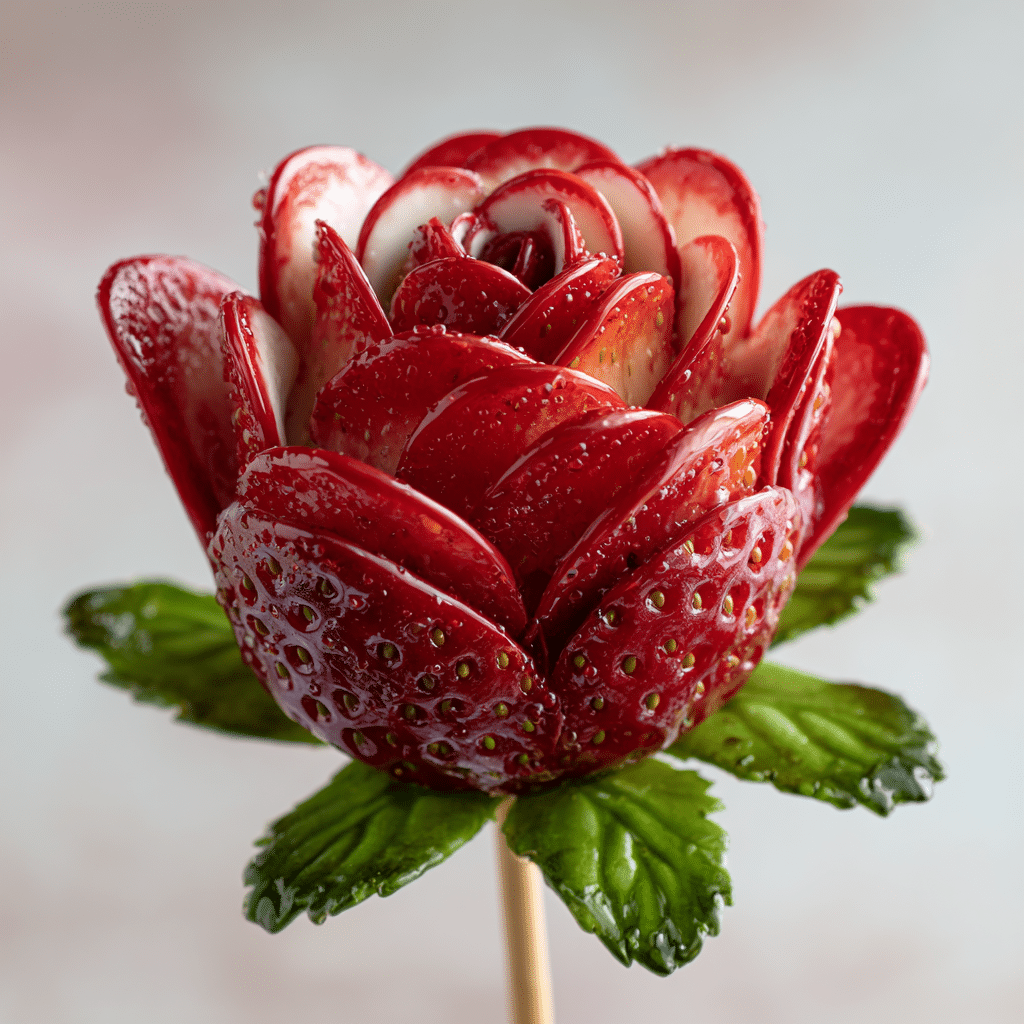
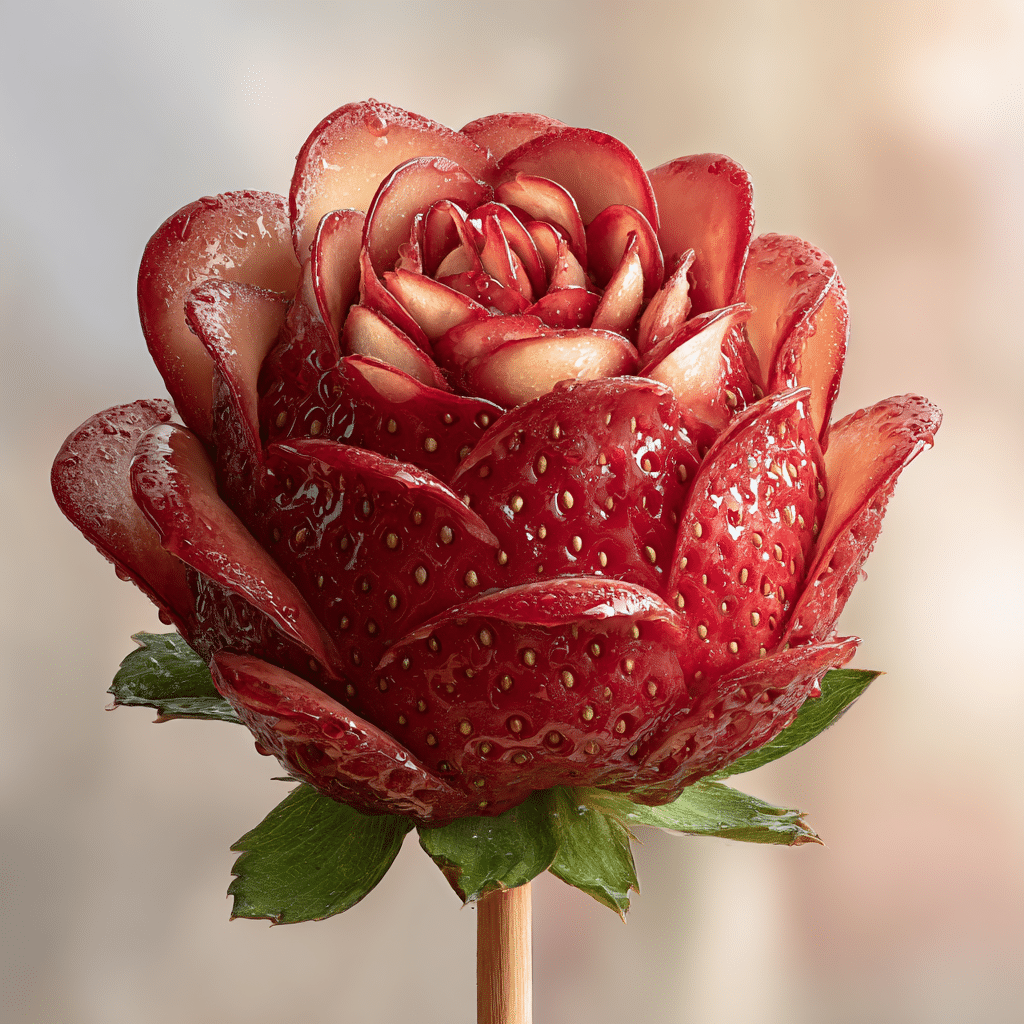
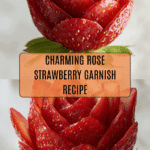
How To Make Easy Rose Strawberries Recipe
If you’re searching for a show-stopping treat that’s as fun to make as it is stunning to serve, look no further than How To Make Easy Rose Strawberries. This charming method transforms fresh strawberries into gorgeous, edible roses with nothing more than a little knife work and creativity. Whether you want a dazzling centerpiece for brunch or simply want to impress your friends and family, these beautiful fruit “flowers” will deliver smiles and plenty of wow factor with every bite.
Ingredients You’ll Need
You’ll be amazed at how quickly these elegant treats come together with just a handful of everyday items. Each ingredient and tool plays a special part, helping to create the color, structure, and lovely shape of your strawberry roses.
- Large Strawberries: The larger and more pointed at the tip, the better! Big strawberries provide plenty of space for carving delicate petals, while the pointed tip forms the rosette’s center.
- Strawberry Leaves: Leave them intact for a pretty, natural “rose” base and easy handling.
- Wooden Skewers: Skewers create a sturdy handle so you can rotate and carve the berry without smushing your masterpiece.
- Pairing Knife: A small, sharp knife gives you control to carve precise, delicate petals—don’t try this with anything too bulky!
- Paper Towels: Pat strawberries dry thoroughly so your petals hold their curl and your berries don’t slip around as you carve.
How to Make How To Make Easy Rose Strawberries
Step 1: Prepare Your Strawberry Canvas
Begin with fresh, washed strawberries that are fully dry. Firmly insert a wooden skewer into the bottom of each berry, right where the leafy greens are. This creates a “stem” to hold as you carve, making the process so much easier and keeping fingerprints off your beautiful work.
Step 2: Set Up for Success
Hold the skewer upright with the pointed tip of the strawberry facing up. Take a moment to get comfortable—the steadier your grip, the prettier your petals!
Step 3: Carve the First Petal
At the base of the strawberry, carefully make a small slit with the knife, taking care not to slice all the way through. This opening will become your very first “petal.” The key is to go slowly and keep the cut shallow.
Step 4: Curl the Petal
Use the tip of your knife to gently press and nudge the cut edge back, curling the petal away from the berry. Watch as it beautifully mimics the look of a rose’s bloom—it’s so satisfying!
Step 5: Complete the First Row
Repeat steps 3 and 4 around the base, creating four evenly spaced petals. Each petal should be gently curled back, giving your strawberry a flowery base to build on.
Step 6: Build the Second Row
Just above your first row, start a second row of petals. Begin each new petal between the petals below, making a small slit and curling each one back. Stack them higher to create the layered effect of real rose petals.
Step 7: Finish the Top and Shape the Center
For the finishing touch on your How To Make Easy Rose Strawberries, use your knife to make a single slit down the tip of the strawberry. Gently press the tip outward—this forms the rose’s heart and brings the whole bloom to life.
How to Serve How To Make Easy Rose Strawberries
Garnishes
Pile your finished strawberry roses on a platter and tuck in a few edible mint leaves for a fresh, garden-inspired accent. You can also dust the “petals” with a light sprinkle of powdered sugar or drizzle with a touch of melted chocolate for extra flair.
Side Dishes
Serve these beauties alongside whipped cream, yogurt parfaits, or as a gorgeous topping for cakes and cupcakes. They also turn any cheese board or fruit salad into a true showpiece—the contrast of textures and flavors is delightful!
Creative Ways to Present
If you want to really wow your guests, try arranging your rose strawberries in a bouquet—poke the skewers into florist foam or a vase for a striking edible centerpiece. You can also place each strawberry in a cupcake liner or mini glass for individual servings that look as sweet as they taste.
Make Ahead and Storage
Storing Leftovers
If you have extra How To Make Easy Rose Strawberries, they can be kept covered in the refrigerator for up to one day. Store them upright on their skewers or in an airtight container lined with paper towels to absorb any moisture and help maintain their shape.
Freezing
Unfortunately, strawberry roses don’t freeze well. The petals tend to wilt and lose their pretty curl after thawing, so it’s best to enjoy them fresh whenever possible.
Reheating
There’s no need to reheat these strawberry delights. To refresh them before serving, simply pat gently with a paper towel to remove any excess moisture and fluff the petals with your fingers if needed.
FAQs
Are there any tips for making the petals look more realistic?
Yes! Be sure to stagger each row of petals so they remain offset, just like real roses. Gently curling each petal outward and using a light touch with your knife gives your rose a delicate, lifelike appearance.
Can I use a different type of knife if I don’t have a pairing knife?
A small, sharp knife is best for carving, but if you don’t have a pairing knife, a sharp, thin-bladed vegetable knife will work. Just avoid serrated knives, as they can tear the delicate strawberry skin.
How far in advance can I make How To Make Easy Rose Strawberries?
It’s best to make these strawberries the day you plan to serve them. If you need to prep ahead, carve them a few hours in advance and keep them chilled in the fridge until showtime.
Do I need to use large strawberries, or will smaller ones work?
Large strawberries are easiest to work with because they give you more room for carving. However, with a little patience and a steady hand, you can turn smaller berries into lovely mini roses as well!
What should I do if my petals break?
Don’t worry—petals that aren’t perfect still look beautiful, and you can usually hide little splits by overlapping the next petal over them. Just keep going and remember: real roses have flaws, too!
Final Thoughts
You’ll love how creative and rewarding it feels to master How To Make Easy Rose Strawberries. They’re the sweetest way to turn simple fruit into art, and your friends and family will be absolutely delighted. Don’t wait for a special occasion—treat yourself and your loved ones to these edible flowers!
PrintHow To Make Easy Rose Strawberries Recipe

Learn how to create stunning and elegant rose-shaped strawberries with this easy tutorial. Perfect for impressing guests or adding a special touch to desserts!
- Prep Time: 15 minutes
- Cook Time: 0 minutes
- Total Time: 15 minutes
- Yield: Varies
- Category: Dessert
- Method: Carving
- Cuisine: Any
- Diet: Vegetarian
Ingredients
Ingredients:
- Large Strawberries (with pointed tips and leaves, washed and dried)
- Wooden skewer (to hold strawberry)
- Pairing knife
Instructions
- Insert the skewer into the bottom of the strawberry (where the leaves are)
- With the pointed end of the strawberry upwards, you are ready to start carving!
- Starting at the bottom, make a small slit but do not cut all the way through.
- Use your knife to very gently curl the tip of the “petal” by pressing it back.
- This is your first petal!
- Repeat on the other 3 sides of the strawberry until you have four “petals” at the base of the strawberry.
- Now let’s make another row!
- Starting above the row you just made, between two petals, make another slit.
- Curl the petal back gently.
- Repeat on the other 3 sides of the strawberry.
- To finish the rose, make a slit down the tip and press back gently to curl the tips.
Nutrition
- Serving Size: 1 rose strawberry
- Calories: 10
- Sugar: 2g
- Sodium: 0mg
- Fat: 0g
- Saturated Fat: 0g
- Unsaturated Fat: 0g
- Trans Fat: 0g
- Carbohydrates: 2g
- Fiber: 0.5g
- Protein: 0g
- Cholesterol: 0mg
Keywords: Strawberries, Rose-Shaped, Dessert, Carving, Garnish

