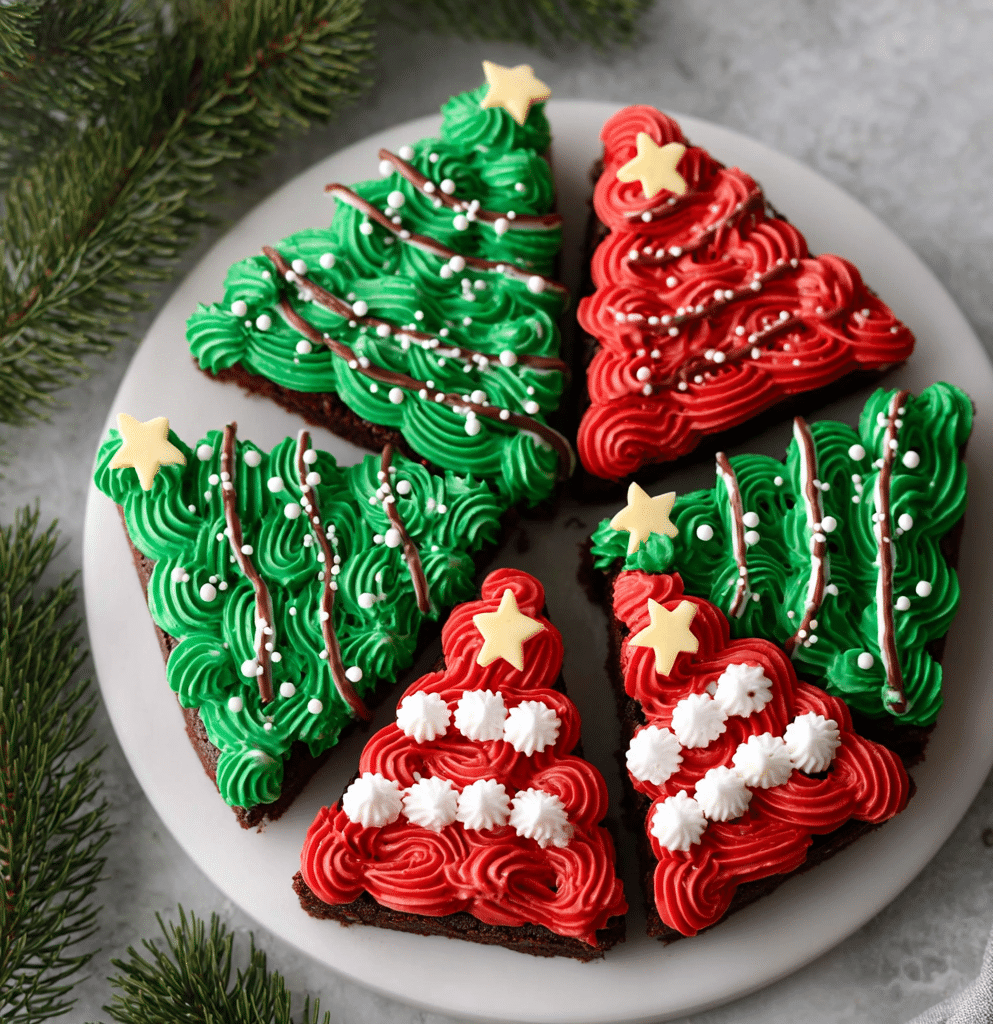
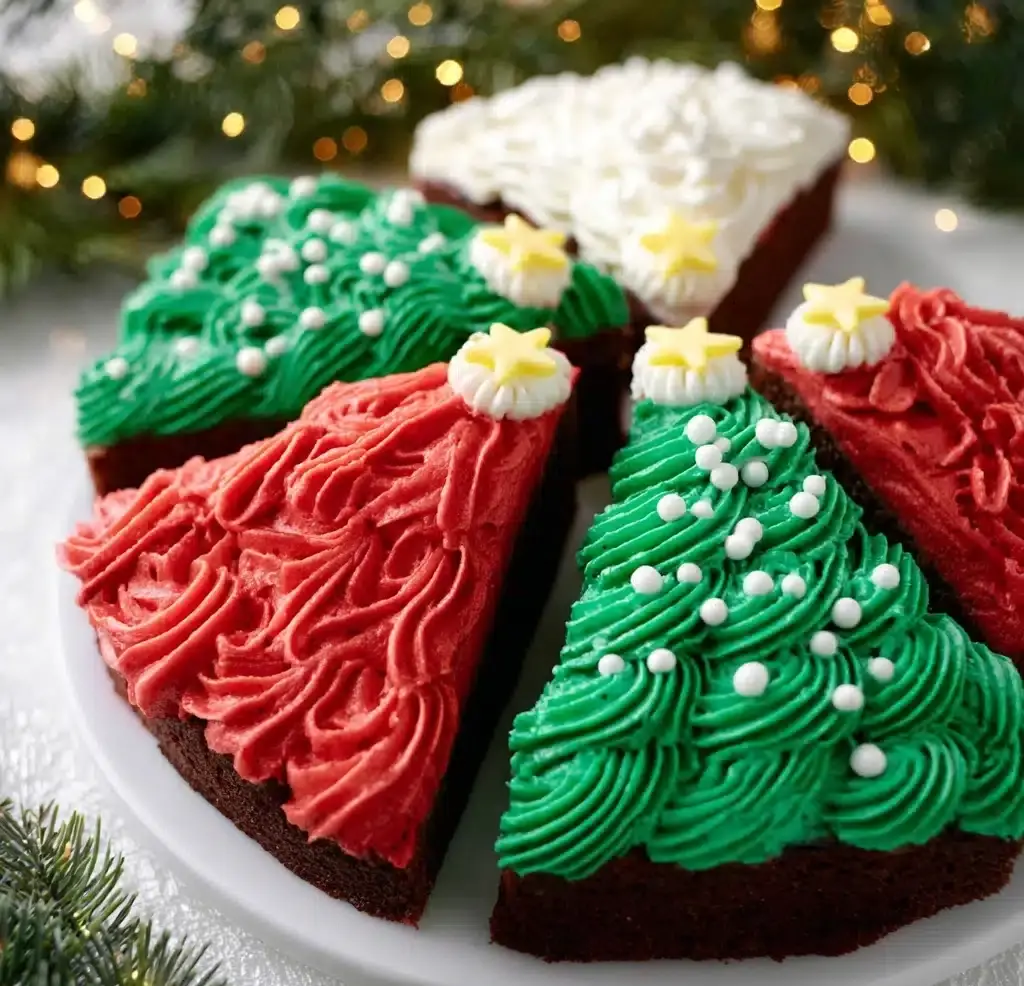
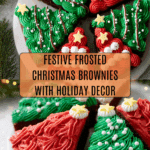
Frosted Christmas Brownies Recipe
If you’re looking for a festive treat that captures all the joyful flavors and colors of the season, these Frosted Christmas Brownies are exactly what you need. Picture rich, fudgy brownies generously coated with vibrant red, green, and white frosting that instantly put you in a holiday mood. Topped with sparkling edible stars and delicate pearl sprinkles, this dessert is as delightful to the eyes as it is to the taste buds. Whether you whip these up for a family gathering or a cozy night in, they promise smiles, warmth, and that unmistakable holiday magic in every bite.
Ingredients You’ll Need
These ingredients are straightforward but essential to delight every sense. Each brings a special element, from the fudgy texture of the brownies to the festive colors and sparkle of the frosting decorations.
- 2 Boxes of Brownie Mix or a double batch of homemade brownies: The base of your dessert, providing that perfectly rich and chewy chocolate flavor.
- White Frosting (1-3 jars): A creamy canvas that’s perfect for mixing in colors and creating decorative frosting designs.
- Edible Gel Food Coloring: Adds vibrant red and green hues without the artificial taste, making your frosting pop with festive cheer.
- Edible Gold Stars: Sparkling details that bring a touch of holiday magic and elegance to each brownie.
- White Pearl Sprinkles: Delicate, classy accents that mimic snowflakes or holiday ornaments when scattered on frosting.
- Icing Bags: Essential tools for smooth, precise frosting application and creating beautiful patterns.
- Frosting Tips (large star – 1M): Perfect for piping festive shapes and giving your brownies that professional yet homemade look.
How to Make Frosted Christmas Brownies
Step 1: Prepare Your Brownie Base
Start by preheating your oven according to the brownie mix instructions. Grease a 9-inch springform pan with spray oil to prevent sticking and ease removal. Mix together both brownie mixes or prepare your homemade batter, then pour it evenly into the pan. Baking until a toothpick comes out clean ensures your brownies hold together perfectly while staying fudgy inside.
Step 2: Cool and Slice
Once your brownies have baked, patience is key—let them cool completely before you remove the springform pan. This step helps keep the brownies intact when slicing. Transfer the slab to a cutting board and carefully cut into 8 triangle-shaped portions, setting the stage for your holiday decorating.
Step 3: Prepare Your Festive Frosting
Divide your white frosting into three bowls. Color one batch with red gel food coloring and another with green, leaving the third white for contrast. Gel colors keep the frosting thick and smooth, perfect for piping. Load each colored frosting into separate icing bags fitted with your large star tip, ready for some festive decorating fun.
Step 4: Decorate with Holiday Spirit
This is where your Frosted Christmas Brownies truly come to life. Use the green frosting to mimic Christmas tree needles, then adorn with white pearl sprinkles as ornaments and edible gold stars for that magical finish. For Santa hat-inspired brownies, blend the green and white frosting to create playful designs that evoke holiday cheer. Let your creativity guide you here; after all, these treats are as much fun to make as they are to eat!
How to Serve Frosted Christmas Brownies
Garnishes
For an extra festive touch, sprinkle a few edible gold stars and white pearls on each brownie just before serving to keep the sparkle intact. You can also dust a tiny amount of powdered sugar around the edge of the plate to appear like fresh snow, making your presentation even more magical.
Side Dishes
Pairing these brownies with a scoop of vanilla bean ice cream or a warm cup of cinnamon-spiced hot chocolate completes the cozy holiday vibe. Fresh berries or peppermint bark on the side can add a refreshing contrast to the rich sweetness of the brownies.
Creative Ways to Present
Arrange the brownies on a festive platter shaped like a Christmas tree or use tiered dessert stands decorated with holly sprigs and fairy lights. Wrapping each brownie in a small cellophane bag with a decorative ribbon transforms them into charming homemade gifts that show off your thoughtfulness and baking skills.
Make Ahead and Storage
Storing Leftovers
If you have any of these delightful treats leftover, store them in an airtight container at room temperature. The frosting will stay creamy, and the brownie texture remains moist for up to three days, perfect for enjoying throughout the holidays.
Freezing
You can freeze the unfrosted brownie slab for up to three months. Be sure to wrap it tightly in plastic wrap and foil for protection. When you’re ready to frost, simply thaw the brownies completely before decorating to keep your texture and colors just right.
Reheating
Frosted Christmas Brownies are best enjoyed at room temperature, but if you prefer them slightly warm, gently heat each piece in the microwave for about 10 seconds. Avoid overheating to keep the frosting stable and prevent it from melting too much.
FAQs
Can I use homemade brownies instead of a mix?
Absolutely! Homemade brownies work wonderfully and offer a chance to add your own twist, such as extra chocolate chips or nuts. Just be sure they are fully cooled before decorating.
What if I don’t have edible gold stars?
No worries! You can substitute with any festive sprinkles or even small candy pearls. The key is to add that sparkling touch that makes these brownies feel special.
Can I make these gluten-free?
Yes, just swap out the brownie mix for a gluten-free version or bake a gluten-free homemade brownie. The frosting and decorations remain the same and are typically gluten-free.
Is there a dairy-free frosting option?
Definitely. Use a dairy-free frosting alternative available in most stores, or whip up a coconut-based frosting. Add food coloring and decorations as usual for a delicious dairy-free treat.
How far in advance can I decorate these brownies?
It’s best to decorate on the day you plan to serve. However, you can bake and slice brownies a day ahead, store them, and frost just before serving to keep everything fresh and vibrant.
Final Thoughts
With their stunning holiday colors and rich chocolatey goodness, Frosted Christmas Brownies are a guaranteed crowd-pleaser. Baking and decorating them is a fun way to get into the holiday spirit, and every bite feels like a festive celebration. Give this recipe a try—you’ll find they quickly become a cherished tradition for yourself and everyone lucky enough to share in their joy.
PrintFrosted Christmas Brownies Recipe

Celebrate the festive season with these delightful Frosted Christmas Brownies, featuring rich, fudgy brownies topped with vibrant red, green, and white frostings and festive edible decorations. Perfect for holiday parties and family gatherings, these brownies are not only delicious but also visually charming.
- Prep Time: 20 minutes
- Cook Time: 30 minutes
- Total Time: 50 minutes
- Yield: 8 large triangle brownies 1x
- Category: Dessert
- Method: Baking and Decorating
- Cuisine: American
- Diet: Vegetarian
Ingredients
Brownies
- 2 Boxes of Brownie Mix, or a double batch of homemade brownies
- Spray oil for greasing the pan
Frosting and Decorations
- 1 to 3 jars of White Frosting
- Edible Gel Food Coloring (red and green) or natural food coloring alternatives
- Edible Gold Stars
- White Pearl Sprinkles
- Icing Bags
- Frosting Tip (large star tip, size 1M)
Instructions
- Preheat and Prepare Pan: Preheat your oven according to the instructions on the brownie mix box. Spray a 9-inch springform pan evenly with spray oil to ensure the brownies do not stick.
- Mix and Bake Brownies: Prepare both boxes of brownie mix or a double batch of your homemade brownie batter. Pour the batter into the prepared springform pan and bake following the package instructions or until a toothpick inserted in the center comes out clean, usually about 25-35 minutes.
- Cool and Cut: Once baked, allow the brownies to cool completely in the pan. Carefully remove the springform sides, then place the brownie slab onto a cutting board. Using a sharp knife, cut the brownies into 8 even triangle shapes, mimicking Christmas tree slices.
- Prepare Frostings: In a small bowl, mix white frosting with edible red gel food coloring until you achieve a vibrant red shade. In a separate bowl, do the same with green food coloring to create green frosting. Keep some white frosting plain.
- Fill Icing Bags: Place each colored frosting (red, green, and white) into individual icing bags fitted with the large star (1M) frosting tip for easy decorating.
- Decorate Brownies: Use the green frosting to create Christmas tree shapes on the triangle brownies. Add white pearl sprinkles and edible gold stars to embellish the trees. For Santa Claus hat brownies, use red and white frostings to pipe hat shapes on brownies cut in your preferred style.
- Serve and Enjoy: Arrange the decorated brownies on a festive platter and serve fresh at your holiday celebration. Enjoy the rich, chocolaty goodness with a seasonal twist!
Notes
- Ensure brownies are completely cooled before frosting to avoid melting the frosting.
- Adjust the amount of food coloring to achieve desired color intensity.
- Use natural food colorings if you prefer to avoid artificial dyes.
- The brownie pan size can be adjusted, but baking time will vary accordingly.
- If homemade brownies are used, ensure they have a fudgy consistency to hold decorations well.
Nutrition
- Serving Size: 1 triangular brownie (about 1/8th of pan)
- Calories: 320 kcal
- Sugar: 28 g
- Sodium: 190 mg
- Fat: 15 g
- Saturated Fat: 6 g
- Unsaturated Fat: 7 g
- Trans Fat: 0.2 g
- Carbohydrates: 44 g
- Fiber: 2 g
- Protein: 3 g
- Cholesterol: 30 mg
Keywords: Christmas brownies, holiday dessert, festive brownies, decorated brownies, holiday baking

