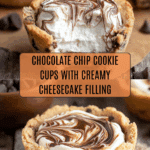
Chocolate Chip Cookie Cups Recipe
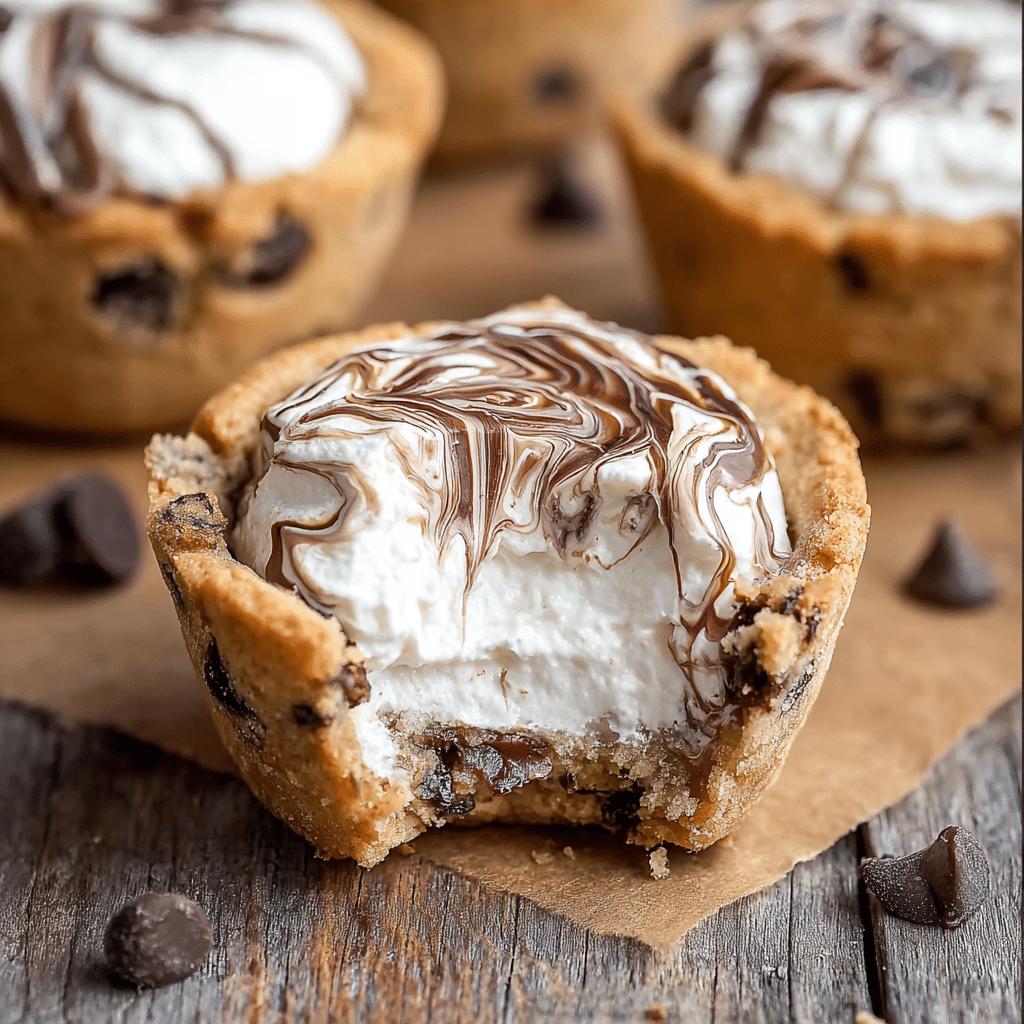
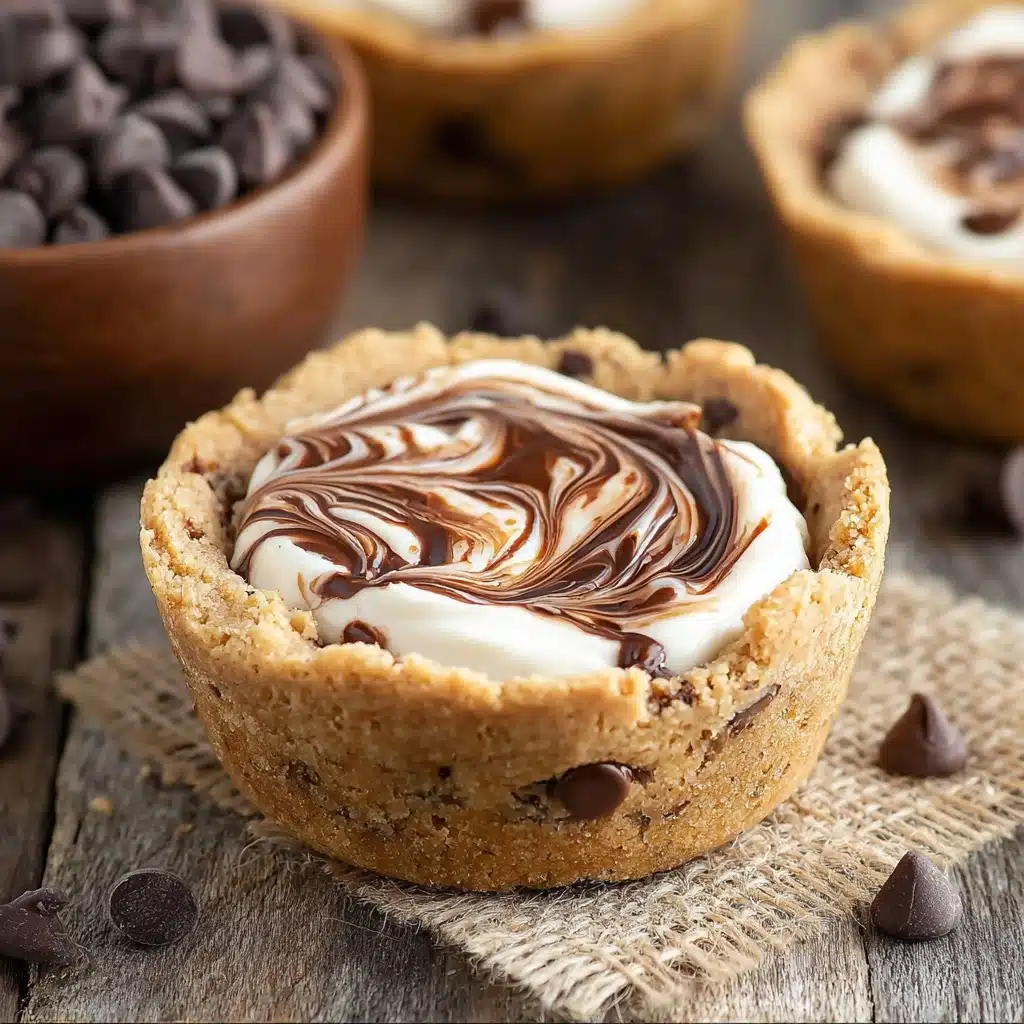
If you’re looking for a show-stopping treat that feels both nostalgic and delightfully fresh, these Chocolate Chip Cookie Cups are exactly what you need. Imagine the warmth and soft chewiness of a classic chocolate chip cookie, perfectly molded into little edible mugs and filled with rich, creamy cheesecake mousse—each bite an irresistible marriage of texture and flavor. Whether you’re serving these for a special occasion or just want to impress your friends with something unique and indulgent, these delightful cookie cups are sure to steal the spotlight and create lasting smiles.
Ingredients You’ll Need
The magic behind these Chocolate Chip Cookie Cups is how simple pantry staples come together to create something stunning. Each ingredient plays a vital role: the flour and baking soda give you the perfect cookie base, while the sugars deliver tenderness and caramel notes. Butter brings richness and moisture, eggs add structure, and mini chocolate chips sprinkle pockets of melty sweetness. For the irresistible filling, cream cheese and heavy cream form a dreamy cheesecake mousse that elevates these cups to dessert royalty.
- All-purpose flour (2 1/4 cups): The foundation for a soft but sturdy cookie that holds the cup shape beautifully.
- Baking soda (1/2 tsp): Adds the perfect lift to create a tender crumb with just the right amount of rise.
- Sea salt (1 tsp): Balances sweetness and enhances the chocolate and buttery flavor notes.
- Unsalted butter (1 cup, room temperature): Provides richness and moisture for soft, flaky cookie cups.
- Granulated sugar (1/2 cup): Adds light sweetness and helps with that classic cookie chew.
- Light brown sugar (1 cup, packed): Gives a deeper caramel flavor and extra softness.
- Large eggs (2, room temperature): Bind the ingredients and help the cups keep their shape.
- Vanilla extract (2 tsp): Infuses warmth and depth that brings the whole cookie to life.
- Mini semi-sweet chocolate chips (1 1/2 cups): Melt evenly and distribute small bursts of chocolate in every bite.
- Heavy whipping cream (1 cup, cold): Whipped to airy peaks, it makes the cheesecake mousse fluffy and light.
- Cream cheese (8 oz, softened): The creamy base for a rich, tangy cheesecake filling that pairs perfectly with the sweet cookie.
- Granulated sugar (1/2 cup): Sweetens the cheesecake mousse just right without overpowering.
- Vanilla extract (1 tsp): Adds a subtle note to the mousse, enhancing the overall flavor profile.
- Chocolate sauce (optional): For drizzling or swirling on top, adding a luscious finishing touch.
How to Make Chocolate Chip Cookie Cups
Step 1: Prepare Your Workspace and Tools
Start by preheating your oven to 350°F and greasing two regular-sized muffin tins with cooking spray to ensure the cookie cups won’t stick. Having everything ready upfront makes the process smooth and stress-free as you bake and shape the cookie cups.
Step 2: Mix the Dry Ingredients
Whisk together the all-purpose flour, baking soda, and sea salt in a medium bowl. This ensures your leavening is evenly distributed and the salt is balanced throughout the cookie dough, setting the stage for a perfectly textured cup.
Step 3: Cream Butter and Sugars
Using a stand or hand mixer, beat the softened butter with both granulated and brown sugars on medium-high speed until the mixture turns pale and fluffy—usually about 2 to 3 minutes. This step is crucial for creating lightness and tenderness in the cookie cookie cups.
Step 4: Incorporate Eggs and Vanilla
Reduce the mixer speed and add the eggs one at a time, beating well after each addition. Then mix in the vanilla extract. This slow incorporation keeps the batter from curdling and encourages even texture.
Step 5: Combine Wet and Dry Mixtures
Slowly add the flour mixture to the wet ingredients and mix just until combined to avoid overworking the dough, which can make cookies tough. Gently fold in the mini chocolate chips, spreading out those chocolatey bites evenly throughout your dough.
Step 6: Scoop Dough into Muffin Tins
Using a large cookie scoop or spoon (about 3 tablespoons), place dough into each muffin cup. Aim for an even distribution so each cookie cup bakes uniformly, ensuring consistent sizes that hold the filling perfectly.
Step 7: Bake and Shape the Cookie Cups
Bake the cookie dough for approximately 15 minutes or until the edges are lightly browned and the centers are mostly set but still soft. Right after removing them from the oven, use a small jar or container to firmly press down in the center of each cookie, creating a well or “cup” shape. Let them cool in the pans for about 10 minutes before transferring to a wire rack to cool completely.
Step 8: Make the Cheesecake Mousse Filling
Whip the cold heavy whipping cream until stiff peaks form—using chilled tools is a game-changer here for that perfect airy texture. In a separate bowl, beat the softened cream cheese and sugar until smooth, then add the vanilla extract and mix again. Fold the whipped cream gently into the cream cheese mixture until combined, creating a luscious mousse filling ready to pipe or spoon into the cooled cookie cups.
Step 9: Assemble and Chill
Pipe or spoon the cheesecake mousse into each cookie cup, filling them generously. You can drizzle chocolate sauce over the top and swirl it in with a toothpick for a decorative flair. Refrigerate the completed cookie cups for about 2 hours to let the mousse set perfectly before serving.
How to Serve Chocolate Chip Cookie Cups
Garnishes
These cookie cups are already a treat, but embellishing them can take them to the next level. Try topping with a fresh raspberry or a sprinkle of mini chocolate chips for extra pizzazz. A dusting of powdered sugar adds a pretty finishing touch and a hint of extra sweetness.
Side Dishes
Serving these cookie cups alongside a hot cup of coffee, freshly brewed tea, or a glass of cold milk creates a lovely balance, cutting through the richness and making the indulgence feel even more special. They also pair beautifully with fresh fruit to lighten up the dessert experience.
Creative Ways to Present
For an eye-catching dessert table, arrange the Chocolate Chip Cookie Cups on a tiered cake stand or a rustic wooden board. Consider placing individual spoons next to each cup for ease. You can even package them in mini clear boxes or cupcake liners to gift or serve at parties, turning these little delights into edible conversation starters.
Make Ahead and Storage
Storing Leftovers
You can keep leftover Chocolate Chip Cookie Cups covered tightly in the refrigerator for 2 to 3 days. This helps maintain the mousse’s fresh texture and keeps the cookies from getting stale or soggy. Make sure they’re in an airtight container to preserve flavor and moisture.
Freezing
Want to enjoy these treats later? Freeze assembled cookie cups in a single layer on a baking sheet first, then transfer to a freezer-safe container or bag. They can be frozen for up to 4 weeks. When you’re ready, thaw them in the fridge overnight—the mousse keeps its creamy consistency, and the cookie stays soft and delicious.
Reheating
If you prefer the cookie cups a bit warmer, remove the filling by gently scooping it out and refrigerate it separately. Warm the cookie cups in a 300°F oven for about 5 minutes, then add the filling back before serving. This prevents the mousse from losing its silky texture while refreshing the cookie’s freshly baked warmth.
FAQs
Can I use regular-sized chocolate chips instead of mini chocolate chips?
Absolutely! Regular-sized chips will work just fine, but mini chocolate chips distribute more evenly and melt more consistently, which helps maintain the shape and texture of each cookie cup.
Is it necessary to use cream cheese in the filling?
Using cream cheese gives the mousse its tangy richness and creaminess, making it more like a cheesecake filling. You could try using mascarpone or whipped cream alone, but the texture and flavor will be noticeably different.
How can I make these cookie cups gluten-free?
You can substitute the all-purpose flour for a gluten-free flour blend, preferably one designed for baking. Just be aware that texture might vary slightly, so keep an eye on baking time and firmness.
Can I make the cookie cups without the cheesecake mousse filling?
Yes! The cookie cups are delicious on their own as bite-sized chocolate chip cookies baked in muffin tins. You can also fill them with ice cream or other fillings for different variations.
What’s the best way to press the cookie cups to create the well?
Use a small jar or any heat-safe container with a narrow, rounded bottom that fits inside the muffin cup. Press firmly right after baking while the cookie is still warm to shape the cup without cracking.
Final Thoughts
Making these Chocolate Chip Cookie Cups is such a joy—they’re deceptively easy but incredibly impressive. I love how they transform a classic cookie into an elegant dessert perfect for any occasion. Give this recipe a try, share it with friends, and brace yourself for all the compliments coming your way. Once you taste that creamy filling nestled in a soft cookie cup, you just might find your new favorite sweet treat.
Chocolate Chip Cookie Cups Recipe

Delight in these irresistible Chocolate Chip Cookie Cups filled with a creamy cheesecake mousse, combining the warm, buttery goodness of classic cookie dough with a luscious whipped cream and cream cheese filling. Perfect for parties, dessert tables, or anytime you crave a sweet treat that’s both fun to make and delicious to eat.
- Prep Time: 20 minutes
- Cook Time: 15 minutes
- Total Time: 2 hours 35 minutes (including chilling time)
- Yield: 24 cookie cups 1x
- Category: Dessert
- Method: Baking
- Cuisine: American
- Diet: Vegetarian
Ingredients
Cookie Dough:
- 2 1/4 cups all-purpose flour
- 1/2 tsp baking soda
- 1 tsp sea salt
- 1 cup unsalted butter (room temperature)
- 1/2 cup granulated sugar
- 1 cup light brown sugar (packed)
- 2 large eggs (room temperature)
- 2 tsp vanilla extract
- 1 1/2 cups mini chocolate chips (semi-sweet)
Cheesecake Mousse Filling:
- 1 cup heavy whipping cream (cold)
- 8 oz cream cheese (softened)
- 1/2 cup granulated sugar
- 1 tsp vanilla extract
- Chocolate sauce (optional)
Instructions
- Preheat and Prep Muffin Tins: Preheat your oven to 350°F (175°C). Lightly spray two regular-sized muffin tins with cooking spray to prevent sticking.
- Mix Dry Ingredients: Whisk together the all-purpose flour, baking soda, and sea salt in a bowl. Set aside for later use.
- Cream Butter and Sugars: In a large mixing bowl, beat the butter, granulated sugar, and light brown sugar on medium-high speed until the mixture is pale and fluffy, about 2 to 3 minutes.
- Add Eggs and Vanilla: Reduce the mixer speed to low and add eggs one at a time, beating well after each addition. Then add the vanilla extract and mix until fully combined.
- Combine with Dry Ingredients & Fold in Chips: Gradually add the flour mixture to the wet ingredients, mixing just until combined. Gently fold in the mini chocolate chips.
- Scoop Dough into Muffin Tins: Using a large cookie scoop (about 3 tablespoons), scoop the dough evenly into the prepared muffin tins.
- Bake Cookie Cups: Bake the cookie cups for approximately 15 minutes or until they are lightly browned and mostly set but still slightly soft in the center.
- Create Wells: Remove the muffin tins from the oven immediately. Using the bottom of a small jar or container, press firmly down into the center of each cookie to create a well. Let them cool in the pans for 10 minutes before transferring to a wire rack to cool completely.
- Prepare Cheesecake Mousse Filling: Whip the cold heavy cream in a chilled bowl until stiff peaks form. In a separate bowl, beat the softened cream cheese and granulated sugar until smooth, then add the vanilla extract and continue mixing until fully incorporated.
- Combine and Fill: Gently fold the cream cheese mixture into the whipped cream until smooth and creamy. Pipe or spoon this cheesecake mousse into the cooled cookie cups.
- Garnish and Chill: Drizzle chocolate sauce on top if desired and swirl it with a toothpick for decoration. Refrigerate the cookie cups for approximately 2 hours or until the filling is set.
- Serve and Store: Serve the cookie cups chilled. Store leftovers covered in the refrigerator for up to 2-3 days, or freeze for up to 4 weeks.
Notes
- Make sure butter and eggs are at room temperature for better mixing and texture.
- Using cold heavy cream and a chilled bowl helps achieve stiffer whipped cream.
- Do not overbake the cookie cups; they should be just set and lightly browned to maintain softness.
- Pressing down the center while warm is crucial to create the perfect size well for the mousse filling.
- If you don’t have mini chocolate chips, regular-sized chocolate chips chopped in half work fine.
- For easier removal, let cookie cups cool completely before filling or removing from the muffin tin.
- Can be made ahead and stored refrigerated or frozen, just thaw before serving if frozen.
Nutrition
- Serving Size: 1 cookie cup
- Calories: 280 kcal
- Sugar: 20 g
- Sodium: 230 mg
- Fat: 18 g
- Saturated Fat: 9 g
- Unsaturated Fat: 7 g
- Trans Fat: 0.2 g
- Carbohydrates: 26 g
- Fiber: 1 g
- Protein: 3 g
- Cholesterol: 55 mg
Keywords: Chocolate chip cookie cups, cheesecake mousse filling, cookie desserts, mini chocolate chip treats, baked cookie cups
