The Best Gluten Free Christmas Tree Cookies Recipe
Introduction
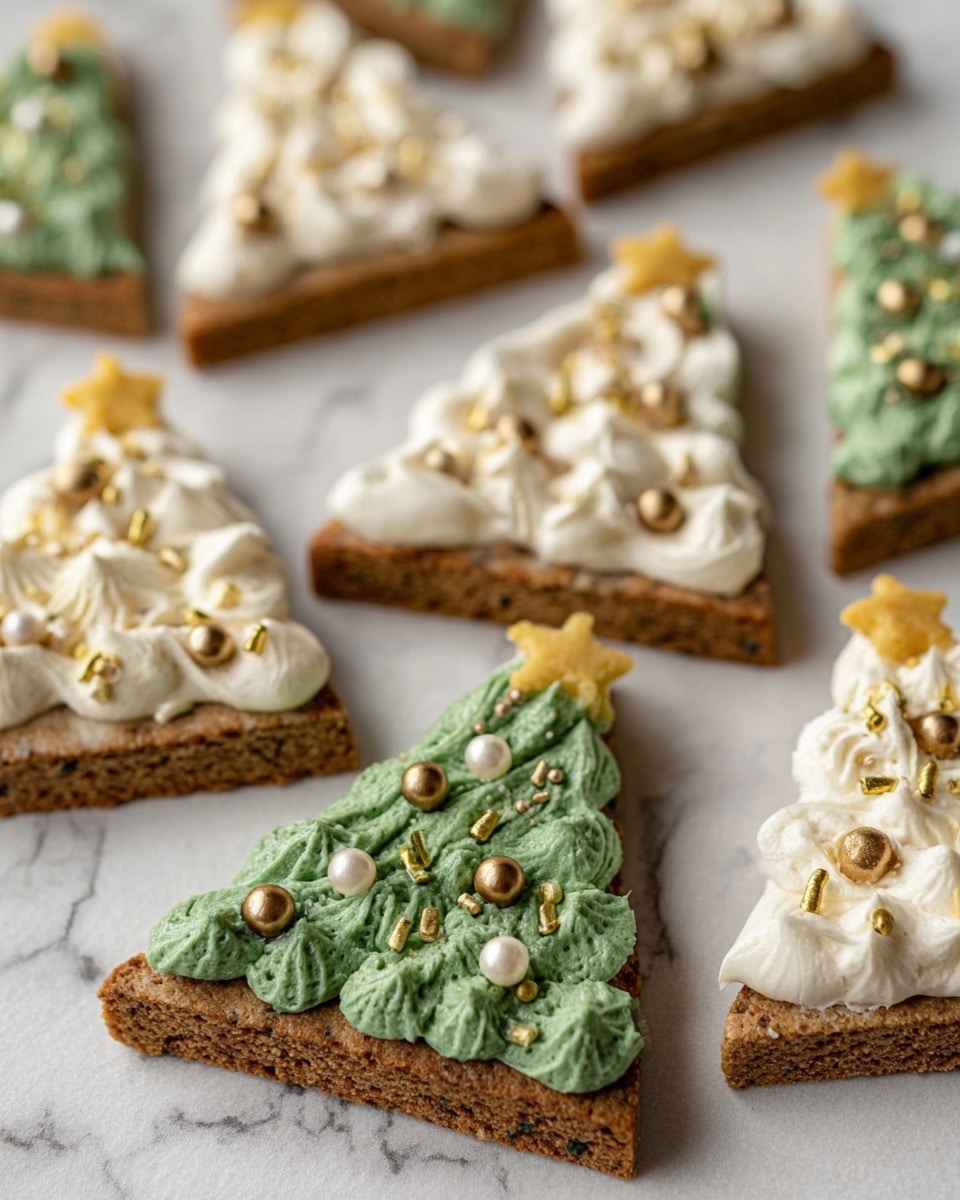
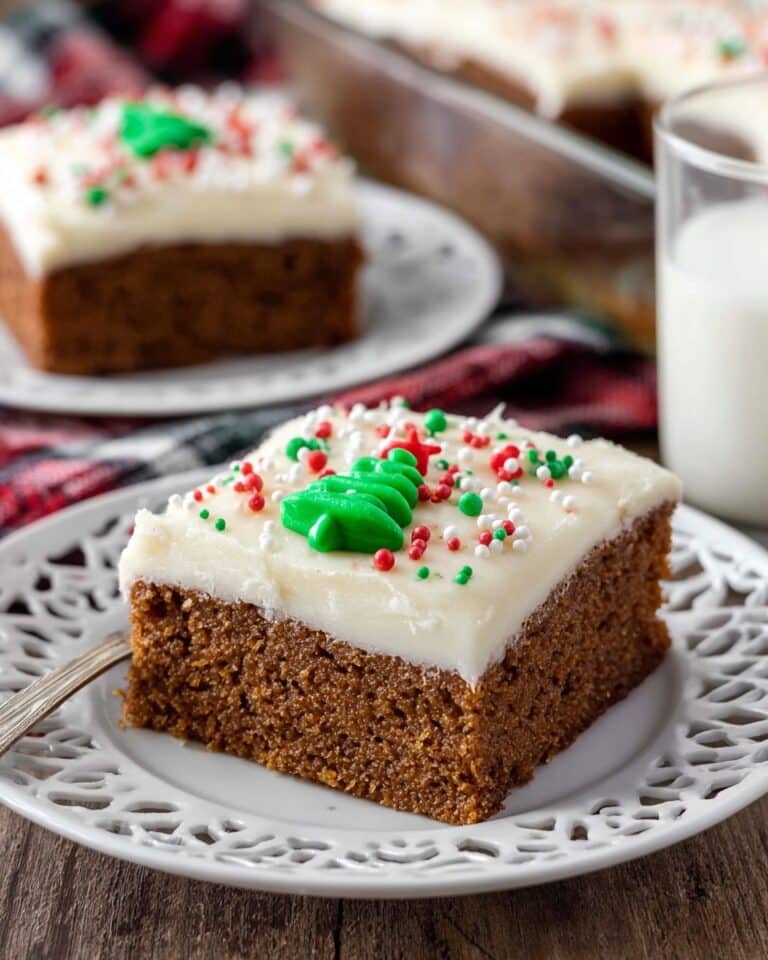
Celebrate the holidays with these delightful gluten-free Christmas tree cookies. Soft, chocolaty, and decorated with creamy buttercream, they make a festive treat the whole family will enjoy. Easy to customize and perfect for gift-giving or holiday parties.

Ingredients
- 1 16 oz box gluten-free chocolate chip cookie mix* (mixed according to package) OR homemade gluten-free cookie cake dough (see below)
- 2 cups gluten-free flour (such as Bob’s Red Mill Gluten-Free 1:1 Baking Flour)
- 1/2 cup unsalted butter, softened
- 3/4 cup packed brown sugar
- 1/2 cup sugar
- 2 teaspoons vanilla extract
- 1 teaspoon baking soda
- 1 teaspoon cornstarch
- 1 large egg + 1 egg yolk
- 1/4 teaspoon salt
- 1 1/2 cups chocolate chips
- 1 cup (2 sticks) salted butter, softened (for buttercream)
- 4 1/2 cups confectioners’ sugar (powdered sugar)
- 2 teaspoons clear vanilla extract (for whiter frosting) or regular vanilla extract
- 2–4 tablespoons whole milk or heavy cream
Instructions
- Step 1: Preheat your oven to 350°F. Grease a circle baking dish or 9-inch cake pan well.
- Step 2: If using homemade dough, stir together the gluten-free flour, baking soda, cornstarch, and salt in a bowl. In a large bowl, beat the softened unsalted butter with brown sugar and sugar until light and fluffy, about 3 to 5 minutes. Add the eggs and vanilla, mixing until smooth.
- Step 3: Gradually add the flour mixture to the butter mixture, stirring just until combined. Fold in the chocolate chips.
- Step 4: Spread the cookie dough evenly into the prepared pan. If using a box mix, prepare the dough according to package instructions and spread similarly.
- Step 5: Bake until golden and the cookie springs back when lightly pressed, about 20 to 25 minutes. Let the cookie cake cool completely in the pan.
- Step 6: Once cooled, use a sharp knife to cut the cookie cake into eight equal wedges, like slicing a pizza.
- Step 7: To make the buttercream, beat the softened salted butter in a stand mixer on medium speed until creamy. Add the vanilla extract and mix well.
- Step 8: Gradually add confectioners’ sugar, one cup at a time, mixing on low to avoid sugar dust. Scrape the bowl sides as needed.
- Step 9: Check the consistency—if too thick, add milk or cream one tablespoon at a time until spreadable; if too thin, add more sugar. Add food coloring gel if you want festive colors.
- Step 10: Decorate each cookie wedge by piping rows of buttercream with a tipless piping bag, swiping each row down with a small spatula or popsicle stick until the wedge resembles a Christmas tree.
- Step 11: Add sprinkles, edible glitter, and top each tree with a small star-shaped decoration for a festive finish.
Tips & Variations
- Use clear vanilla extract in the frosting for a bright white buttercream perfect for coloring.
- Try adding chopped nuts like pecans or walnuts to the cookie dough for extra texture.
- If you don’t have a tipless piping bag, use a small spatula to spread the buttercream in tree shape.
- For a dairy-free version, substitute butter and milk with plant-based alternatives.
Storage
Store cookies in an airtight container at room temperature for up to 3 days or refrigerate for up to a week. If refrigerated, let cookies come to room temperature before serving for the best flavor and texture. The buttercream frosting may firm up in the fridge; soften slightly before decorating.
How to Serve
Serve this delicious recipe with your favorite sides.
FAQs
Can I use a different gluten-free flour blend?
Yes, any 1:1 gluten-free baking flour that is suitable for cookies should work well. Just be sure it contains xanthan gum or a similar binder for the best texture.
Can I prepare these cookies ahead of time?
Absolutely! You can bake the cookie cake and make the buttercream a day or two in advance. Store them separately and assemble and decorate the cookies just before serving for the freshest results.
PrintThe Best Gluten Free Christmas Tree Cookies Recipe

These Gluten Free Christmas Tree Cookies are a festive and delicious holiday treat perfect for anyone following a gluten-free diet. Made from either a gluten-free chocolate chip cookie mix or a homemade gluten-free cookie cake recipe, these soft and chewy cookies are baked into a cake-style round and sliced into wedges. Each wedge is then frosted with creamy buttercream and decorated to resemble charming Christmas trees, making them perfect for holiday parties or gifting.
- Prep Time: 20 minutes
- Cook Time: 25 minutes
- Total Time: 45 minutes
- Yield: 8 cookie wedges 1x
- Category: Dessert
- Method: Baking
- Cuisine: American
- Diet: Gluten Free
Ingredients
Gluten-Free Cookie Cake
- 1 16 oz box gluten-free chocolate chip cookie mix (mixed according to package) OR
- 2 cups gluten-free flour (Bob’s Red Mill Gluten-Free 1:1 Baking Flour)
- 1/2 cup unsalted butter (softened)
- 3/4 cup brown sugar (packed)
- 1/2 cup sugar
- 2 tsp vanilla extract
- 1 tsp baking soda
- 1 tsp cornstarch
- 1 large egg + 1 egg yolk
- 1/4 tsp salt
- 1 1/2 cups chocolate chips
Buttercream Frosting
- 1 cup (2 sticks) salted butter (softened)
- 4 1/2 cups confectioners’ sugar (powdered sugar)
- 2 tsp clear vanilla extract or regular vanilla extract
- 2–4 tbsp whole milk or heavy cream
Decorations
- Sprinkles
- Sparkling gold or silver dust/glitter
- Star-shaped toppings to garnish each tree
Instructions
- Preheat and Prepare: Preheat your oven to 350°F. Grease a round baking dish or 9-inch cake pan to prevent sticking for your cookie cake.
- Mix Dry Ingredients: In a bowl, stir together the gluten-free flour, baking soda, cornstarch, and salt until evenly combined.
- Cream Butter and Sugars: Using an electric mixer, beat the softened unsalted butter, brown sugar, and sugar on medium speed until the mixture is light and fluffy, about 3 to 5 minutes. Then add the egg, egg yolk, and vanilla, mixing until smooth.
- Combine Mixtures: Gradually add the dry flour mixture to the wet butter mixture, stirring until just combined. Fold in the chocolate chips thoroughly.
- Spread Dough and Bake: Spread the cookie dough evenly into the prepared pan. Bake in the preheated oven for 20 to 25 minutes, or until the cookie cake is golden and springs back gently when pressed.
- Cool and Slice: Allow the cookie cake to cool completely. Use a sharp knife to slice into eight equal wedge-shaped pieces resembling pizza slices.
- Make Buttercream Frosting: In a stand mixer, beat the softened salted butter at medium speed until smooth and creamy. Add vanilla extract and mix well. Gradually add the confectioners’ sugar, one cup at a time, starting the mixer on low to prevent sugar cloud. Scrape down the bowl sides as needed until fully combined.
- Adjust Buttercream Consistency: Evaluate the buttercream thickness. If it’s too thick, add whole milk or heavy cream one tablespoon at a time until desired spreading consistency is achieved. If too thin, add more powdered sugar. Optionally, add food coloring gel for color.
- Decorate the Cookies: Using a tipless piping bag, pipe rows of buttercream starting at the long end of each wedge. Swipe each row down with a small spatula or popsicle stick to form an even layer. Repeat until six rows fill the wedge, creating a Christmas tree shape.
- Add Festive Decorations: Sprinkle each buttercream tree with colorful sprinkles, sparkling gold or silver edible dust or glitter, and top with a small star decoration for a festive holiday finish.
Notes
- You can use a gluten-free chocolate chip cookie mix for convenience or make the cookie cake from scratch with the homemade recipe.
- Make sure the cookie cake is completely cooled before slicing and frosting to prevent melting the buttercream.
- The buttercream consistency can be adjusted by adding milk or powdered sugar—add liquids slowly to avoid too runny frosting.
- Use clear vanilla extract if you want a whiter frosting color.
- Decorate creatively with your favorite holiday sprinkles and edible glitter for a festive look.
- Store frosted cookie wedges in an airtight container at room temperature for up to 3 days.
Keywords: Gluten Free Christmas Cookies, Holiday Cookies, Christmas Tree Cookies, Gluten Free Dessert, Festive Cookies, Holiday Baking


