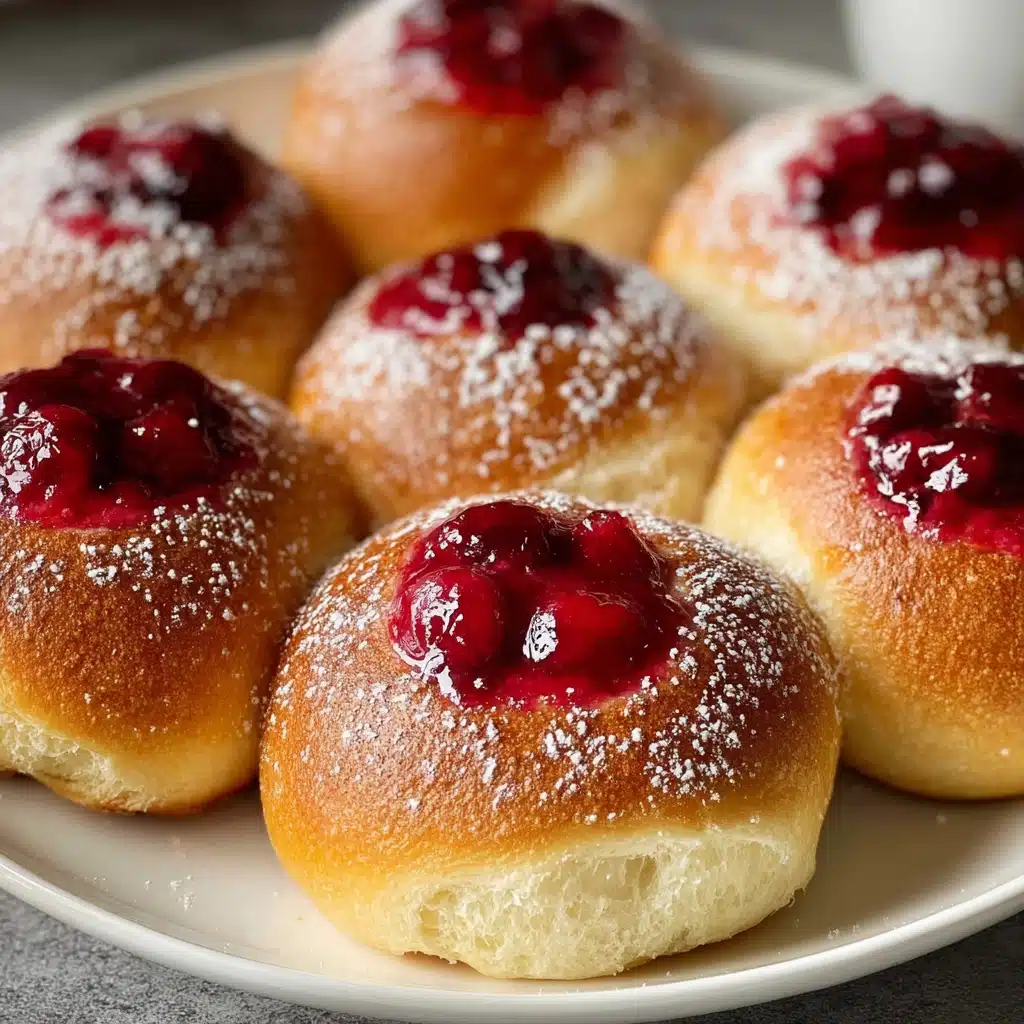
Sweet Cherry Filled Buns (Vatrushki) Recipe
If you’re craving something sweet, pillowy, and absolutely bursting with summer flavor, Sweet Cherry Filled Buns (Vatrushki) are the answer to your wishes. These golden buns hide a juicy surprise inside: a pocket of ripe, sweet cherries, all tucked under a buttery crumb topping. Whether you serve them for a leisurely breakfast, as an afternoon snack with tea, or as a centerpiece on your brunch table, Sweet Cherry Filled Buns (Vatrushki) never fail to delight. Each bite is the perfect balance of tender dough, syrupy fruit, and a rich, melt-in-your-mouth finish — a true treat worth baking from scratch.

Ingredients You’ll Need
There’s a wonderful simplicity to the ingredients in Sweet Cherry Filled Buns (Vatrushki), each one playing a crucial role in flavor, texture, or the irresistible aroma. Let yourself appreciate the alchemy as familiar staples combine to create something utterly memorable!
- Warm milk (1 cup, about 100˚F): The gentle heat of milk activates the yeast and creates a luxuriously tender crumb.
- Active dry yeast (1/2 tablespoon): This is the magic maker, ensuring your buns are light, puffy, and soft.
- Granulated sugar (4 tablespoons, divided): Sweetness for the dough, cherries, and crumb topping — it balances every layer.
- All-purpose flour (3 1/4 cups, divided, plus extra): Gives your buns their structure and softness; be sure to measure correctly for best results.
- Egg (1, room temperature): Adds richness to the dough and helps bind everything together beautifully.
- Unsalted butter (1 tablespoon, melted for dough + 4 tablespoons cold for topping): Melted butter adds moisture to the dough; cold diced butter creates irresistible crumbs on top.
- Salt (1/2 teaspoon): Enhances all the flavors and balances the sweetness.
- Egg (1, beaten for egg wash): Brushed on top, it creates that signature golden shine.
- Sweet red cherries (1 pound, pitted): Juicy, fresh cherries are the star — their flavor bursts with every bite. Use the ripest fruit you can find.
- Granulated sugar (1/4 cup for cherries; 1/2 teaspoon per bun): Just a touch, sprinkled over the fruit, draws out natural juices and creates a syrupy center.
- All-purpose flour (1/2 cup for crumb topping): Blends with butter and sugar for those buttery golden crumbles on top.
- Granulated sugar (1 tablespoon for crumb topping): Lends subtle crunch and flavor to the crumble.
How to Make Sweet Cherry Filled Buns (Vatrushki)
Step 1: Prepare the Dough
Start by combining warm milk, yeast, and a tablespoon of sugar in your mixer’s bowl. Let this mixture rest for 5–7 minutes; you’ll soon see a frothy layer form, proof that your yeast is alive and ready to work. This step is your guarantee of fluffy, airy Sweet Cherry Filled Buns (Vatrushki) from the very beginning.
Step 2: Make the Sponge
Mix in 1/2 cup of flour and another tablespoon of sugar until smooth. Cover the bowl and let it sit in a warm, cozy spot until noticeably puffed — about 20 minutes in a low oven, or up to 45 minutes at room temperature. This “sponge” gives the buns their lightness and helps develop that airy texture everyone loves.
Step 3: Mix and Knead the Dough
Add the egg, the rest of your sugar, melted butter, and salt to the sponge. Now, switch to the dough hook and gradually work in the remaining flour, a cup at a time. Mix until the dough is smooth and just a tiny bit tacky, then let your mixer knead it for 15 whole minutes. Patience pays off here, resulting in delightfully soft Sweet Cherry Filled Buns (Vatrushki).
Step 4: Let the Dough Rise
Cover your bowl tightly with plastic and let the dough rise somewhere warm until tripled in volume. This may take an hour, or up to two hours at room temperature. The anticipation only makes the first bite sweeter!
Step 5: Shape the Buns
Tip the dough onto a lightly floured surface and divide it into two equal halves, then slice each half into eight portions. Shape each piece into a smooth little ball — a perfect blank canvas for the cherry filling.
Step 6: Prepare the Pans and Make Wells
Butter your baking dish or line it with parchment, then arrange the dough balls inside, giving them a little space to rise. Press the bottom of a narrow glass into each dough ball to make a deep well. This is where the magic happens — each well will hold a pocketful of sweet cherries.
Step 7: Fill the Buns
Drop four juicy, pitted cherries into every well, and finish each with a sprinkle of sugar. Cover the buns with a clean towel and let them rise while you prepare the crumb topping — about 20–30 minutes, until they’re beautifully puffy.
Step 8: Prepare the Crumb Topping
Combine cold diced butter, sugar, and flour in a bowl. Use a pastry cutter or your fingertips to blend the mixture until it forms pea-sized crumbs. This topping will turn golden and crispy as it bakes, making Sweet Cherry Filled Buns (Vatrushki) absolutely irresistible.
Step 9: Bake to Golden Perfection
Heat your oven to 360˚F. Brush the buns with beaten egg, then shower them generously with the crumb topping. Slide the pan into the oven and bake for 20–22 minutes, until puffed, golden, and deeply fragrant. Let them cool slightly before serving so the cherry juices thicken up — if you can wait that long!
How to Serve Sweet Cherry Filled Buns (Vatrushki)
Garnishes
For an extra-special touch, dust your Sweet Cherry Filled Buns (Vatrushki) with a snowy sprinkle of powdered sugar right before serving. If you’re feeling fancy, a sprig of fresh mint or a drizzle of vanilla glaze adds a café-worthy flourish.
Side Dishes
These buns are begging to be paired with something smooth and creamy like a dollop of crème fraîche, Greek yogurt, or ricotta. Serve them alongside fresh fruit, or make it a full brunch spread with eggs and smoked salmon for contrast.
Creative Ways to Present
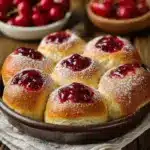
Turn Sweet Cherry Filled Buns (Vatrushki) into the star of a pastry platter by arranging them in a ring for sharing. Or go picnic-style: wrap cooled buns individually in parchment and tie with baker’s twine for a whimsical, grab-and-go treat that’s as fun to give as it is to eat.
Make Ahead and Storage
Storing Leftovers
Sweet Cherry Filled Buns (Vatrushki) are best fresh, but they’ll stay delicious for up to two days at room temperature. Just store them in an airtight container, lined with paper towel to keep the crumb topping crisp. They make a wonderful breakfast treat the next day!
Freezing
If you want to savor that cherry-bun magic longer, freeze leftovers once cooled completely. Wrap each bun individually in plastic wrap, then pop them in a resealable freezer bag. They’ll keep beautifully for up to a month, and you can pull one out anytime you crave a taste of summer.
Reheating
To revive the just-baked magic, warm buns in a 300˚F oven for 8–10 minutes straight from the fridge, or add a couple extra minutes if reheating from frozen. This brings the crumb back to life and ensures the cherries are lusciously warm again.
FAQs
Can I use frozen cherries for Sweet Cherry Filled Buns (Vatrushki)?
Yes! If fresh cherries aren’t in season, frozen ones are a great substitute. Thaw and drain them well so your filling isn’t too juicy, and your buns will still taste fantastic.
Do I need a stand mixer to make this dough?
While a stand mixer makes things easier, you can mix and knead by hand. It will take a bit more elbow grease, but many home bakers swear by the tender texture it gives. Just knead until your dough is perfectly smooth.
Can I make mini Sweet Cherry Filled Buns (Vatrushki)?
Absolutely! Simply divide the dough into smaller pieces and reduce the number of cherries per bun. Adjust the baking time as needed (they’ll bake a bit faster), and you’ll have adorable, bite-sized treats.
How can I make these dairy-free?
Use your favorite plant-based milk and swap in vegan butter for the dough and crumb topping. The result is still tender and delicious, and you won’t miss any of the classic flavor.
Why didn’t my buns rise enough?
If your Sweet Cherry Filled Buns (Vatrushki) didn’t get as fluffy as hoped, it’s usually a yeast issue. Make sure your milk isn’t too hot or cold, and always check that your yeast is fresh before starting. Giving the dough enough time in a warm place makes all the difference, too!
Final Thoughts
Baking a batch of Sweet Cherry Filled Buns (Vatrushki) brings simple joy and old-world charm to your kitchen. Whether you’re enjoying them with family or gifting them to friends, these beautiful buns are a celebration of sweetness and tradition. Don’t be surprised if they disappear faster than you can make them — and don’t wait to fall in love with every bite!
PrintSweet Cherry Filled Buns (Vatrushki) Recipe
These Sweet Cherry Filled Buns, also known as Vatrushki, are a delightful treat perfect for breakfast or as a snack. Soft and fluffy yeast buns are filled with sweet red cherries and topped with a buttery crumb topping, creating a delicious combination of flavors and textures.
- Prep Time: 30 minutes
- Cook Time: 20-22 minutes
- Total Time: Approx. 3 hours
- Yield: 16 buns 1x
- Category: Bread, Breakfast, Snack
- Method: Baking
- Cuisine: Russian
- Diet: Vegetarian
Ingredients
For the Yeast Buns:
- 1 cup warm milk (about 100˚F)
- 1/2 tablespoon active dry yeast
- 4 tablespoons granulated sugar, divided
- 3 1/4 cups all-purpose flour, divided (plus extra for dusting)
- 1 egg, at room temperature
- 1 tablespoon unsalted butter, melted
- 1/2 teaspoon salt
- 1 egg, beaten (for egg wash)
For the Cherry Filling:
- 1 pound sweet red cherries, pitted
- 1/4 cup granulated sugar (1/2 teaspoon for each bun)
For the Crumb Topping:
- 4 tablespoons unsalted butter, cold and diced
- 1 tablespoon granulated sugar
- 1/2 cup all-purpose flour
Instructions
- Prepare the Dough: In the bowl of an electric mixer, combine warm milk, yeast, and 1 tablespoon of sugar. Let sit for 5–7 minutes until frothy.
- Stir in 1/2 cup flour and another tablespoon of sugar. Mix until smooth, then let rise in a warm place (100˚F oven for 20 minutes or at room temperature for 30–45 minutes).
- Add the egg, remaining sugar, melted butter, and salt. Mix to combine.
- Attach the dough hook to your mixer and gradually add the remaining 2 3/4 cups of flour, 1 cup at a time. Mix on low speed until the dough is smooth and no longer sticky. Continue kneading with the mixer for 15 minutes.
- Cover the bowl with plastic wrap and let the dough rise in a warm place for 1 hour, or at room temperature for 2 hours, until it triples in volume.
- Shape the Buns: Transfer the dough to a lightly floured surface. Divide it into two halves, then divide each half into 8 pieces, making 16 pieces in total. Shape each piece into a ball.
- Butter a baking dish (two round cake pans or one 9×13-inch rimmed pan). Arrange the dough balls evenly in the dish, leaving space between them.
- Use the bottom of a narrow glass or a small ramekin to press into the center of each dough ball, creating a well.
- Assemble the Filling: Place 4 pitted cherries into each well and sprinkle with 1/2 teaspoon of sugar. Cover the dish with a cloth and let the buns rise in a warm place for 20 minutes (or 30–45 minutes at room temperature) until puffy.
- Prepare the Crumb Topping: Combine cold butter, sugar, and flour in a bowl. Use a pastry cutter or your fingers to blend until small crumbs form.
- Bake the Buns: Preheat your oven to 360˚F. Brush the tops of the buns with the beaten egg wash. Generously sprinkle the crumb topping over each bun.
- Bake for 20–22 minutes, or until the tops are golden brown.
Nutrition
- Serving Size: 1 bun
- Calories: 220 kcal
- Sugar: 10g
- Sodium: 150mg
- Fat: 7g
- Saturated Fat: 4g
- Unsaturated Fat: 2g
- Trans Fat: 0g
- Carbohydrates: 35g
- Fiber: 2g
- Protein: 5g
- Cholesterol: 35mg
Keywords: Sweet Cherry Filled Buns, Vatrushki, Cherry Buns, Yeast Buns, Russian Recipe
