Strawberry Cannoli Cones Recipe
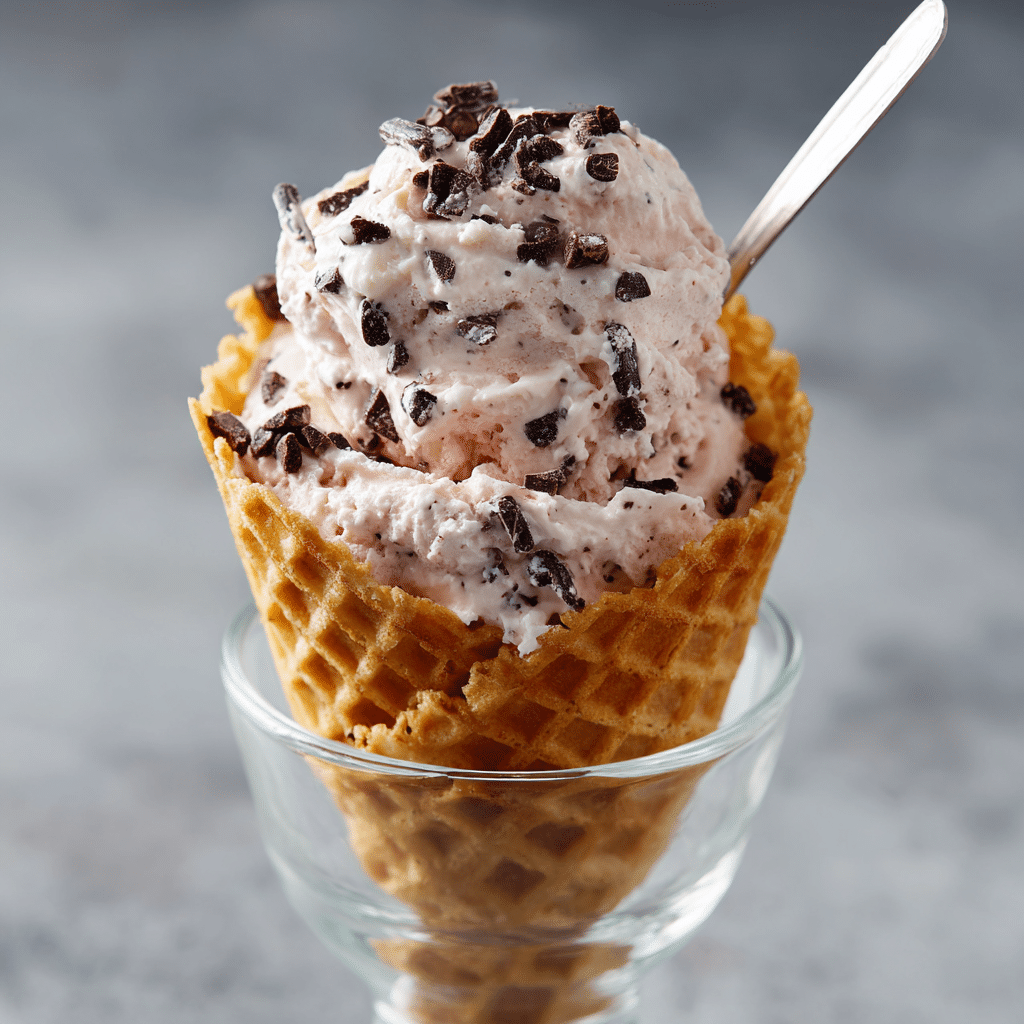
If you’re craving a show-stopping dessert that’s as fun to eat as it is to look at, these Strawberry Cannoli Cones are here to steal the spotlight! Picture luscious, creamy filling kissed with fresh strawberry puree, elegantly piped into crisp waffle cones, and finished with a sprinkle of mini chocolate chips. Bursting with color, flavor, and just the right amount of nostalgia, Strawberry Cannoli Cones take all the best parts of a classic cannoli and give them a playful (and portable!) twist, perfect for parties or any sweet occasion.
Ingredients You’ll Need
The beauty of Strawberry Cannoli Cones is in their straightforward ingredients—each one plays a key role in creating that creamy, tangy, and sweet balance we love. Here’s what you’ll need, and why!
- Frozen strawberries: Frozen berries work beautifully for a bright, flavorful strawberry puree that infuses the filling with springtime freshness.
- Powdered sugar: Divided in the recipe to sweeten both the berry puree and the creamy cheese filling—plus it mixes in smoothly with zero grittiness!
- Cream cheese (softened): Adds irresistible richness and a velvety smooth texture to the filling.
- Vanilla extract: Just a splash goes a long way to round out the flavors and complement the strawberries.
- Ricotta cheese (drained): The star of any cannoli filling, ricotta brings lightness and that classic cannoli tang. Draining it keeps your filling fluffy, not runny!
- Waffle cones: These crunchy cones are a fun, easy stand-in for cannoli shells—plus, you get to eat the whole thing, no mess or waste!
- Mini chocolate chips (optional): For that iconic cannoli touch and a little extra chocolatey magic in every bite.
How to Make Strawberry Cannoli Cones
Step 1: Cook and Sweeten the Strawberries
Begin by adding your frozen strawberries and three tablespoons of powdered sugar to a medium saucepan set over medium-low heat. Stir them often as they warm and soften, soaking up that sweetness and becoming beautifully saucy in about five minutes.
Step 2: Puree the Strawberries
Once softened, remove the pan from the heat and transfer the strawberries and syrupy juices into a bowl. Use an immersion blender to puree everything until completely smooth, intensifying the berry flavor and ensuring a silky filling later.
Step 3: Chill the Puree
Pop the bowl of strawberry puree into the freezer for about 10 minutes, just to cool it down. This quick chill helps keep your ricotta mixture the perfect texture when everything comes together.
Step 4: Beat the Cream Cheese
While the strawberries cool, grab a large mixing bowl and beat your softened cream cheese with a hand mixer on high for 30 to 45 seconds. You want it nice and smooth, with no lumps—this will keep your filling luxurious!
Step 5: Add Vanilla
Splash in your vanilla extract and beat just until it’s blended evenly into the cream cheese. Even a little vanilla brings big flavor and ties the filling together.
Step 6: Mix in Ricotta and Powdered Sugar
Add the drained ricotta and remaining 1 ¼ cups of powdered sugar to the bowl. Beat on medium speed for about a minute, until everything is creamy and uniform. If your strawberry puree isn’t fully cooled yet, tuck this mixture into the fridge while you wait for the next step.
Step 7: Combine with Strawberry Puree
Once your strawberry puree is nice and cool, pour it into the ricotta mixture. Beat again on medium speed until it’s all beautifully pink and combined—the filling should be thick and enticingly creamy.
Step 8: Chill the Filling
Cover the bowl and let your filling chill in the fridge for at least 15 minutes. This time lets all the flavors meld and firms up the filling so it’ll pipe perfectly into your cones.
Step 9: Fill the Cones
When you’re ready to serve, transfer the strawberry cannoli mixture to a pastry bag fitted with a large tip—or just snip the corner off a big zip-top bag. Pipe the filling generously into each waffle cone, swirling it right to the top.
Step 10: Add the Finishing Touches
Sprinkle the tops with mini chocolate chips (if using), serve immediately, and watch your guests fall in love with these Strawberry Cannoli Cones!
How to Serve Strawberry Cannoli Cones

Garnishes
For that irresistible “dessert shop” look, don’t be shy with the chocolate chips! You can also finish your Strawberry Cannoli Cones with a dusting of extra powdered sugar, a fresh strawberry slice perched on top, or even a few colorful sprinkles for a fun twist.
Side Dishes
These cones are a dessert all on their own, but they shine even brighter alongside a light fruit salad, a scoop of lemon sorbet, or a platter of mini cookies for a playful Italian-inspired dessert spread. Pair them with espresso or chilled rosé to keep the party vibes going strong!
Creative Ways to Present
Why not set up a Strawberry Cannoli Cones bar at your next gathering? Arrange cones upright in a tall glass or mason jar, and offer bowls of toppings like chopped pistachios, rainbow sprinkles, or white chocolate curls. Let guests customize their own masterpiece for extra interactive fun!
Make Ahead and Storage
Storing Leftovers
If you happen to have leftover filled cones (lucky you!), cover and store them in the fridge. Keep in mind that the cones may lose their crispness over time—if possible, store the filling and cones separately and only fill what you’ll eat immediately for the absolute best texture.
Freezing
The strawberry ricotta filling actually freezes quite well! Scoop it into an airtight container and freeze for up to one month. Thaw overnight in the refrigerator and give it a quick stir before piping. However, it’s best not to freeze filled cones, as the shells can become soggy.
Reheating
These Strawberry Cannoli Cones are best enjoyed chilled, so there’s no need to reheat. If your chilled filling gets a little firm from the fridge, let it sit at room temperature for 10–15 minutes, then stir before piping into fresh cones.
FAQs
Can I use fresh strawberries instead of frozen?
Absolutely! If you have ripe, sweet fresh strawberries on hand, feel free to use them instead of frozen. Just chop them up and simmer with powdered sugar as directed until softened—they’ll puree beautifully for the filling.
How do I drain ricotta cheese properly?
Place your ricotta in a fine mesh strainer or cheesecloth-lined bowl, and let it sit in the fridge for several hours (or overnight) so excess liquid drips away. This step ensures your Strawberry Cannoli Cones filling stays thick and creamy instead of watery.
What can I use instead of waffle cones?
If you don’t have waffle cones, try using sugar cones for a similar crunch. For a gluten-free option, look for specialty cones at the store, or pipe the filling into small cups and serve with cookies or fresh fruit on the side!
Can I make the filling ahead of time?
Definitely. The strawberry ricotta filling can be made up to a day in advance—just store it covered in the fridge until you’re ready to pipe and serve. Wait to fill the cones so they stay wonderfully crisp.
Can I customize the filling flavors?
Yes! Try swapping in other berries, adding a hint of citrus zest, or folding in finely chopped nuts or dark chocolate for your own signature Strawberry Cannoli Cones spin.
Final Thoughts
Trying Strawberry Cannoli Cones is truly a joy, whether you’re looking to wow a party crowd or treat yourself to something special at home. They’re playful, delicious, and guaranteed to disappear fast—so don’t be surprised if these become your new favorite way to serve up a little sweetness and a lot of smiles!
PrintStrawberry Cannoli Cones Recipe
These Strawberry Cannoli Cones are a delightful twist on the classic Italian dessert. A creamy, strawberry-infused ricotta filling is piped into crispy waffle cones for a fun and delicious treat.
- Prep Time: 20 minutes
- Cook Time: 5 minutes
- Total Time: 30 minutes
- Yield: 8 servings 1x
- Category: Dessert
- Method: Mixing, Chilling
- Cuisine: Italian
- Diet: Vegetarian
Ingredients
Frozen Strawberry Puree:
- 12 ounces frozen strawberries
- 3 tablespoons powdered sugar
Ricotta Filling:
- 1 ¼ cups powdered sugar
- 8 ounces cream cheese, softened
- 1 ½ teaspoon vanilla extract
- 32 ounces ricotta cheese, drained
Additional:
- 8 waffle cones
- Mini chocolate chips (optional)
Instructions
- Cook Strawberry Puree: In a saucepan, heat frozen strawberries and 3 tablespoons of powdered sugar until softened. Puree with an immersion blender.
- Cool Puree: Chill strawberry mixture in the freezer for 10 minutes.
- Prepare Ricotta Filling: Beat cream cheese until smooth. Add vanilla, ricotta, and powdered sugar. Mix until combined.
- Combine Mixtures: Blend strawberry puree into ricotta mixture. Chill for 15 minutes.
- Fill Cones: Transfer filling to a pastry bag and pipe into waffle cones.
- Serve: Top with mini chocolate chips and enjoy!
Notes
- You can refrigerate the filled cones for a short time, but they are best enjoyed immediately.
- Feel free to customize the filling with other fruits or nuts for variety.
Nutrition
- Serving Size: 1 cone
- Calories: 320
- Sugar: 24g
- Sodium: 200mg
- Fat: 18g
- Saturated Fat: 10g
- Unsaturated Fat: 6g
- Trans Fat: 0g
- Carbohydrates: 34g
- Fiber: 1g
- Protein: 8g
- Cholesterol: 50mg
Keywords: Strawberry Cannoli Cones, Dessert Recipe, Italian Dessert, Waffle Cones, Ricotta Filling


