Sticky Date Pudding Recipe
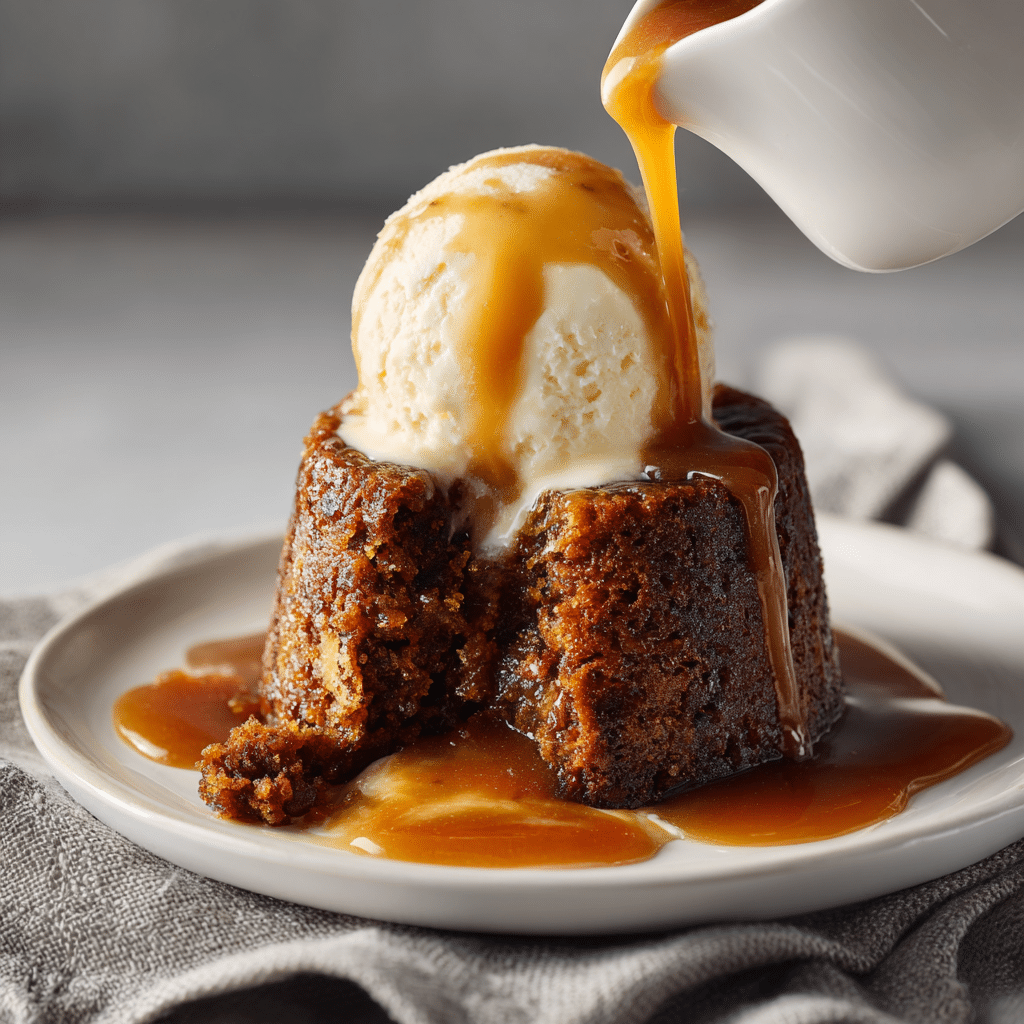
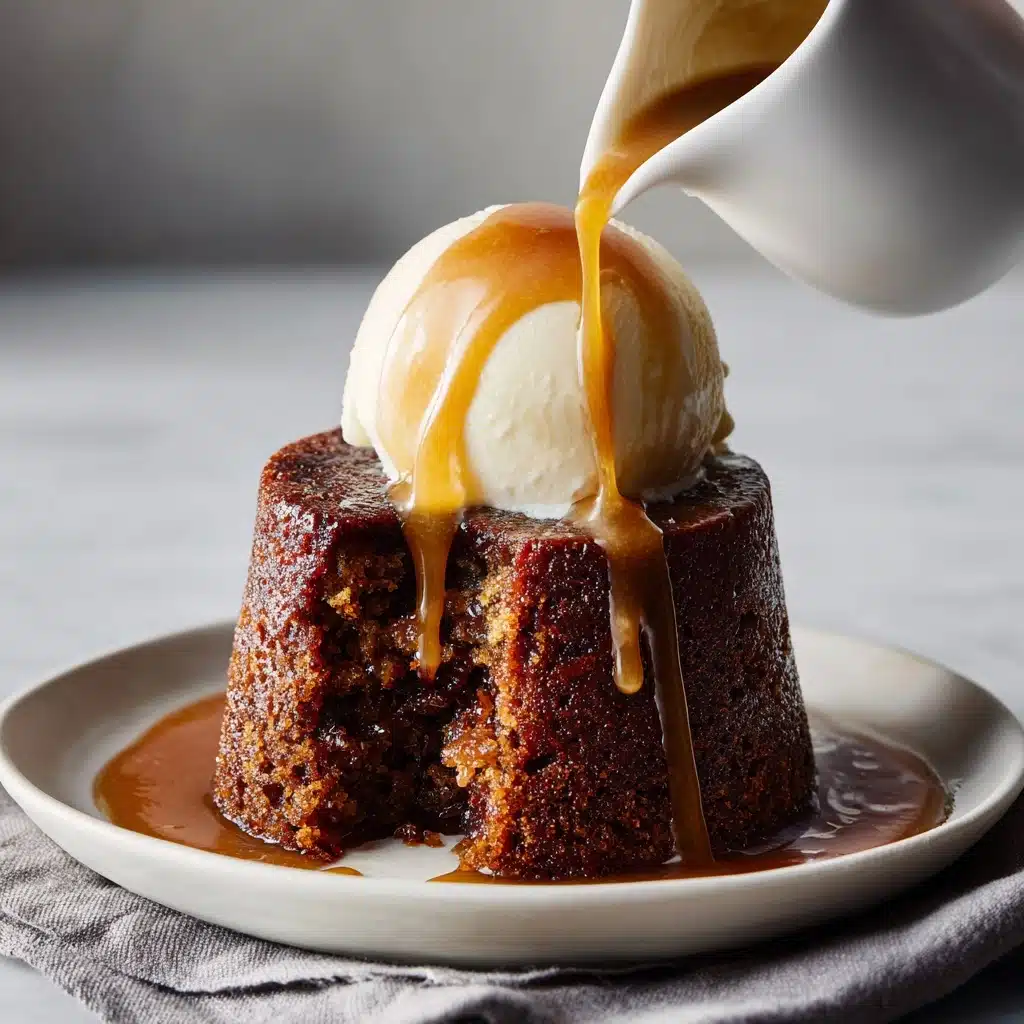
There is something so heartwarming about serving up a plate of Sticky Date Pudding—it’s pure comfort food joy! This classic dessert features moist, caramel-scented cake dotted with tender date pieces, all draped in a rich butterscotch sauce. Whether you’re sharing it with family or saving a slice for yourself, Sticky Date Pudding is a recipe that never fails to impress and is always requested for second helpings.
Ingredients You’ll Need
With just a handful of kitchen staples and a few special touches, you’ll be amazed at how easy it is to bring together the iconic Sticky Date Pudding. Each ingredient serves a wonderful purpose, helping to create the irresistible sweetness, cloud-like texture, and golden color that make this treat absolutely unforgettable.
- Pitted dates: Choose high-quality dates for the best soft texture and natural caramel flavor in every bite.
- Baking soda: Softens the dates and helps the cake rise to fluffy perfection.
- Boiling water: Plumps up the dates and infuses them with extra tenderness for a pudding with just the right texture.
- Brown sugar: Adds depth and a rich, molasses-like sweetness to both the cake and the sauce.
- Unsalted butter: Brings melt-in-your-mouth richness that balances out the sweetness—ideal for both the cake and the sauce.
- Eggs: Provide structure and help create a tender crumb throughout the pudding.
- Plain flour: The trusty backbone of your batter, binding everything together just perfectly.
- Baking powder: Lifts the cake, making sure you get that soft and spongy pudding everyone loves.
- Thickened (heavy) cream: The star of that luscious, creamy butterscotch sauce you’ll want to eat with a spoon.
- Vanilla extract: A little touch for a fragrant aroma and deep, cozy flavor.
- Ice cream or dolloping cream: For serving—this cool creamy side sends Sticky Date Pudding straight over the top!
How to Make Sticky Date Pudding
Step 1: Prepare Your Oven and Pans
Start by preheating your oven to 180°C or 350°F (160°C if using a fan-forced oven). Next, grease seven pudding moulds generously with butter, or if you’re making one large pudding, line an 8-inch (20 cm) square cake pan, leaving an overhang for easy lifting later. This step sets you up for a pudding that releases smoothly and bakes evenly every single time.
Step 2: Make the Mashed Dates
Place your chopped dates in a bowl and sprinkle the baking soda over them. Pour the boiling water right on top, and let everything stand for about 10 minutes. This little soak creates date magic, making them beautifully soft and sticky. After the wait, mash the dates thoroughly with a potato masher or fork until you get a porridge-like consistency. This mixture is the not-so-secret ingredient that gives Sticky Date Pudding its signature moistness.
Step 3: Mix the Batter
In another bowl, cream together the softened butter and brown sugar until smooth and combined; it doesn’t need to be fluffy, just mixed well. Beat in the eggs one at a time, ensuring each is fully incorporated. Next, add your flour and sprinkle the baking powder evenly across the surface. Gently mix until everything is just incorporated—over-mixing can make the cake less tender, so go easy here. Lastly, fold in your mashed dates quickly, making sure they’re evenly distributed through the batter. That’s it—the cake mixture is ready!
Step 4: Bake the Sticky Date Pudding
Pour the batter into your prepared pan or distribute it evenly among the pudding moulds, making sure not to fill them more than two-thirds of the way up. For one large pudding, bake for about 35 minutes (for individual ones, 25 minutes), until a skewer inserted into the center comes out clean. The kitchen will smell absolutely divine—expect everyone to amble in asking, “Is it ready yet?”
Step 5: Infuse with Butterscotch Sauce
While your Sticky Date Pudding is still lovely and warm, poke holes all over the surface using a skewer—about 40 holes for a big cake or around 10 for each individual pudding. Carefully pour over a generous amount of warm butterscotch sauce (about half a cup for the big cake or a tablespoon per mini pudding). Let it soak for about ten minutes, giving that sauce time to seep into every nook and cranny, amping up the gooey factor to irresistible heights.
Step 6: Make the Butterscotch Sauce
While your puddings cool slightly, prepare the butterscotch sauce by combining brown sugar, thickened cream, vanilla extract, and butter in a saucepan over medium heat. Let everything melt and come together in a beautiful simmer, stirring now and then, and allow it to bubble gently for two minutes before removing it from the heat. Keep it warm for drizzling over when serving—the best part!
Step 7: Serve and Enjoy!
Lift the pudding from the pan using the overhang, or unmould your individual puddings onto serving plates. Serve them warm, drizzled with more butterscotch sauce and topped with a scoop of vanilla ice cream or a big dollop of whipped cream. Each spoonful is pure delight—a mix of steamy, toffee-soaked cake and meltingly cold cream.
How to Serve Sticky Date Pudding
Garnishes
A final flourish can take your Sticky Date Pudding from wonderful to totally swoon-worthy. Try a sprinkle of toasted pecans or walnuts for crunch, a scattering of sea salt flakes to play up the caramel flavors, or even a dash of cinnamon or nutmeg for added warmth. A little zest from an orange is gorgeous if you want a bright twist, too!
Side Dishes
Sticky Date Pudding is rich and luscious, so simple sides work best. Vanilla ice cream or softly whipped cream are unbeatable classics, offering cool contrast to the warm, gooey cake. For a festive touch, try it with a scoop of ginger ice cream, a spoonful of mascarpone, or even some lightly macerated berries—the tartness is a perfect counterpoint to the sweetness.
Creative Ways to Present
Individual puddings look stunning when turned out onto plates and drizzled tableside with sauce. For a more rustic crowd-pleaser, serve the whole pudding in a baking dish and let everyone dig in family-style. Little mason jars or ramekins make for charming single servings, and you can even layer cubes of Sticky Date Pudding with whipped cream in parfait glasses for a fun, modern spin!
Make Ahead and Storage
Storing Leftovers
If (and that’s a big if!) you find yourself with extra Sticky Date Pudding, just wrap the cake or individual puddings tightly in plastic wrap or tuck them into an airtight container. They’ll stay moist and delicious for up to three days at room temperature, and even longer if you refrigerate them. Keep the butterscotch sauce in its own covered container in the fridge for up to a week.
Freezing
You can definitely freeze Sticky Date Pudding! Allow the cake or puddings to cool completely, then wrap well in foil and store in an airtight container; they’ll keep beautifully for up to two months. Freeze the butterscotch sauce separately in a freezer-safe jar or zip-top bag. When you’re ready to indulge, simply thaw in the fridge overnight.
Reheating
To restore that just-baked warmth and softness, reheat slices or individual puddings in a microwave for 20 to 30 seconds, or in a low oven (covered in foil to prevent drying) for about 10 minutes. Gently rewarm your butterscotch sauce on the stove or in short microwave bursts until it’s deliciously pourable. Then just assemble and serve as if it was just baked!
FAQs
Can I make Sticky Date Pudding in advance?
Absolutely! Sticky Date Pudding can be baked a day or two ahead and reheated just before serving. In fact, it often tastes even better after resting as the flavors have more time to meld. Just be sure to store sauce and cake separately until you’re ready to serve.
Can I make this recipe gluten free?
Yes, you can swap the plain flour for a good quality gluten free flour blend. The pudding should turn out just as tender and tasty—just make sure your baking powder is also gluten free.
What type of dates work best?
Medjool dates are superb for Sticky Date Pudding thanks to their plump, soft texture and intense caramel flavor. Regular dried dates work well, too; just be sure to soak and mash them thoroughly for an ultra-moist crumb.
Do I have to serve it with butterscotch sauce?
While the butterscotch sauce is iconic and amplifies the decadence, Sticky Date Pudding is still delightful on its own or with a simple vanilla custard. But honestly, don’t skip the sauce if you can—it’s worth that little extra step!
Why do I need to poke holes in the pudding?
Poking holes allows the butterscotch sauce to soak deep inside the cake, infusing every bite with gooey, toffee goodness. This technique ensures your Sticky Date Pudding is beautifully moist from top to bottom.
Final Thoughts
There you have it—your step-by-step guide to making the very best Sticky Date Pudding! This dessert truly brings people together and never fails to warm both the kitchen and the heart. Trust me, once you’ve tried it, you’ll find yourself coming back to this cozy classic again and again.
PrintSticky Date Pudding Recipe

Indulge in the rich and comforting Sticky Date Pudding, a classic dessert that is sure to satisfy your sweet tooth. This recipe combines moist dates with a luscious butterscotch sauce, creating a decadent treat perfect for any occasion.
- Prep Time: 20 minutes
- Cook Time: 35 minutes
- Total Time: 1 hour
- Yield: 7 servings 1x
- Category: Dessert
- Method: Baking
- Cuisine: International
- Diet: Vegetarian
Ingredients
Mashed Dates:
- 280g pitted dates, roughly chopped (Note 1)
- 1 tsp baking soda / bi carb soda
- 1 cup boiling water
Batter:
- 1/4 cup brown sugar, loosely packed
- 80g unsalted butter, softened
- 2 eggs, at room temperature
- 1 1/4 cups plain flour (all-purpose flour)
- 1 1/2 tsp baking powder
- 1 cup brown sugar, tightly packed
- 1 1/2 cups thickened cream (heavy cream)
- 1/2 tsp vanilla extract
- 70g unsalted butter
Instructions
- Preheat oven to 180°C/350°F (160°C fan-forced).
- Grease 7 pudding moulds with butter or grease and line a 20 cm / 8″ square cake pan with overhang.
- Mashed Dates:
Place dates in a bowl, sprinkle over baking soda. Pour over boiling water. Stand 10 minutes, then mash well until it resembles sloppy porridge. - Batter:
Place butter and sugar in a bowl. Beat until combined and smooth. Add eggs, beat until incorporated. Add flour and baking powder. Mix until flour is incorporated. Add dates, mix quickly until well incorporated into the batter. - One Pudding:
Pour into cake pan, smooth surface. Bake 35 minutes or until skewer inserted into the center comes out clean. While still hot, poke holes all over the surface using a skewer. Pour over Butterscotch Sauce, leave to soak for 10 minutes. Serve warm with remaining warm sauce and ice cream or cream. - Baking Individual Puddings:
Pour batter into pudding moulds, fill 2/3 of the way up. Bake for 25 minutes or until skewer inserted into the center comes out clean. While still hot, poke holes on the surface of the pudding. Spoon over Butterscotch Sauce per Pudding. Leave to soak 10 minutes. Serve warm with remaining warm sauce and ice cream or cream. - Butterscotch Sauce:
Place ingredients in a saucepan over medium heat. Once butter is melted, stir, then bring to a simmer. Simmer for 2 minutes, stirring once, then remove from heat. Serve warm.
Notes
- You can serve the pudding with additional caramel or butterscotch sauce for extra indulgence.
- This dessert is best enjoyed warm, so reheat individual servings in the microwave if needed.
Nutrition
- Serving Size: 1 slice
- Calories: 380 kcal
- Sugar: 38g
- Sodium: 210mg
- Fat: 18g
- Saturated Fat: 11g
- Unsaturated Fat: 6g
- Trans Fat: 0g
- Carbohydrates: 53g
- Fiber: 3g
- Protein: 4g
- Cholesterol: 110mg
Keywords: Sticky Date Pudding, Dessert Recipe, Butterscotch Sauce, Comfort Food


