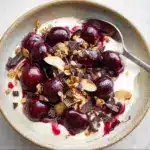
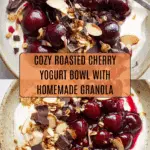
Roasted Cherry Yogurt Bowl with Granola Recipe
If you are looking for a delightfully satisfying breakfast or snack that feels both indulgent and nourishing, the Roasted Cherry Yogurt Bowl with Granola is an absolute game-changer. This vibrant bowl combines the natural sweetness of roasted cherries with the creamy richness of Greek yogurt and the satisfying crunch of homemade cinnamon-spiced granola. Each bite bursts with layers of flavor and texture that make starting your day feel like a special occasion. Trust me, once you try this, it will quickly become one of your go-to wholesome treats.

Ingredients You’ll Need
The beauty of the Roasted Cherry Yogurt Bowl with Granola lies in its simple, wholesome ingredients – each one playing a crucial part in building the perfect balance of taste, texture, and color. From the toasted almonds that add a satisfying crunch to the juicy cherries bursting with flavor, every element shines.
- Rolled oats: The heart of the granola providing wholesome fiber and a chewy base texture.
- Ground cinnamon: Adds warming spice that enhances the sweetness gently.
- Kosher salt: A pinch to balance flavors and deepen the overall taste.
- Maple syrup: Natural sweetness that caramelizes perfectly in both granola and cherries.
- Melted coconut oil: Helps the granola crisp up with a subtle tropical note.
- Vanilla extract: Infuses the granola with fragrant warmth.
- Sliced almonds: Offer a nutty crunch and nutritional boost.
- Unsweetened shredded or flaked coconut: Adds a lovely texture and enhances the tropical vibe.
- Pitted cherries (fresh or defrosted frozen): The star ingredient offering juicy sweetness and gorgeous color.
- Water: Helps soften the cherries as they roast and release their juices.
- Almond extract or amaretto: A hint of almond flavor that elevates the cherries beautifully.
- Plain Greek yogurt: Creamy and tangy, the perfect canvas for toppings.
- Chopped dark chocolate (optional): Adds a touch of indulgence and a hint of bittersweet contrast.
How to Make Roasted Cherry Yogurt Bowl with Granola
Step 1: Prepare the Granola
Begin by preheating your oven to 350°F and lining a baking sheet with parchment paper to prevent sticking. In a large bowl, whisk together the melted coconut oil, maple syrup, and vanilla extract until smooth and fragrant. Next, stir in the rolled oats, ground cinnamon, and kosher salt, ensuring everything is evenly coated in that luscious syrup mixture. Spread the oats mixture in a single layer on the baking sheet and bake for 10 minutes. Once done, toss the granola, mix in sliced almonds, then bake for another 5 minutes. Finally, add the shredded coconut and bake for 4–5 more minutes until golden and toasted; keep an eye out to avoid burning. Let the granola cool completely to crisp up nicely before storing.
Step 2: Roast the Cherries
While the granola is baking, increase your oven heat to 425°F and lightly grease a pie plate or small baking dish with cooking spray. Toss the pitted cherries with maple syrup and a pinch of salt, coating them thoroughly. Spread the cherries in the baking dish and roast for about 10 minutes. Remove them, add 1–2 tablespoons of water, stir gently, and roast for another 5 minutes until the cherries soften and release their juices. The roasting deepens the cherries’ natural sweetness and intensifies their luscious flavor. Remove the cherries from the oven, stir in almond extract or amaretto for an elegant note, and set aside to cool.
Step 3: Assemble Your Yogurt Bowl
In a medium bowl, gently stir plain Greek yogurt with a tablespoon of maple syrup to balance the tartness with some smooth sweetness. Divide the maple-kissed yogurt into serving bowls and generously top each with the warm roasted cherries and their syrupy juices. Sprinkle a generous handful of your homemade granola over the top to add that addictive crunch. For an extra touch of decadence, scatter some chopped dark chocolate if you like, which melts slightly against the warm fruit for a dreamy finish. Your Roasted Cherry Yogurt Bowl with Granola is now ready to enjoy!
How to Serve Roasted Cherry Yogurt Bowl with Granola

Garnishes
Fresh mint leaves add a refreshing green pop and subtle herbal aroma that complements the roasted cherries beautifully. A light dusting of cinnamon or a drizzle of extra maple syrup can enhance the flavors if you have a sweet tooth. Toasted coconut flakes or additional sliced almonds also make perfect finishing touches to add more texture and visual appeal. These little extras make your bowl feel even more special and inviting.
Side Dishes
This bowl stands majestically on its own but pairs wonderfully with a tall glass of freshly squeezed orange juice or a hot cup of chai tea. For a more substantial brunch, you might enjoy it alongside a warm slice of whole-grain toast smeared with almond butter or a simple egg dish for added protein. The bowl’s bright flavors and textures balance so well against savory sides, creating a harmonious meal.
Creative Ways to Present
If you’re serving this dish at a brunch or gathering, consider layering the yogurt, roasted cherries, and granola in clear glass jars or parfait glasses for a visually stunning presentation. You could also offer individual bowls with mini jars of extra granola and syrup on the side so everyone can customize their bowl just how they like it. No matter how you present it, this dish always dazzles in both flavor and appearance.
Make Ahead and Storage
Storing Leftovers
You can prepare the granola and roasted cherries ahead of time and store them separately in airtight containers. Granola will stay crisp for up to two weeks at room temperature, while roasted cherries keep best refrigerated for 3 to 5 days. Store yogurt separately and assemble just before eating to keep the granola crunchy and fresh.
Freezing
While granola should not be frozen as it may lose its crisp texture, roasted cherries freeze beautifully. Freeze cherries in airtight freezer-safe containers or bags for up to 3 months and thaw in the refrigerator overnight when ready to use. This means you can enjoy the magic of your Roasted Cherry Yogurt Bowl with Granola all year round even when cherries aren’t in season.
Reheating
If you want warm roasted cherries, gently reheat them in a saucepan over low heat or in the microwave for 30 seconds to one minute. Avoid overheating to keep them from becoming mushy. The granola is best enjoyed at room temperature or chilled, so serve it fresh alongside reheated fruit for contrast in textures and temperatures.
FAQs
Can I use frozen cherries for this recipe?
Absolutely! Frozen cherries work great as long as you defrost them beforehand. Roasting defrosted cherries helps concentrate their natural sweetness and juices for that perfect topping.
Is it possible to make the granola gluten-free?
Yes! Simply use certified gluten-free rolled oats, and ensure your other ingredients meet gluten-free standards. This recipe is naturally adaptable to gluten-free diets.
Can I substitute the Greek yogurt for a non-dairy alternative?
You can swap in unsweetened coconut or almond yogurt, but keep in mind the flavor and creaminess will differ slightly. Choose a thick-style non-dairy yogurt for the best texture.
How long does homemade granola stay fresh?
When stored in an airtight container at room temperature, homemade granola stays fresh and crunchy for up to two weeks. It’s best to enjoy it within this timeframe for optimal taste.
Can I add other fruits besides cherries?
Definitely! Roasted berries, sliced stone fruits, or even apples can work beautifully in this bowl. Just adjust roasting times depending on the fruit’s juiciness and firmness.
Final Thoughts
Creating and enjoying a Roasted Cherry Yogurt Bowl with Granola is like gifting yourself a moment of pure comfort and freshness. The harmony of warm, juicy cherries with crunchy granola and creamy yogurt is a little culinary lyric that makes everyday mornings feel extraordinary. I encourage you to try this recipe, share it with loved ones, and watch how effortlessly it becomes a cherished staple in your kitchen.
PrintRoasted Cherry Yogurt Bowl with Granola Recipe
This Roasted Cherry Yogurt Bowl with Granola is a wholesome and delicious breakfast or snack option, featuring golden homemade granola, sweet roasted cherries, and creamy Greek yogurt, all enhanced with warm spices and a hint of almond or amaretto extract.
- Prep Time: 15 minutes
- Cook Time: 30 minutes
- Total Time: 45 minutes
- Yield: 4 servings 1x
- Category: Breakfast, Snack
- Method: Baking, Roasting, Mixing
- Cuisine: American
- Diet: Vegetarian
Ingredients
Granola
- 1 cup rolled oats
- 1/2 teaspoon ground cinnamon
- 1/4 teaspoon kosher salt
- 3 tablespoons maple syrup
- 1 tablespoon melted coconut oil
- 1/4 teaspoon vanilla extract
- 1/4 cup sliced almonds
- 3 tablespoons unsweetened shredded or flaked coconut
Roasted Cherries
- 2 cups pitted cherries (fresh or frozen, defrosted)
- 1 tablespoon maple syrup
- Pinch of salt
- 1–2 tablespoons water
- 1/4 teaspoon almond extract or 1 tablespoon amaretto
Yogurt Bowl
- 2 cups plain Greek yogurt
- 1 tablespoon maple syrup (more for sweeter yogurt)
- Chopped dark chocolate (optional)
Instructions
- Prepare the Granola: Preheat the oven to 350°F (175°C) and line a baking sheet with parchment paper. In a large bowl, whisk together the melted coconut oil, maple syrup, and vanilla extract. Add the rolled oats, ground cinnamon, and kosher salt, stirring until the oats are fully coated.
- Spread the oat mixture evenly on the baking sheet in a single layer. Bake for 10 minutes, remove from the oven, toss the oats, and then add the sliced almonds. Return to the oven and bake for another 5 minutes.
- After 5 minutes, take the granola out again and stir in the shredded coconut. Bake for a final 4 to 5 minutes until the granola turns golden brown. Watch carefully to avoid burning. Let the granola cool completely before storing it in an airtight container.
- Roast the Cherries: Increase oven temperature to 425°F (220°C). Lightly spray a pie plate or baking dish with cooking spray. Combine the pitted cherries, maple syrup, and a pinch of salt in the dish, tossing to coat all the fruit.
- Roast the cherries in the oven for about 10 minutes, then remove and add 1 to 2 tablespoons of water. Toss to mix and return to the oven for an additional 5 minutes, or until the cherries soften and release their juices.
- Take the cherries out, stir in the almond extract or amaretto, and allow the mixture to cool. Store in an airtight container in the refrigerator if not using immediately.
- Assemble the Yogurt Bowl: In a medium bowl, mix the plain Greek yogurt with 1 tablespoon maple syrup, stirring well. Divide the sweetened yogurt into serving bowls, then top each with roasted cherries and their juices, a generous sprinkling of granola, and optionally, chopped dark chocolate for added richness.
Notes
- You can substitute maple syrup with honey if preferred, but maple syrup keeps the recipe vegan.
- Use fresh cherries in season or frozen cherries that are fully defrosted for best flavor.
- The granola can be stored in an airtight container at room temperature for up to 1 week.
- Adjust the amount of maple syrup in the yogurt to your desired sweetness.
- For an alcoholic twist, use amaretto extract or liquor; omit for a non-alcoholic version.
- Dark chocolate is optional but adds a nice contrast and slight bitterness to the sweet flavors.
Nutrition
- Serving Size: 1 bowl (about 1 cup yogurt with toppings)
- Calories: 350 kcal
- Sugar: 18 g
- Sodium: 120 mg
- Fat: 12 g
- Saturated Fat: 7 g
- Unsaturated Fat: 4 g
- Trans Fat: 0 g
- Carbohydrates: 45 g
- Fiber: 5 g
- Protein: 12 g
- Cholesterol: 10 mg
Keywords: roasted cherry yogurt bowl, homemade granola, roasted cherries, breakfast bowl, Greek yogurt recipe, healthy breakfast, fruit and yogurt bowl
