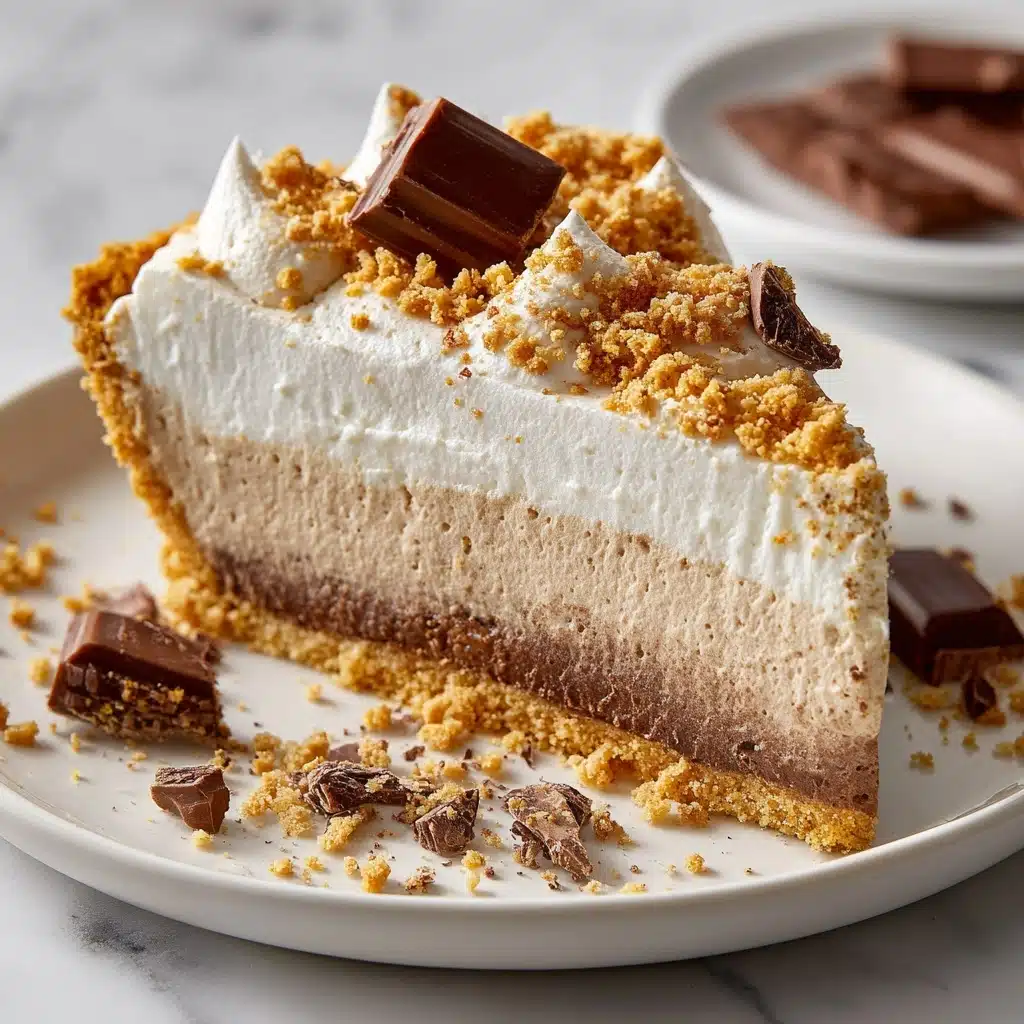
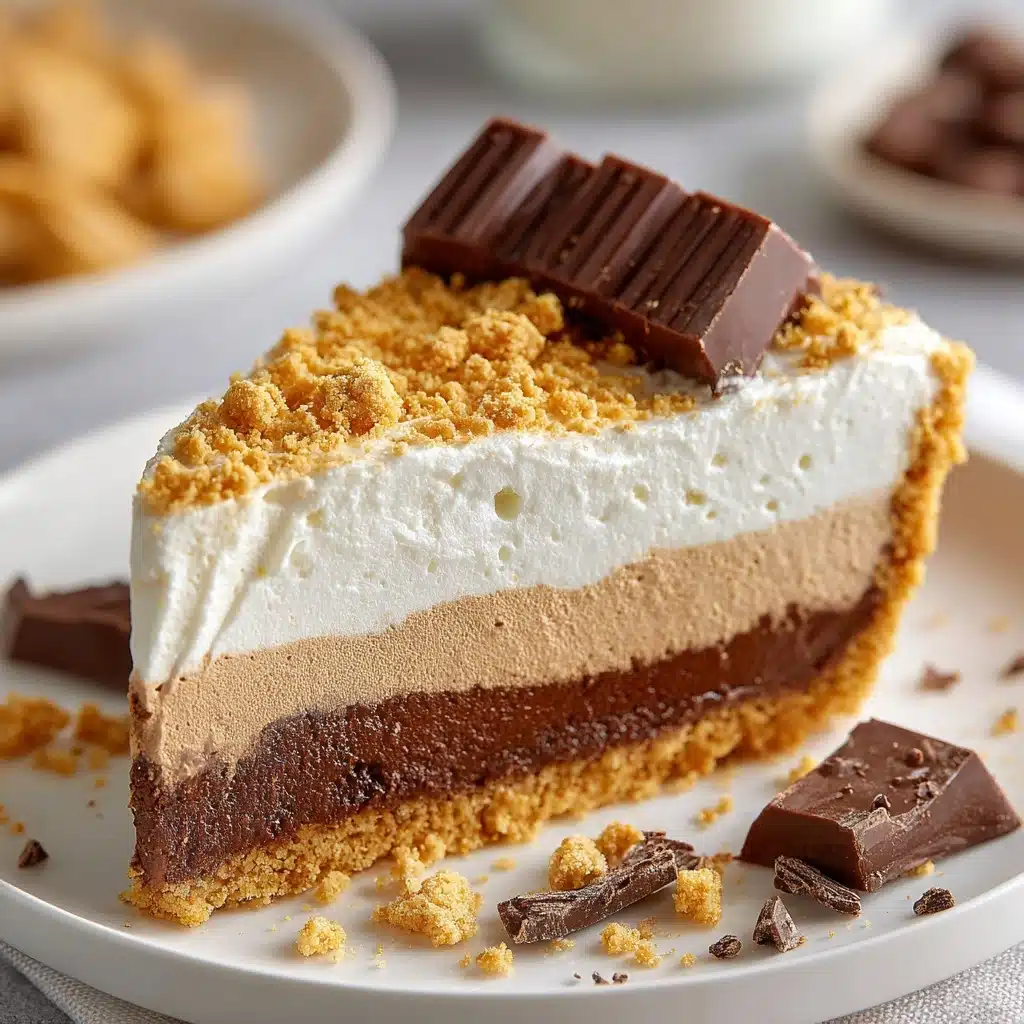
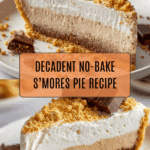
No-Bake S’Mores Pie Recipe
Meet the pie that turns every nostalgic campfire memory into an irresistibly creamy dessert — the No-Bake S’Mores Pie. This treat is the answer to those days when you crave a classic s’more but want something a little more special, a little more shareable, and a whole lot simpler. There’s no need to light a fire or heat up the oven; instead, you get rich chocolate, gooey marshmallow flavor, and a buttery graham cracker crust in every chilled, velvety bite. If you’re looking for a dessert that’s equal parts comfort and wow-factor, No-Bake S’Mores Pie has got you covered!
Ingredients You’ll Need
You’ll love how straightforward these ingredients are, and yet each one brings something essential to the table. Every component layers in a bit of that classic s’mores magic: crisp graham, luscious chocolate, sweet marshmallow, and a creamy, dreamy finish. Here’s what you need and why you’ll appreciate every element.
- Graham cracker sheets: Crushed into crumbs to form the golden, toasty base, they’re key for that authentic s’mores flavor.
- Butter (melted): Binds the crust together and adds rich, melt-in-your-mouth goodness.
- Hershey’s chocolate bars: Instantly recognizable, these melt smoothly and layer in that perfect, iconic chocolate flavor.
- Cream cheese (room temperature): Gives the filling a tangy richness and silky smooth texture.
- Marshmallow fluff: Packs in all the sweetness and gooeyness s’mores fans expect, without lighting a single marshmallow on fire.
- Pure vanilla extract: Rounds out the flavors with warmth and depth (use pure vanilla if possible—it makes a difference).
- Coconut extract: Adds a subtle hint of tropical sweetness that really elevates the creamy filling.
- Cool Whip: Makes the filling extra light and airy, blending perfectly with the marshmallow and cream cheese.
How to Make No-Bake S’Mores Pie
Step 1: Make the Graham Cracker Crust
Place those golden graham crackers in a large food processor and pulse until they become fine crumbs. Their toasted flavor sets the stage for the entire pie. Add melted butter and pulse again—this binds everything so your crust holds up beautifully when sliced, plus it infuses every bite with a little extra richness.
Step 2: Press and Chill the Crust
Pour the buttery graham mixture into a greased 9-inch springform pan. Press it firmly and evenly across the bottom to create a sturdy base. Pop it in the fridge while you prepare the filling; this helps the crust set and makes slicing so much easier later.
Step 3: Whip Up the Cream Cheese Filling
In a large bowl, grab your electric mixer and beat the cream cheese until it’s creamy and lump-free—about a minute will do the trick. Cream cheese is key to a luscious, velvety filling that holds its shape.
Step 4: Add Marshmallow Fluff and Flavorings
Next, add the marshmallow fluff, vanilla extract, and coconut extract right into the cream cheese. Beat until smooth and fully combined. This is where that unmistakable s’mores gooeyness starts to shine through.
Step 5: Fold in the Cool Whip
Add all the Cool Whip and gently fold it in with a spatula. Take your time here—folding rather than stirring keeps your filling fluffy and light, giving the pie its signature soft, cloud-like texture.
Step 6: Assemble the Layers
Spread half of the marshmallow filling evenly over your chilled crust. This creates the first creamy layer, which is all marshmallowy goodness.
Step 7: Melt the Chocolate
Place three Hershey’s chocolate bars in a microwave-safe bowl. Microwave in 30-second intervals, stirring between each session, until the chocolate is completely melted and smooth—watch closely so it doesn’t scorch.
Step 8: Blend Chocolate Layer
Pour the melted chocolate into the remaining marshmallow filling and gently stir until fully combined. This creates a dreamy chocolate-mallow layer that tastes just as decadent as it sounds.
Step 9: Layer the Chocolate Mixture
Carefully spread the chocolate-marshmallow filling right over the first marshmallow layer, being gentle to keep those layers distinct for gorgeous slices later.
Step 10: Finish with Toppings
Sprinkle extra crushed graham crackers across the top for crunch and nostalgia. Garnish with the remaining Hershey’s chocolate bar (broken into pieces) for extra wow-factor and instant recognition.
Step 11: Chill and Set
Refrigerate the No-Bake S’Mores Pie for at least four hours. Overnight is even better if you can wait—the flavors deepen and the pie slices perfectly.
Step 12: Slice and Serve
Pop open the springform pan, slice out a generous wedge, and get ready for happy applause—every bite is silky, chocolatey, marshmallow bliss.
How to Serve No-Bake S’Mores Pie
Garnishes
A drizzle of melted chocolate or a few extra sprinkles of crushed graham crackers take your No-Bake S’Mores Pie from pretty to positively irresistible. You can also add a dollop of whipped cream, a sprinkle of mini marshmallows, or a dusting of shaved chocolate for a real showstopper effect.
Side Dishes
Leave room for fun! No-Bake S’Mores Pie pairs beautifully with tangy, fresh berries or a scoop of vanilla ice cream. The contrast of creamy, cold ice cream with the silky pie is just dreamy, and berries cut the sweetness with a fresh pop.
Creative Ways to Present
Try serving each slice in little mason jars or parfait glasses for a party-perfect touch, or make individual mini No-Bake S’Mores Pies in cupcake liners for picnics and gatherings. You can even set up a DIY garnish bar and let guests finish their own slices with toppings galore!
Make Ahead and Storage
Storing Leftovers
Cover any leftover No-Bake S’Mores Pie tightly with plastic wrap or store it in an airtight container in the fridge. It will stay fresh and delicious for up to 4 days, so you can pace yourself (if you have the willpower!).
Freezing
Want to save some pie for later? No-Bake S’Mores Pie freezes surprisingly well. Wrap individual slices in plastic and slip them into a freezer-safe bag or airtight container. Thaw overnight in the fridge before serving for best flavor and texture.
Reheating
You won’t need to reheat this pie—No-Bake S’Mores Pie is designed to be served cold for ultimate creaminess! Just allow slices to sit at room temperature for about 5-10 minutes if you want them a bit softer.
FAQs
Can I use homemade whipped cream instead of Cool Whip?
Absolutely! Swap in homemade whipped cream at a 1:1 ratio. Just be sure to whip it until stiff peaks form so your No-Bake S’Mores Pie filling stays nice and fluffy.
Can I make this pie gluten-free?
Yes, just use gluten-free graham crackers to make the crust and double-check your chocolate bars to ensure they’re gluten-free as well. Everything else in the recipe is naturally gluten-free!
What if I don’t have a springform pan?
No worries. You can use a deep-dish pie plate or even make the pie in a square baking dish for bars. Lining the bottom with parchment can help with easy removal.
How far in advance can I make No-Bake S’Mores Pie?
You can make this pie up to 2 days in advance! The flavors actually meld and intensify with a little time in the fridge, making it perfect for parties or busy schedules.
Can I add anything extra to the filling?
Definitely! Stir in some mini chocolate chips, or add a swirl of peanut butter for an extra layer of flavor. The No-Bake S’Mores Pie is the perfect canvas for delicious mix-ins.
Final Thoughts
If you’re craving summer sweetness all year round, this No-Bake S’Mores Pie delivers heartwarming nostalgia and irresistible, no-fuss decadence. It’s easy enough for a weeknight treat but impressive enough for any special occasion. Give it a try and watch everyone fall in love with this playful twist on a campfire favorite!
PrintNo-Bake S’Mores Pie Recipe

Indulge in the deliciousness of a No-Bake S’Mores Pie that combines the classic flavors of graham crackers, chocolate, and marshmallows in a delightful dessert.
- Prep Time: 20 minutes
- Cook Time: 0 minutes
- Total Time: 4 hours 20 minutes
- Yield: 1 9-inch pie 1x
- Category: Dessert
- Method: No-Bake
- Cuisine: American
- Diet: Vegetarian
Ingredients
Graham Cracker Crust:
- 12 graham cracker sheets
- 6 tbsp butter, melted
Filling:
- 4 (1.55 ounce) Hershey’s chocolate bars
- 8 ounces cream cheese, at room temperature
- 14 ounces marshmallow fluff
- 1/2 tsp pure vanilla extract
- 1/4 tsp coconut extract
- 8 ounces Cool Whip
Instructions
- Prepare Graham Cracker Crust: Place graham crackers in a large food processor and pulse until fine crumbs. Add melted butter and pulse to combine. Press into a greased 9″ springform pan and refrigerate.
- Make Filling: Beat cream cheese until creamy. Add marshmallow fluff, vanilla extract, and coconut extract; beat to combine. Fold in Cool Whip.
- …
Nutrition
- Serving Size: 1 slice
- Calories: 380
- Sugar: 28g
- Sodium: 240mg
- Fat: 22g
- Saturated Fat: 14g
- Unsaturated Fat: 6g
- Trans Fat: 0g
- Carbohydrates: 42g
- Fiber: 1g
- Protein: 3g
- Cholesterol: 40mg
Keywords: S’mores pie, no-bake dessert, s’mores dessert