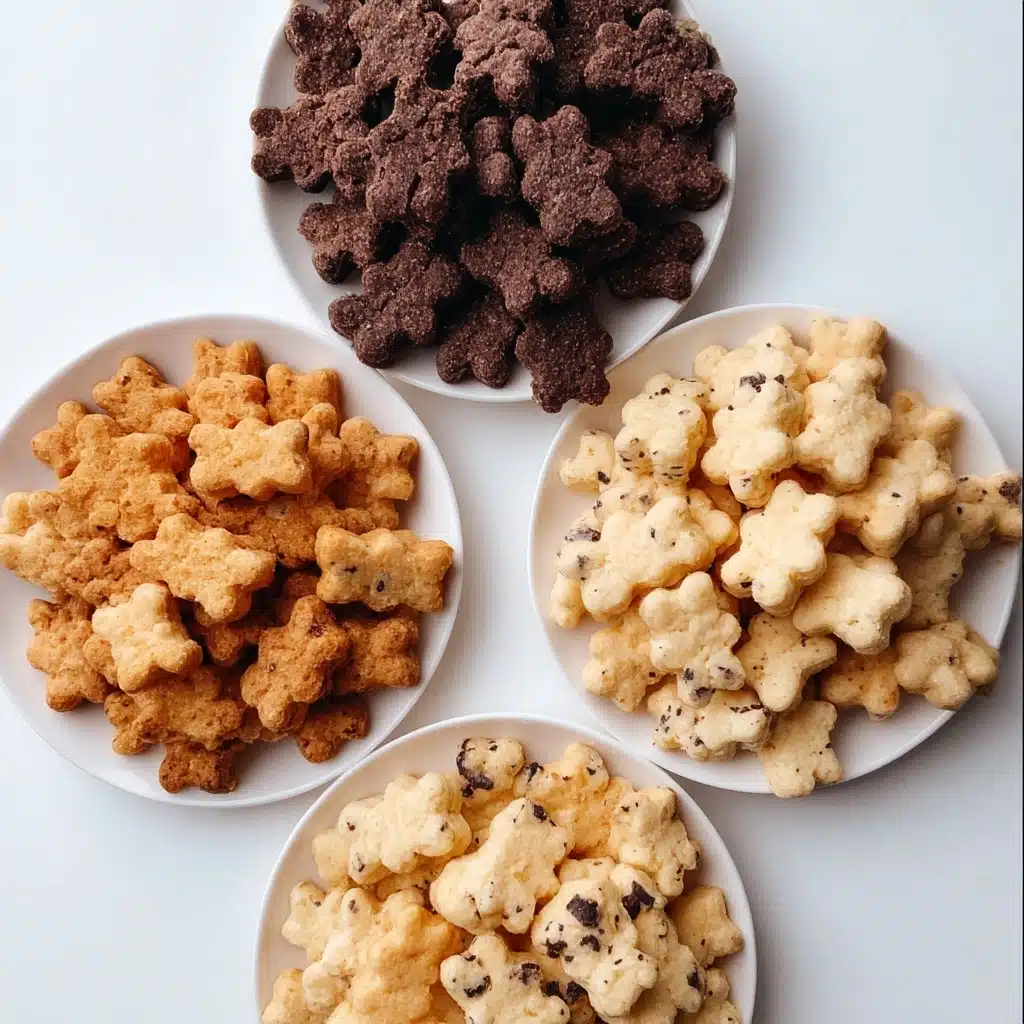
Homemade Teddy Grahams Recipe
If you’ve ever reached into a box of those adorable bear-shaped cookies and thought, “Could these get any better?” you’re in for a treat you make yourself! Homemade Teddy Grahams take the charm and crunchy sweetness of the classic snack and elevate them with the freshest flavors, allergen-friendly twists, and that warm glow you only get from baking at home. Whether you crave rich cocoa, crave-worthy chocolate chips, or cozy honey cinnamon, this recipe lets you tailor each cute bear to your personal snacking dreams. There’s just something special about a treat that’s made with love in your own kitchen.
Ingredients You’ll Need

Ingredients You’ll Need
You don’t need anything fancy to bake your own Homemade Teddy Grahams. Each ingredient here plays a specific role—delivering serious flavor, magical texture, and that signature golden-brown hue. Plus, every item keeps the cookies allergy-friendly and customizable for every taste!
- Gluten-Free Flour: Provides a light but sturdy base for the grahams; be sure to use your favorite 1-to-1 blend for best results.
- Cocoa Powder: For the cocoa version, adds deep chocolate flavor; go for a high-quality brand!
- Salt: Just a pinch enhances the sweetness and brightens all the flavors.
- Dairy-Free Butter, Softened: Gives a tender crumb and rich, buttery aroma without dairy.
- Coconut Milk: Lends moisture and subtle richness, helping bind ingredients together.
- Vanilla Extract: Adds that irresistible aroma and rounds out the sweetness.
- Cane Sugar: For sweetness and a gentle sandy crunch in every bite.
- Agave or Maple Syrup: Gives a hint of caramelly flavor—perfect in the cocoa version.
- Mini Chocolate Chips, Chopped: The chocolatey chip version gets extra delight from melty pockets of chopped chips!
- Cinnamon: Only in the honey cinnamon bears, it’s a must for those cozy, warm cookie flavors.
- Coconut Sugar: Brings a deep, brown-sugar note to the honey cinnamon batch.
- Honey (or Maple Syrup for Vegan): Infuses a floral sweetness—just like the classic graham flavor! Maple syrup is a delicious plant-based swap.
How to Make Homemade Teddy Grahams
Step 1: Cream the Butter and Sugars
Start by placing the softened dairy-free butter in the bowl of a stand mixer, or use a sturdy hand mixer and large bowl. Add your sugar (and honey or agave if the recipe calls for it), coconut milk, and vanilla extract. Mix on medium speed just until everything is creamy and smoothly blended. Don’t overmix—the goal is to combine, not to whip or aerate, so those teddy grahams bake up nice and dense, with that signature crunch.
Step 2: Blend in the Dry Ingredients
Add your gluten-free flour, a pinch of salt, and—depending on the version—cocoa powder, cinnamon, or mini chocolate chips. Gently mix until a soft, thick dough forms. Don’t worry if it looks a touch crumbly; that’s exactly what you want. If making the chocolate chip kind, fold those chips in last, making sure they’re evenly distributed for bear-shaped bites loaded with melty chocolate.
Step 3: Shape Your Bears
For the most adorable Homemade Teddy Grahams, a bear-shaped silicone mold is a game changer—simply press the dough firmly into the molds for perfect, snackable bears. If you don’t have a mold, no worries at all! Chill your dough for about 30 minutes (this makes it easier to handle), then roll it out on a lightly floured surface. Using a mini teddy bear cookie cutter, cut out your cute shapes and transfer them to a parchment-lined baking sheet.
Step 4: Bake and Cool
Preheat your oven to 325°F, then bake those beautiful bears for 12 to 15 minutes. If you’re using a mold, give them 15 minutes and let them cool in the mold for 10 before gently popping out. If you used a cutter, let them cool for 10 minutes on the baking sheet so they firm up, then finish cooling completely on a rack. As they cool, your kitchen will smell absolutely irresistible—the hardest part is waiting to taste your homemade batch!
How to Serve Homemade Teddy Grahams
Garnishes
For a truly special platter, dust your Homemade Teddy Grahams lightly with powdered sugar, cinnamon, or even a drizzle of dairy-free chocolate. They’re delightful as-is, but a little extra sparkle or drizzle turns snacktime into a celebration!
Side Dishes
These crunchy bears pair perfectly with chilled almond or oat milk for dunking, or nestle alongside a bowl of fresh fruit slices for a wholesome, fun after-school treat. For adults, Homemade Teddy Grahams are fantastic beside a hot mug of coffee or chai.
Creative Ways to Present
Pile your bears into a cute mason jar tied with twine for gifting, or arrange them on a board with fruit, nuts, and chocolate pieces for an epic snack board. They also make charming cupcake toppers or a fun, edible cake “border” for birthday parties! Let your imagination—and love of all things cute—take the lead.
Make Ahead and Storage
Storing Leftovers
Once the bears are completely cool, store them in an airtight container on your countertop. They’ll keep their crunch and flavor for about 4 to 5 days—assuming they last that long with snackers around!
Freezing
Homemade Teddy Grahams freeze beautifully. Simply pack them in a freezer-safe bag, squeezing out extra air, and freeze for up to two months. When you’re ready for a treat, let them thaw a few minutes at room temperature.
Reheating
To restore the “fresh baked” crispness, you can pop a handful of bears on a baking sheet and warm in the oven at 325°F for 3 to 5 minutes. Let cool and enjoy that oven-fresh snap!
FAQs
Can I use regular butter and flour instead of dairy-free and gluten-free?
Absolutely! If you don’t need to avoid gluten or dairy, regular all-purpose flour and unsalted butter can be substituted in equal amounts. The flavor and crunch will be just as wonderful.
Do I need a teddy bear mold to make Homemade Teddy Grahams?
No mold? No problem! A mini teddy bear-shaped cookie cutter works perfectly. If you don’t have that, you can even cut squares or other fun shapes—just keep them small for the classic snacking experience.
Can I change the flavors or mix-ins?
Definitely—with homemade baking, the sky’s the limit! Try swapping in peanut butter chips, orange zest, or even sprinkles for festive teddy grahams. Adjust spices or add extracts to suit whatever tickles your fancy.
What’s the best way to make them crisp?
Achieving that perfect crunch depends on the bake time and spreading the bears out so they cook evenly. If you like a super-snappy teddy graham, leave them in at the lower end of the bake time, cool completely, and store uncovered for a few hours before sealing them up.
Can kids help with this recipe?
Yes! Homemade Teddy Grahams are a fantastic baking project for little hands. Kids will love pressing the dough into molds or using cookie cutters—and of course, decorating (and tasting!) the finished bears.
Final Thoughts
If you’re ready to upgrade snack time with fresh, flavorful nostalgia, Homemade Teddy Grahams are the answer. Every bite is cuter and better than the last, whether you make them chocolatey, spiced, or studded with chips. Jump in, bake a batch, and share the bear-shaped joy!
PrintHomemade Teddy Grahams Recipe

Learn how to make delicious homemade Teddy Grahams in three different flavors: Cocoa, Chocolatey Chip, and Honey Cinnamon. These cute bear-shaped cookies are easy to bake and perfect for snacking.
- Prep Time: 20 minutes
- Cook Time: 15 minutes
- Total Time: 45 minutes
- Yield: About 4 dozen Teddy Grahams 1x
- Category: Snack
- Method: Baking
- Cuisine: American
- Diet: Vegetarian
Ingredients
Cocoa
- 1 cup + 2 tbsp (144g) gluten-free flour
- 1/2 cup (40g) cocoa powder
- 1/4 tsp salt
- 1/4 cup (56g) dairy-free butter, softened*
- 2 tbsp (30g) coconut milk
- 1/2 tsp vanilla extract
- 2/3 cup (140g) cane sugar
- 2 tbsp (40g) agave or maple syrup
Chocolatey Chip
- 1 1/4 cup (160g) gluten-free flour
- 1/4 tsp salt
- 1/4 cup (56g) dairy-free butter, softened
- 3 tbsp (45g) coconut milk
- 1 tsp vanilla extract
- 2/3 cup (140g) cane sugar
- 3 tbsp (30g) mini chocolate chips, chopped
Honey Cinnamon
- 1 1/4 cup + 2 tbsp (176g) gluten-free flour
- 1/4 tsp salt
- 1 tsp cinnamon
- 1/4 cup (56g) dairy-free butter, softened
- 2 tbsp (30g) coconut milk
- 1/2 tsp vanilla extract
- 1/3 cup (70g) cane sugar
- 1/4 cup (45g) coconut sugar
- 2 tbsp (40g) honey (or maple syrup for vegan)
Instructions
- For the chocolate version: In a stand mixer (or bowl with hand mixer), mix softened butter, sugar, coconut milk, vanilla, and agave on medium speed until combined (don’t over beat/whip). Add the flour, cocoa powder, and salt. Mix until just combined, it will be a pretty thick dough.
- For the chocolate chip version: In a stand mixer (or bowl with hand mixer), mix softened butter, sugar, coconut milk, and vanilla on medium speed until combined (don’t over beat/whip). Add the flour, salt, and chopped chocolate chips. Mix until just combined, it will be a pretty thick dough.
- For the honey cinnamon version: In a stand mixer (or bowl with hand mixer), mix softened butter, sugars, coconut milk, honey, and vanilla on medium speed until combined (don’t over beat/whip). Add the flour, salt, and cinnamon. Mix until just combined, it will be a pretty thick dough.
- To bake:
- If you have a teddy graham mold, press the dough into the mold. Bake 15 minutes at 325°F. Cool 10 minutes in the mold, then pop out and cool completely.
- If you don’t have a mold, chill the dough 30 minutes. Then roll out and cut with a mini bear cookie cutter. Transfer to a lined baking sheet and bake 12-15 minutes at 325°F. Cool 10 minutes on a pan, then transfer to a cooling rack.
Notes
- Store the Teddy Grahams in an airtight container for up to one week.
- You can customize the flavors by adding different spices or mix-ins to the dough.
Nutrition
- Serving Size: 5 Teddy Grahams
- Calories: 120
- Sugar: 8g
- Sodium: 70mg
- Fat: 4.5g
- Saturated Fat: 3g
- Unsaturated Fat: 1.5g
- Trans Fat: 0g
- Carbohydrates: 19g
- Fiber: 1g
- Protein: 1g
- Cholesterol: 0mg
Keywords: Teddy Grahams, Homemade, Cookies, Snack, Gluten-Free, Dairy-Free, Vegan
