Homemade Gluten-Free Pie Crust Recipe
Introduction
Making a homemade pie crust might seem intimidating, but it’s simpler than you think and much tastier than store-bought. This recipe yields a flaky, buttery crust perfect for any pie, whether sweet or savory. With just a few basic ingredients, you’ll have a reliable crust ready for your favorite fillings.
Ingredients
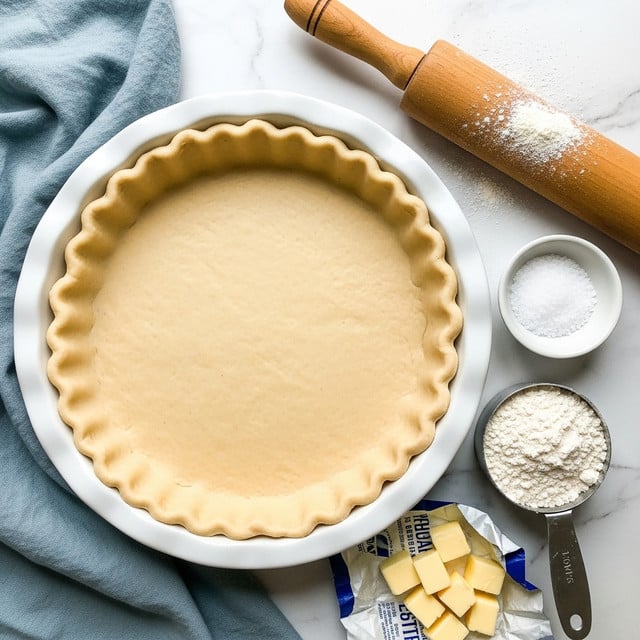
- 1 cup flour (gluten-free 1-to-1 blend)
- 6 Tbsp. butter (cold, cubed)
- ¼ cup cold water
- 1 Tbsp. sugar (optional)
- Pinch of salt (optional)
Instructions
- Step 1: Preheat your oven to 375 degrees Fahrenheit.
- Step 2: In the bowl of a large food processor, combine the flour, cold cubed butter, sugar, and salt. Pulse 20-25 times until the mixture resembles coarse crumbs.
- Step 3: Pour in the cold water and pulse again until the dough sticks together and forms a ball.
- Step 4: Shape the dough into a round disc, place it between two sheets of wax paper, and refrigerate for 20-30 minutes or overnight for best results.
- Step 5: Keeping the wax paper on, roll out the dough into an 11 to 12-inch diameter circle.
- Step 6: Remove the top sheet of wax paper and carefully flip the dough into a lightly sprayed 9-inch ceramic or glass pie dish.
- Step 7: Gently press the dough so it fits snugly into the pie plate.
- Step 8: To crimp the edges, form a “V” with your thumb and forefinger on one hand, and push the dough edge with the thumb of your other hand to create a decorative pattern.
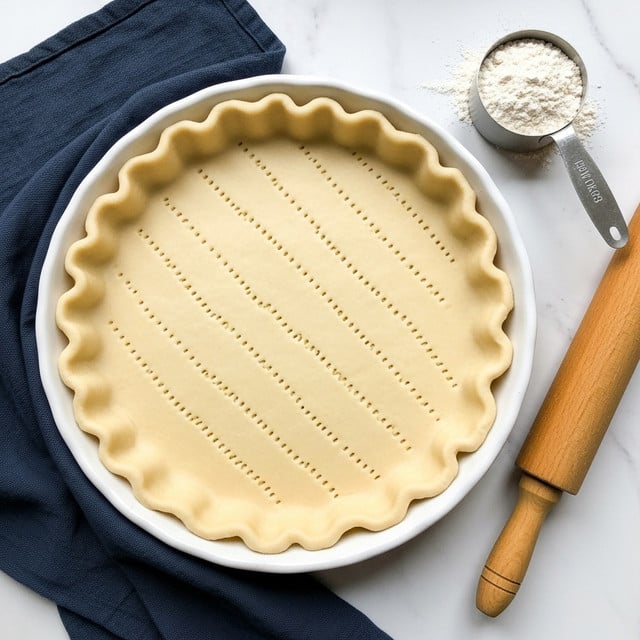
- Step 9: Use a fork to poke holes evenly in the bottom of the crust to prevent bubbling.
- Step 10: For a partially baked (blind baked) crust, bake at 375 degrees for 10-15 minutes until the bottom starts drying.
- Step 11: For a fully baked crust, cover with parchment paper or foil and fill with pie weights or dried beans. Bake at 375 degrees for 20 minutes, then remove the weights and bake an additional 15-20 minutes until golden.
- Step 12: Use your prepared crust in any baked or no-bake pie recipes.
Tips & Variations
- Keep all ingredients cold to ensure a flaky crust.
- Use gluten-free 1-to-1 flour blend to make this recipe gluten-free without altering the texture.
- Adding sugar is optional but can enhance the flavor for sweet pies.
- For an extra flaky crust, avoid over-processing the butter; small pea-sized pieces add flakiness.
Storage
Wrap leftover dough tightly in plastic wrap and refrigerate for up to 2 days. You can also freeze it for up to 3 months; thaw overnight in the fridge before rolling out. Baked pie crust can be stored at room temperature, covered loosely, for 1-2 days. Reheat gently in a low oven to crisp before filling.
How to Serve
Serve this delicious recipe with your favorite sides.
FAQs
Can I make this pie crust without a food processor?
Yes, you can use a pastry cutter or two forks to cut the cold butter into the flour until the mixture resembles coarse crumbs, then add cold water gradually to bring it together.
Can I use regular all-purpose flour instead of gluten-free?
Absolutely. This recipe works well with all-purpose flour if gluten is not a concern. The texture may be slightly different but still delicious.
PrintHomemade Gluten-Free Pie Crust Recipe

This homemade pie crust recipe delivers a flaky, buttery base perfect for any pie. Made with simple ingredients like flour, butter, and water, it can be tailored with optional sugar and salt to suit sweet or savory pies. The dough is quick to prepare using a food processor, chilled for firm texture, and can be either partially baked (blind baked) or fully baked depending on the pie filling requirements.
- Prep Time: 10 minutes
- Cook Time: 35 minutes (for fully baked crust)
- Total Time: 45-50 minutes including chilling time (minimum 20 minutes chilling; overnight recommended for best results)
- Yield: One 9-inch pie crust 1x
- Category: Dessert
- Method: Baking
- Cuisine: American
- Diet: Gluten Free
Ingredients
Pie Crust Dough
- 1 cup flour (gluten-free 1-to-1 blend)
- 6 Tbsp. cold butter, cubed
- ¼ cup cold water
- 1 Tbsp. sugar (optional)
- Pinch of salt (optional)
Instructions
- Preheat Oven: Preheat your oven to 375 degrees Fahrenheit to prepare for baking the pie crust.
- Combine Dry Ingredients and Butter: Add the flour, cubed butter, sugar (if using), and salt (if using) to the bowl of a large food processor. Pulse 20-25 times until the mixture resembles coarse crumbs. This process cuts the butter into the flour for flakiness.
- Add Water and Form Dough: Pour in the cold water and pulse again until the mixture just sticks together and forms a ball of dough, being careful not to overmix.
- Chill Dough: Shape the dough into a round disc, place between two sheets of wax paper, and refrigerate for 20-30 minutes or overnight. This firms up the dough making it easier to roll out.
- Roll Out Dough: Keep the wax paper on and roll the dough into an 11 to 12-inch circle, ensuring even thickness for uniform baking.
- Transfer to Pie Dish: Remove the top wax paper and carefully flip the dough into a lightly sprayed 9-inch ceramic or glass pie dish. Gently press to cover the bottom and sides completely.
- Crimp Edges: Form a V-shape with your thumb and pointer finger on one hand and press with the thumb of the other hand to create a decorative edge around the crust.
- Dock the Crust: Use a fork to poke holes in the bottom of the crust to prevent bubbling during baking.
- Partial (Blind) Bake Option: For pies that require a pre-baked crust, bake in the preheated oven at 375°F for 10-15 minutes, until the bottom starts to dry out.
- Full Bake Option: For a fully baked crust, place a piece of parchment paper or foil over the crust and fill with dried beans or pie weights. Bake at 375°F for 20 minutes, remove the weights, and bake for an additional 15-20 minutes until golden and fully cooked.
- Use as Desired: The crust can be used immediately in your favorite baked pies, such as pumpkin pie, or cooled and used for no-bake fillings.
Notes
- Keep all ingredients and dough cold to ensure a flaky crust.
- The sugar and salt are optional and can be adjusted depending on whether you are making a sweet or savory pie.
- Blind baking prevents soggy bottoms when using wet fillings.
- Dried beans or ceramic pie weights are reusable and perfect for blind baking.
- Chilling the dough can be done overnight to improve texture and flavor.
Keywords: homemade pie crust, gluten free pie crust, flaky pie crust, blind baking, pie dough

