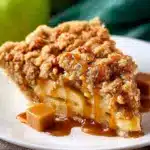
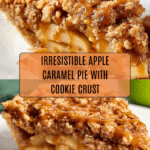
Disney’s Apple Caramel Pie Recipe
If you’ve ever wished you could bring a bit of Disney magic into your own kitchen, this recipe for Disney’s Apple Caramel Pie is your golden ticket. Imagine a tender sugar cookie crust cradling juicy spiced apples, all smothered in silky caramel and crowned with a crumbly streusel topping—every bite is pure theme park bliss! Whether you’re making it for a special occasion or just to treat yourself, Disney’s Apple Caramel Pie delivers sweet nostalgia and a mouthwatering experience you’ll want to share with everyone. Get ready to wow your family and friends with a treat that’s as enchanting as a day at the park.

Ingredients You’ll Need
One of the best things about Disney’s Apple Caramel Pie is that every ingredient plays a crucial role in creating that magical flavor and texture. From the sugar cookie dough base to the fresh apples and buttery crumble, these simple staples come together for a show-stopping dessert.
- Refrigerated sugar cookie dough (16.5 ounces): The foundation of your pie—a deliciously soft and sweet crust that’s so much easier than making pastry from scratch.
- All-purpose flour (½ cup, for the crust): Gives the dough enough structure to hold up all those luscious apples and caramel.
- Apples (2 ½ pounds, peeled, cored, and sliced thin): Honey Crisp or Granny Smith provide the perfect balance of tart and sweet, and hold their shape beautifully when baked.
- Sugar (½ cup for apples, plus ½ cup for crumble): Sweetens the apples and the crumble, highlighting the natural fruity flavors.
- All-purpose flour (⅛ cup, for apples; 1 cup, for crumble): Tossed with apples to thicken their juices, and lends that signature crumbly topping.
- Apple pie spice (1 ½ teaspoons for apples, 1 ½ teaspoons for crumble): This cozy mix of cinnamon, nutmeg, and allspice truly makes the whole kitchen smell like autumn at Disney.
- Caramel topping (1 ¼ cups): A rich, gooey drizzle that elevates the pie into pure decadence—plus extra for serving!
- Brown sugar (½ cup, packed, for crumble): Adds a molasses-like depth and chewy texture to your streusel.
- Vanilla extract (1 teaspoon): Rounds out the sweetness and enhances all those caramel apple flavors.
- Butter (½ cup): The secret to a golden, crumbly topping that melts in your mouth.
How to Make Disney’s Apple Caramel Pie
Step 1: Prep Your Pan
Preheat your oven to 350℉ and lightly spray a 10-inch springform pan (or something similar with tall sides) with nonstick spray. This ensures your pie releases beautifully and keeps every layer intact from first bite to last.
Step 2: Make the Sugar Cookie Crust
In a medium mixing bowl, combine the refrigerated sugar cookie dough with ½ cup flour. Work them together with clean hands or a sturdy spoon until you have a unified dough. This little flour boost is what helps the crust hold up under all those gorgeous apples and caramel.
Step 3: Shape the Crust
Press the dough into the bottom of your prepared pan, making sure to go up the sides about 3/4-inch. Don’t rush—thoroughly cover every inch, patching any thin spots to ensure no apple filling sneaks out during baking.
Step 4: Prepare the Apple Filling
In a large bowl, toss your thinly sliced apples with ½ cup sugar, ⅛ cup flour, and 1 ½ teaspoons apple pie spice. This coating adds flavor and helps the filling thicken as it bakes. Spread the apples evenly over your crust, then slowly pour over ¾ cup caramel topping, ensuring an even drizzle across all the fruit.
Step 5: Bake the Pie (Part 1)
Cover the pie loosely with aluminum foil (to stop the crust from getting too golden before the apples are soft), then bake for about 45 minutes. Your kitchen will start to smell like Main Street, USA!
Step 6: Make the Streusel Topping
While the pie’s baking, combine 1 cup flour, ½ cup packed brown sugar, ½ cup sugar, 1 teaspoon vanilla, and 1 ½ teaspoons apple pie spice in a mixing bowl. Cut in the ½ cup butter until the mixture forms wet, crumbly clumps. This is your magical, buttery topping.
Step 7: Add the Streusel Topping
Remove the pie from the oven, carefully lift off the foil, and sprinkle all of the crumb topping evenly over the warm apples. Every bite is about to get even better!
Step 8: Bake the Pie (Part 2)
Return the pie to the oven, uncovered, for another 15–20 minutes, or until that streusel is lightly browned and irresistibly crunchy.
Step 9: Cool, Slice, and Serve
Allow your pie to cool so the filling sets, then release the sides of the springform pan. When you’re ready to serve, slice generous pieces and drizzle with extra caramel topping for the full Disney’s Apple Caramel Pie experience.
How to Serve Disney’s Apple Caramel Pie

Garnishes
Add a scoop of vanilla ice cream or a generous swirl of whipped cream to take your Disney’s Apple Caramel Pie over the top. A handful of toasted pecans or a dusting of cinnamon can add even more magical crunch and bakery flair.
Side Dishes
Serve warm slices with mugs of spiced apple cider or steaming coffee for a comforting treat. For a Disney-inspired brunch, pair with light dishes like fresh fruit salad or simple scrambled eggs to balance the sweetness of the pie.
Creative Ways to Present
Bring the magic to your table by serving Disney’s Apple Caramel Pie in individual ramekins for personalized mini treats. Want to feel like you’re right at the park? Top each slice with a decorative Mickey-shaped chocolate or caramel candy. Little details like these make dessert time unforgettable.
Make Ahead and Storage
Storing Leftovers
Keep extra pie covered in the refrigerator for up to three days. The crust and filling maintain their wonderful texture, and you might even notice that the flavors deepen and become more caramel-y overnight.
Freezing
Disney’s Apple Caramel Pie freezes quite well! Wrap cooled, unsliced pie tightly in plastic wrap and foil, or portion individual slices in airtight containers. Store in the freezer for up to two months—thaw in the fridge overnight before serving.
Reheating
For the best experience, warm leftovers in a 300℉ oven for 10–15 minutes to rejuvenate that buttery topping and bring the caramel back to life. A quick zap in the microwave works in a pinch, but the oven helps maintain the pie’s textures.
FAQs
Can I use a different type of apple?
Absolutely! While Honey Crisp and Granny Smith are classic for their firmness and tartness, feel free to mix in Fuji, Gala, or even Pink Lady apples for your own flavor twist. Just make sure to pick apples that hold up during baking.
Do I need to use a springform pan?
It’s ideal for cleanly unmolding Disney’s Apple Caramel Pie, but if you don’t have one, use a deep-dish pie pan or square baking dish—just be gentle when serving, as you might lose some of that picture-perfect edge.
Is it possible to make this pie gluten free?
You can! Swap the sugar cookie dough and flour for your favorite gluten-free alternatives. Look for gluten-free sugar cookie dough in the refrigerated section or make your own—just keep the ratios the same for best results.
Can I make the pie in advance?
Yes, Disney’s Apple Caramel Pie is a fantastic make-ahead dessert. Bake it the night before, cool, and refrigerate. Warm it gently in the oven just before serving and finish with fresh caramel drizzle for that just-baked effect.
How do I keep the bottom crust from getting soggy?
Pre-baking the crust is not necessary with this recipe, but make sure you patch any thin spots and spread the apple mixture evenly. The added flour with the apples helps absorb excess moisture and keeps that sugar cookie base perfectly tender, not soggy.
Final Thoughts
There’s something about the gooey caramel, spiced apples, and crumbly topping that makes Disney’s Apple Caramel Pie feel like an instant celebration. Whether you serve it for a holiday, a birthday, or just a Tuesday treat, I hope you make this pie and share it with the people you love—because every slice truly brings a little Disney magic right to your table!
PrintDisney’s Apple Caramel Pie Recipe
Indulge in the deliciousness of Disney’s Apple Caramel Pie – a sweet treat perfect for any occasion!
- Prep Time: 30 minutes
- Cook Time: 1 hour 5 minutes
- Total Time: 1 hour 35 minutes
- Yield: 1 10-inch pie 1x
- Category: Dessert
- Method: Baking
- Cuisine: American
- Diet: Vegetarian
Ingredients
For the Crust:
- 16.5 ounces refrigerated sugar cookie dough (Pillsbury)
- 1/2 cup flour
For the Filling:
- 2 1/2 pounds apples (peeled, cored, and thinly sliced – Honey Crisp or Granny Smith)
- 1/2 cup sugar
- 1/8 cup flour
- 1 1/2 teaspoons apple pie spice
- 1 1/4 cups caramel topping
For the Topping:
- 1 cup flour
- 1/2 cup brown sugar (packed)
- 1/2 cup sugar
- 1 teaspoon vanilla
- 1 1/2 teaspoons apple pie spice
- 1/2 cup butter
Instructions
- Preheat Oven: Heat oven to 350℉. Grease a 10-inch springform pan.
- Prepare Crust: Mix cookie dough and flour, then press into the pan, covering the bottom and sides.
- Prepare Filling: Toss apples with sugar, flour, and apple pie spice. Spread over crust and drizzle with 3/4 cup caramel. Cover with foil and bake for 45 minutes.
- Prepare Topping: Combine flour, brown sugar, sugar, vanilla, and apple pie spice. Cut in butter until crumbly.
- Finish Pie: Remove foil from pie, sprinkle crumb mixture over it, and bake uncovered for 15-20 minutes until browned.
- Serve: Cool, remove pan sides, slice, and drizzle with more caramel before serving.
Notes
- You can use store-bought caramel topping or make your own.
- This pie is best served warm with a scoop of vanilla ice cream.
- Feel free to add chopped nuts to the topping for extra crunch.
Nutrition
- Serving Size: 1 slice
- Calories: 380
- Sugar: 32g
- Sodium: 180mg
- Fat: 15g
- Saturated Fat: 8g
- Unsaturated Fat: 6g
- Trans Fat: 0g
- Carbohydrates: 58g
- Fiber: 3g
- Protein: 2g
- Cholesterol: 25mg
Keywords: Disney, Apple Caramel Pie, Dessert, Pie, Caramel, Baking

