Christmas Tree Brownies Recipe
Introduction
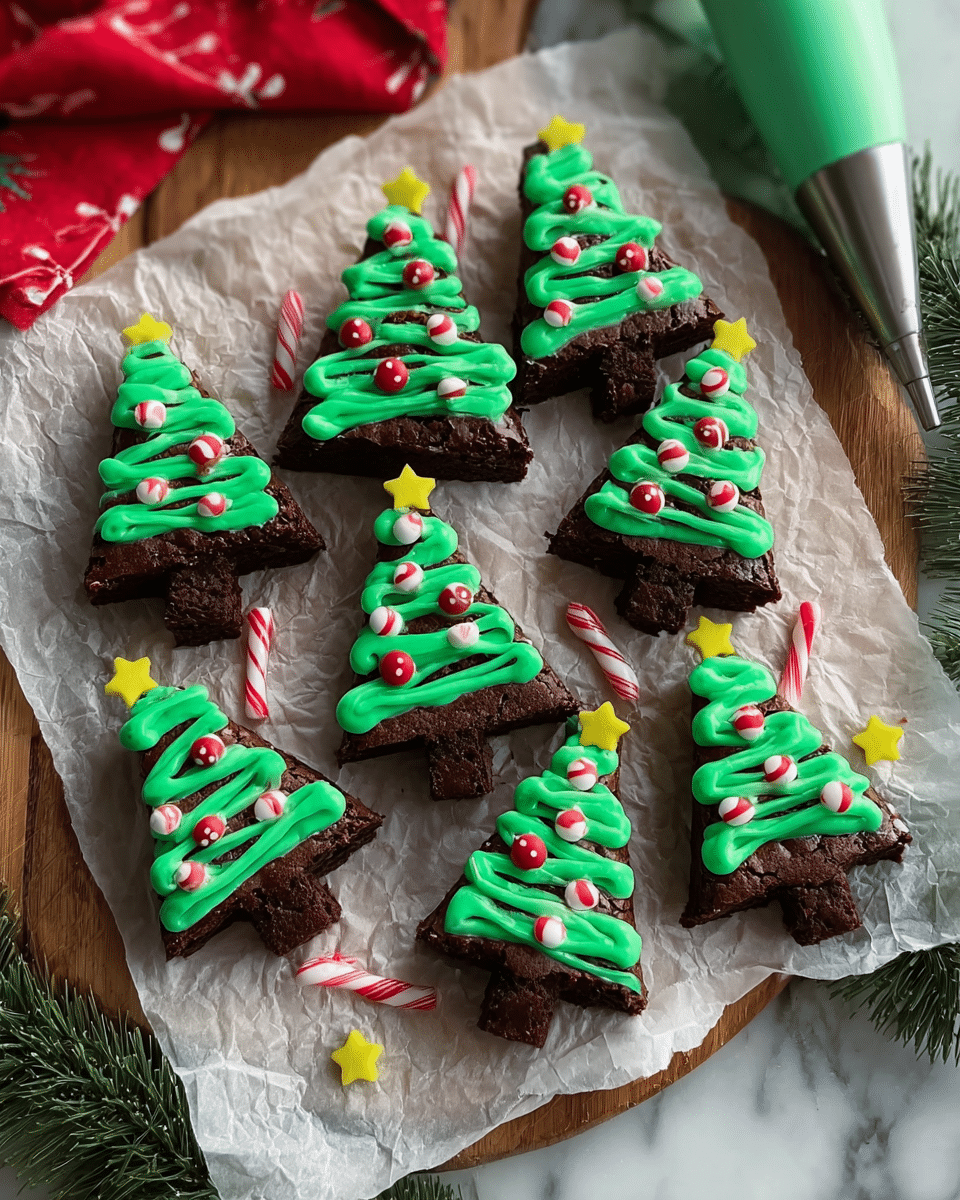
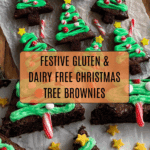
These Christmas Tree Brownies are a festive and fun twist on classic brownies, perfect for holiday gatherings. Decorated with green frosting, sprinkles, and mini candy canes, they bring both cheer and deliciousness to your dessert table.
Ingredients
- 1 batch of 9×9-inch gluten and dairy free brownies (see recipe link in the post)
- 1 cup dairy free frosting (see recipe link in the post)
- Green food coloring
- Gluten and dairy free sprinkles
- Mini candy canes
Instructions
- Step 1: Line a 9×9-inch baking pan with parchment paper.
- Step 2: Prepare the brownie batter according to your recipe instructions and pour it into the prepared pan.
- Step 3: Bake the brownies as directed. Once baked, allow them to cool completely, then lift the brownies out using the parchment paper.
- Step 4: Make two horizontal cuts across the brownie to create strips. Wipe your knife clean between cuts to keep the edges neat.
- Step 5: Make diagonal cuts along the strips to form triangle shapes that resemble Christmas trees.
- Step 6: Tint the dairy free frosting green with food coloring and fill a piping bag fitted with a petal tip (size 150) or a Ziploc bag with a small corner snipped.
- Step 7: Pipe “tree tinsel” onto each brownie tree by swirling the frosting decoratively over the surface.
- Step 8: Sprinkle each tree with gluten and dairy free sprinkles for a festive look.
- Step 9: Optionally, insert the straight end of a mini candy cane into the bottom of each tree to serve as a trunk.
Tips & Variations
- Use an airtight container to store the decorated brownies and keep them fresh for a few days.
- For extra flavor, add a hint of peppermint extract to the frosting.
- Try using different colored sprinkles or edible glitter to suit your holiday decor theme.
- If you don’t have a petal tip, a small round tip or simply a snipped Ziploc bag corner works well for piping.
Storage
Store the decorated brownies in an airtight container at room temperature for up to three days. If made in advance, bake the brownies and keep them uncut in an airtight container for 1-2 days. Cut and decorate just before serving for the freshest appearance. Reheat is not recommended as the frosting may melt.
How to Serve

Serve this delicious recipe with your favorite sides.
FAQs
Can I use regular brownies and frosting instead of gluten and dairy free?
Yes, you can use your preferred brownie and frosting recipes if you do not need to avoid gluten or dairy. The decorating steps remain the same.
How do I keep the frosting from melting on warm days?
Keep the brownies refrigerated until just before serving, especially in warm environments. Use a sturdy frosting, like buttercream or a dairy free alternative, to help maintain shape.
PrintChristmas Tree Brownies Recipe
These festive Christmas Tree Brownies are a delightful holiday treat, combining rich, gluten and dairy free brownies with vibrant green frosting and colorful sprinkles to create fun, tree-shaped cupcakes perfect for any Christmas celebration. Decorated with the option of mini candy canes as tree trunks, these brownies are both visually appealing and deliciously indulgent.
- Prep Time: 15 minutes
- Cook Time: 30 minutes
- Total Time: 45 minutes
- Yield: 16 Christmas tree brownies 1x
- Category: Baking
- Method: Baking
- Cuisine: American
- Diet: Gluten Free
Ingredients
Brownies
- 1 batch of gluten and dairy free brownie batter (enough for a 9×9-inch pan; recipe linked in the post)
Frosting and Decorations
- 1 cup dairy free frosting (recipe linked in the post)
- Green food coloring, as needed to tint frosting
- Gluten and dairy free sprinkles, to decorate
- Mini candy canes, optional for decorating the tree trunks
Instructions
- Prepare Baking Pan and Brownie Batter: Line a 9×9-inch baking pan with parchment paper to prevent sticking and make removal easy. Prepare the gluten and dairy free brownie batter according to the referenced recipe instructions and pour the batter evenly into the prepared pan.
- Bake and Cool Brownies: Bake the brownies as directed in the recipe. Once fully baked, allow them to cool completely in the pan. After cooling, lift the brownies out using the parchment paper for easy handling.
- Cut Brownies into Tree Shapes: Using a clean knife, make 2 horizontal cuts across the brownies. Clean the knife between each cut for smooth edges. Next, make diagonal cuts to form individual tree shapes. Refer to pictures in the post for exact cutting patterns.
- Prepare Frosting: Tint the dairy free frosting with green food coloring until you achieve a vibrant green shade suitable for tree decoration. Fill a piping bag fitted with a 150 petal tip or a Ziploc bag with a snipped corner with the green frosting.
- Decorate Trees: Pipe the frosting in a tinsel-like pattern over each tree shaped brownie to simulate tree branches. Sprinkle gluten and dairy free sprinkles over the frosting to add a festive touch.
- Add Candy Cane Trunks (Optional): Insert the straight end of a mini candy cane into the bottom of each tree brownie to create a trunk effect, enhancing the tree appearance.
- Store Properly: Store the decorated Christmas Tree Brownies in an airtight container. They can be kept for a few days. For convenience, bake the brownies 1 to 2 days in advance, store uncut in an airtight container, and cut and decorate on the day of serving.
Notes
- Using parchment paper makes removing the brownies from the pan easier and helps maintain their shape.
- Cleaning the knife between cuts ensures cleaner, more defined tree shapes.
- If you don’t have a petal tip, a small round tip or a Ziploc bag with a corner snipped works for piping the frosting.
- Brownies can be baked in advance and stored to save time on the day of your event.
- Check all ingredient labels to ensure they meet gluten and dairy free requirements as needed.
Keywords: Christmas brownies, gluten free brownies, dairy free frosting, holiday treats, Christmas tree dessert, festive brownies


