Baked Piroshki Recipe (2 Filling Options: Sweet or Savory) Recipe
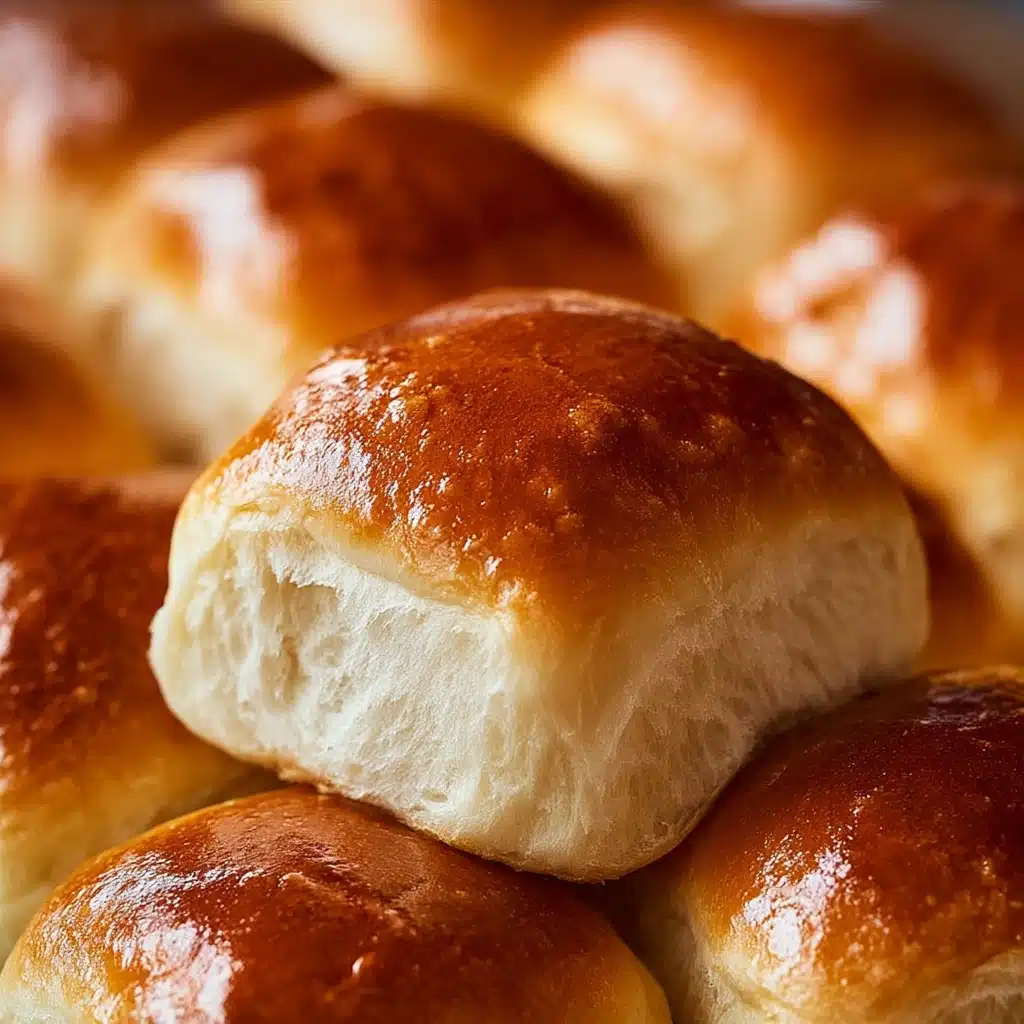
If you’ve ever dreamed of delicate pastries hiding golden sweet apples or richly savory cabbage tucked inside a soft, pillowy bread, this Baked Piroshki Recipe (2 Filling Options: Sweet or Savory) is your new obsession! I’m sharing both a comforting fruit filling and a deeply satisfying braised cabbage option so you can satisfy every mood and craving—perfect for family gatherings, busy weeknights, or even holiday tables. Once you pull these golden beauties from the oven, don’t be surprised if your loved ones hover around, eager to eat them warm from the pan!

Ingredients You’ll Need
The beauty of this recipe is how humble, accessible ingredients come together to deliver something truly magical. Each ingredient adds an important note, whether that’s fluffy texture, glossy color, or an irresistible aroma wafting through your kitchen.
- Warm Milk: Gently activates the yeast for that irresistible fluffy rise; use whole milk for the richest flavor.
- Active Dry Yeast: The essential ingredient for a pillowy, bouncy dough; be sure it’s fresh so your buns will rise beautifully.
- Sugar (divided): Helps with rising, brings gentle sweetness to the dough, and adds shine or contrast depending on your filling.
- All-Purpose Flour (divided): The backbone of your dough; gives structure without making things tough.
- Eggs: Key for a rich, tender crumb inside the buns, and essential for that deeply golden, shiny crust.
- Melted Butter: Gives your piroshki a lush, melt-in-your-mouth bite.
- Salt: Balances sweet or savory flavors and enhances the richness of the other ingredients.
- Apple Filling (2 apples, granulated sugar): Classic, juicy, and fragrant—apples add a sweet and slightly tart pleasure in every bite.
- Braised Cabbage Filling: Hearty, savory, and deeply satisfying; be sure to chop the cabbage (and beef, if using) small for an even fill.
- Egg Wash (1 egg): For a dazzling bakery-worthy finish on your buns—don’t skip this pretty detail!
- Sugar-Water Glaze: Brushed over hot sweet piroshki for a sparkling, sweet sheen.
How to Make Baked Piroshki Recipe (2 Filling Options: Sweet or Savory)
Step 1: Prepare the Apple Filling
Start by finely chopping your apples—your food processor is your friend here for a consistent, quick chop. Sauté the apples in a skillet with sugar for about 10 minutes. It’s important to stir frequently, letting the apples soften and the extra liquid evaporate for a thick, jammy filling. Set this aside to cool while you get on with the dough—the smell alone is enough to make anyone linger in the kitchen!
Step 2: Activate the Yeast
Pour the warm milk into your stand-mixer bowl and sprinkle the yeast over the top. Let it stand for 5 to 7 minutes. You should see a fragrant, bubbly foam form—this is when you know your dough will rise flawlessly. Don’t rush this step; it’s the secret to ultra-fluffy piroshki.
Step 3: Mix Initial Dough Ingredients
Add one cup of flour and ¼ cup sugar to your yeast-milk mixture. Whisk these together until they’re beautifully combined. Allow this starter to rise for 30–45 minutes at room temperature. Want to speed things up? Tuck the bowl into a warm, 100°F oven for about 20 minutes, but steer clear of temperatures any hotter as yeast doesn’t like it too warm.
Step 4: Add Remaining Wet Ingredients
Next, whisk in your eggs, the rest of the sugar, melted butter, and salt. Think of this as building the flavors and texture your dough will carry through to the very last bite. The eggs and butter make everything taste like a treat.
Step 5: Incorporate Flour and Knead
Switch to your dough hook and start adding the remaining flour, one cup at a time. Don’t rush—let each cup fully absorb before adding the next. Be gentle with the last cup, adding it gradually until the dough just pulls away from the sides. It should be soft and slightly sticky, not dry. Let the mixer knead the dough for about 15 minutes on low. You’ll see the magic happening as it transforms into a supple, elastic cloud.
Step 6: First Rise
Cover the bowl tightly with plastic wrap and let the dough rise in a warm spot—ideally a 100°F oven—for about an hour, or leave it on the counter for 2 hours. The dough will triple in size and become light as a feather, which means it’s ready to become little piroshki parcels.
Step 7: Shape the Piroshki
Turn the dough out onto a lightly floured surface and divide it into five equal parts. Roll each part into a big, even circle about 13–14 inches across. Take a pizza cutter and slice each circle into eight neat triangles. This keeps every piroshki uniform and pretty—plus, it’s so satisfying!
Step 8: Fill Each Triangle
Place about half a tablespoon of your chosen filling (sweet apple or savory braised cabbage) on the wide end of each triangle. Don’t be tempted to overfill—it’s the secret to keeping everything inside and the shapes neat. If you’re making both fillings, this is where you can split the batch for sweet and savory options in the same bake!
Step 9: Roll the Piroshki
Fold the two outer points over the filling, pinch them together, then fold in the little corners and roll your triangle up toward the point, making sure the edges are well sealed. This careful roll-and-seal step ensures there are no surprise leaks during baking, and each bite stays satisfyingly full.
Step 10: Second Rise
Set the rolled buns, seam-side down, onto a parchment-lined baking sheet, leaving a half inch between each one. Let them rise again in a 100°F oven for about 20 minutes—or room temperature for 30–45 minutes—until they’re puffy, soft, and almost touching. This is what gives baked piroshki their signature lightness and soft crust.
Step 11: Bake
Preheat the oven to 360°F. Brush each piroshki with your beaten egg for a beautifully glossy finish—this makes them look and taste bakery-fresh. Bake for 20 minutes until golden brown and fragrant. Your kitchen will smell irresistible!
Step 12: Add Sweet Glaze (Optional)
If you’re making sweet piroshki, quickly brush them with sugar water right out of the oven. This gives them a dreamy, shiny glaze and an extra hit of sweetness. Let them cool just a bit (if you can wait!) before serving.
How to Serve Baked Piroshki Recipe (2 Filling Options: Sweet or Savory)
Garnishes
Sweet piroshki shimmer beautifully with a sugar-water glaze, but feel free to scatter a dusting of powdered sugar or even a little cinnamon for a bakery-style finish. For savory piroshki, fresh chopped dill or parsley adds a pop of color and that “wow” factor when serving.
Side Dishes
Pair sweet piroshki with tangy sour cream or a dollop of whipped cream for an old-world treat. Savory piroshki are fabulous alongside a light vegetable soup, beet borscht, or a crisp cucumber salad. The combination of warm bread and cool, fresh sides simply can’t be beat!
Creative Ways to Present
This Baked Piroshki Recipe (2 Filling Options: Sweet or Savory) is naturally beautiful—try arranging your buns in a spiral or a star on a large platter for an inviting display. Offer both sweet and savory flavors together in a basket for family-style serving at parties, or tuck them into lunchboxes for a surprise midday treat.
Make Ahead and Storage
Storing Leftovers
Leftover piroshki store well in an airtight container at room temperature for up to two days, or in the refrigerator for up to five days. Keep sweet and savory varieties separate to prevent flavor mingling, and let them come to room temperature before enjoying for the best taste and texture.
Freezing
This Baked Piroshki Recipe (2 Filling Options: Sweet or Savory) freezes wonderfully. Once fully cooled, layer the buns between sheets of parchment in a freezer-safe container or zip-top bag. Freeze for up to three months. Defrost overnight in the fridge for best results, so they’re ready for easy reheating anytime.
Reheating
For fresh-from-the-oven flavor, warm piroshki in a 325°F oven for about 10 minutes or until heated through—you’ll restore that just-baked texture and aroma! If you’re in a hurry, a quick zap in the microwave works too, although you’ll miss out on the slightly crisp exterior.
FAQs
Can I use different fillings in this recipe?
Absolutely! The Baked Piroshki Recipe (2 Filling Options: Sweet or Savory) is endlessly flexible. You can swap in any cooked fruit, jam, potato-mushroom blend, or even seasoned ground meat or cheese—the dough makes the perfect canvas for your favorite flavors.
Do I need a stand mixer, or can I knead by hand?
While a stand mixer saves time and effort, kneading by hand is just as effective. It takes about 15-20 minutes of kneading to reach that elastic, slightly tacky dough you’re after. It’s a wonderful way to get kids involved, too!
What kind of apples work best in the sweet filling?
Firm, tart varieties like Granny Smith or Honeycrisp hold their shape and add a balanced tang to the sweet filling, but any apple you love baking with will work. Just make sure to sauté them down until soft and delicious.
Can I make the dough ahead of time?
Yes! After the first rise, you can cover and refrigerate the dough overnight. The next day, just let it warm a bit before dividing, filling, and shaping. This is perfect if you want to get ahead for a brunch or picnic.
How do I keep my piroshki from opening up or leaking?
It’s all in the seal! Don’t overfill and make sure to pinch all seams tightly after rolling. Placing them seam side down on the baking tray helps keep everything tucked nicely inside as they bake.
Final Thoughts
There’s something incredibly heartwarming about baking up a batch of this Baked Piroshki Recipe (2 Filling Options: Sweet or Savory)—watching them puff and golden in the oven, then breaking through the soft crust to reveal those comforting fillings. I hope you’ll make this recipe your own and share it with everyone you love—try both fillings and let your tastebuds decide which is your favorite!
PrintBaked Piroshki Recipe (2 Filling Options: Sweet or Savory) Recipe

Delight your taste buds with these homemade baked piroshki, featuring two delicious filling options – sweet apple or savory braised cabbage. These golden, fluffy pastries are perfect for any occasion!
- Prep Time: 30 minutes
- Cook Time: 20 minutes
- Total Time: 3 hours
- Yield: 40 piroshki 1x
- Category: Appetizer
- Method: Baking
- Cuisine: Russian
- Diet: Vegetarian
Ingredients
For the Dough:
- 2 cups warm milk
- 1 tablespoon active dry yeast
- ½ cup sugar, divided
- 6 cups + 2 tablespoons all-purpose flour (divided: 1 cup and 5 cups + 2 tablespoons)
- 3 eggs
- 1½ tablespoons melted butter
- 1 teaspoon salt
For the Apple Filling:
- 2 apples
- ⅓ cup granulated sugar
For the Braised Cabbage Filling:
- (For the full Braised Cabbage with Beef recipe, visit NatashasKitchen.com. If using beef, be sure to cut it into small pieces suitable for filling.)
Instructions
- Prepare the Apple Filling: Finely chop the apples using a food processor. In a skillet over medium-high heat, sauté the apples with ¼ cup sugar for about 10 minutes, stirring frequently until most of the liquid evaporates. Set aside to cool. For a sweet glaze, mix 1 tablespoon sugar into 2 tablespoons warm water and brush over the baked piroshki as soon as they come out of the oven.
- Start the Dough: In the bowl of an electric mixer, combine warm milk and sprinkle yeast over the top. Let sit for 5–7 minutes until foamy.
- Mix Initial Dough Ingredients: Add 1 cup flour and ¼ cup sugar to the yeast mixture. Whisk until combined. Let rise at room temperature for 30–45 minutes. For a quicker rise, place in a warm 100°F oven for 20 minutes (avoid temperatures over 100°F to prevent killing the yeast).
- Add Remaining Ingredients: Whisk in 3 eggs, the remaining ¼ cup sugar, melted butter, and salt.
- Incorporate Flour: Using the dough hook, add the remaining flour 1 cup at a time, mixing until each cup is incorporated before adding the next. Add the last cup slowly, about ½ cup at a time, to avoid adding too much. The dough should pull away from the sides of the bowl but still be soft and slightly tacky. Knead for about 15 minutes on low speed.
- First Rise: Cover the dough with plastic wrap and place in a warm 100°F oven for 1 hour (or 2 hours at room temperature) until it triples in size.
- Shape the Piroshki: Turn the dough out onto a lightly floured surface and divide into 5 equal portions. Roll each portion into a 13–14 inch circle.
- Cut and Fill: Use a pizza cutter to slice each circle into 8 equal triangles. Place about ½ tablespoon of your chosen filling (apple or braised cabbage) at the wide end of each triangle.
- Roll the Piroshki: Fold the two edges over the filling, sealing tightly down the length of the triangle. Fold in the small corners and continue rolling toward the pointed end. Seal the edges well.
- Second Rise: Place the rolled piroshki on a parchment-lined baking sheet with the seam side down, spacing them about ½ inch apart. Let rise in a warm 100°F oven for 20 minutes, or 30–45 minutes at room temperature, until puffed and touching.
- Bake: Preheat oven to 360°F. Brush the tops of the piroshki with the beaten egg. Bake for 20 minutes, or until golden brown on top.
- Finishing Touch: For sweet piroshki, brush the tops with sugar water immediately after baking for a glossy, sweet finish. Let cool slightly before serving.
Notes
- If desired, you can experiment with different fillings like meat, cheese, or vegetables.
- These piroshki can be stored in an airtight container for up to 2 days and reheated in the oven for a fresh taste.
Nutrition
- Serving Size: 1 piroshki
- Calories: 150
- Sugar: 7g
- Sodium: 120mg
- Fat: 3g
- Saturated Fat: 1.5g
- Unsaturated Fat: 1.5g
- Trans Fat: 0g
- Carbohydrates: 25g
- Fiber: 1g
- Protein: 4g
- Cholesterol: 25mg
Keywords: Baked piroshki, Piroshki recipe, Russian pastry, Sweet piroshki, Savory piroshki


